X
wikiHow is a “wiki,” similar to Wikipedia, which means that many of our articles are co-written by multiple authors. To create this article, 36 people, some anonymous, worked to edit and improve it over time.
This article has been viewed 809,556 times.
Learn more...
Within some military units, it's a tradition to make what is known as a "combat bracelet" using paracord from a soldier's trouser ties and a button from their uniform. Each soldier makes one for the next so each one has a bracelet made by someone else. These are then worn on the mission by each soldier and only taken off when the whole unit returns. In this tutorial you will learn how to make these combat bracelets.
Steps
-
1Obtain about 3m (10 feet) of paracord. You can use a measuring tape or anything else to get it to about 3m.
- If you don't have a measuring cord, use your body to approximate! When stretched out to either side, the distance between your fingertips should be approximately equal to your height. If you are close to 5 feet (1.5 m) tall, cutting a cord that is about the same length as two of your arm spans will do the trick.
-
2Grab the middle of the paracord to fold it in half.Advertisement
-
3Wrap the looped end around your wrist to get the circumference of your wrist. For a tighter measurement, lace the non looped end through the looped end, so that the paracord stays around your wrist.
-
4Tie off the end. Use string, yarn, or something similar to mark the circumference of your wrist on the bracelet.
- If the cord or string will fit around a button or other item that you will use as a clasp, you can add it to the cord directly now. Place it at the top end, where the tie is. Alternatively, you can add this in a later step.
-
5Double check that the bracelet will fit. You should now have a loop with 2 long strands coming off. Double check that the bracelet will fit by wrapping the looped end around your wrist. If it is too small or too big, adjust the tie that you made in the previous step.
-
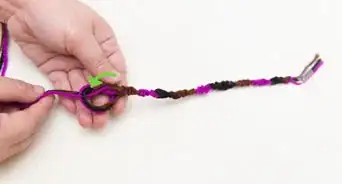
6Begin weaving the strings. Pass the first of the longer strands ( Strand 1) through the loop, then over the second length of string (Strand 2).
-
7Pass strand 2 over the loop and then under strand 1. Strands 1 and 2 should now have switched places.
-
8Tighten the knot by pulling on the loose ends.
-
9Repeat the first part of the process. Begin again with strand 1. Note that this time strand 1 will be going right to left instead of left to right. Alternating the side from which you start will help the bracelet lie flat across your wrist.
-
10Repeat the second part of the knot. Again, strand 2 will come from the opposite side as it did in the first knot. Go over the loop and under the opposite strand.
-
11Continue this process. Stop when you have about 3 centimeter (1.2 in) left at the end of the loop. Then, cut off any excess cord.
- Melt the cut ends of 1 and 2 so that they fuse with the weave. This will stop the bracelet from unraveling when you wear it.
- Melt the cut ends of 1 and 2 so that they fuse with the weave. This will stop the bracelet from unraveling when you wear it.
-
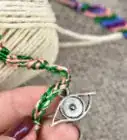
12Sew on your button. Sew your button on the end of the bracelet that does not have a loop. You can adjust the fit of your bracelet by changing the placement of your button.
- If the bracelet seems too small, sew the button as close to the end of the bracelet as possible. If it seems too big, sew the button further in on the bracelet.
- Be sure you test the size of your button before you sew it on. If it is small enough to fit through the loop on the bracelet without any help, you'll need a bigger button. Likewise, if the button cannot fit through the loop at all, you will not be able to put the bracelet on.
-
13Remove the temporary tie that you added above. If you cannot untie it, feel free to cut it instead.
-
14Wear the bracelet. Wrap the bracelet around your wrist and fasten it by slipping the button through the loop.
Advertisement
Community Q&A
-
QuestionWhat's an easier way to make this bracelet?
 T. ChinsenTop AnswererBy alternating the cords, tie a knot around the other cord. This will result in a thinner bracelet. It may not be as even in the pattern if you do not keep the knots close together. Follow the finishing steps from the article.
 -
QuestionCan you do this and just tie the bracelet end to each other instead of adding anything to the ensemble?
 RozsaCommunity AnswerIf you want to be able to wear it, then you need the button to be able to take it on and off. You could tie it mind you, but then you’d have to cut it off your wrist when you didn’t want to wear it anymore.
Advertisement
Things You'll Need
- 3m or so of 550lb paracord
- Scissors or sharp knife
- Candle, matches or a lighter
- Button (fairly large, according to thickness of cord)
- String or thread to tie the top loop.
-Step-12.webp)


References
About This Article
Advertisement


-Step-12.webp)