wikiHow is a “wiki,” similar to Wikipedia, which means that many of our articles are co-written by multiple authors. To create this article, 18 people, some anonymous, worked to edit and improve it over time.
This article has been viewed 52,069 times.
Learn more...
Making silverware jewelry is a fun and creative way to repurpose old utensils into unique fashion statements. Constructing a bracelet out of a fork is very easy, and you can find some forks for less than a dollar! Making fork bracelets are an ideal project for any crafter looking for a new jewelry project.
Steps
Bending The Body of The Fork
-
1Choose your fork. Look to buy forks at garage sales or thrift stores. Usually, silverware sold at garage sales and thrift stores are relatively cheap. The fork that you buy also needs to be made of silver or sterling silver.
That’s because silver and sterling silver is very easy to manipulate and bend. Forks that are silver or sterling silver will have the numbers “900” or “925” stamped on the back of the fork.[1]
Consider looking for forks that have decorative detailing on the handle. It can add some flair when you wear it as a bracelet.
Because stainless steel is less pliable, avoid using stainless steel forks to make your bracelet.[2] -
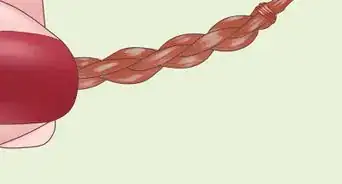
2Bend the fork with your hands. Use your hands to bend the fork following the natural curve of the back of the fork (the curves area around the base of the fork tines).[3] Position the fork upside down, with the face of the fork turned toward the ground.
Grip one hand over the root and tines of the fork, and position your other hand on the end handle of the fork. With the hand that is gripping the end of the fork, extend your thumb out to the neck of the fork, so it can act as a fulcrum while you bend.[4]
Apply pressure to bend and curve the front portion of the fork (with the tines) downward. Once the root and tines are bent, slide your hands down the body of the fork, bending the handle little by little.
When you are finished bending the fork with your hands, the fork should be bent into a relatively even “U” shape.Advertisement -
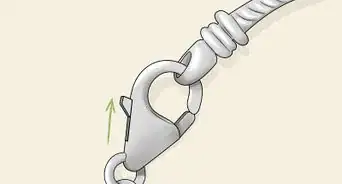
3Secure the end of the fork. Use an adjustable wrench to hold steady the end of the fork as you bend the body of the fork with pliers.[5] Twist the adjustable screw on the head of the wrench to open up the wrench jaws. Position the end of the fork between the jaws of the wrench, placing the fork on the stationary top jaw.
- Twist the adjusting screw to raise the lower jaw of the wrench, and clamp down tightly on the fork’s end.
-
4Wrap the fork with a protective material. Wrap the end portion of the fork with a small square of thick cloth material like corduroy or denim. The cloth can be as small as a square inch, it just has to completely surround and cover both the top and bottom surfaces of the fork.
This is so the pliers don’t leave small indents in the body of the fork as your grip and bend it.
Hold the protective cloth in place with a couple fingers of the hand that is gripping the adjustable wrench, so you can pick up the pliers with your free hand. -
5Bend the body of the fork. Position the wrapped end area of the fork in between the open pinchers of the needle nose pliers. Squeeze together the handles of the pliers to clamp down the pinchers on the wrapped portion of the body of the fork closest to the tines of the fork.[6]
Firmly grip the adjustable wrench, and apply force to turn the needle nose pliers down, bending the body of the fork.
Each bend you make, slide the protective material and the pliers down toward the end of the fork (toward the wrench) and keep making little bends.[7]
When you are finished bending with the pliers, the body of the fork should look rounded instead of the “U” shape from earlier.


Bending The Fork Tines
-
1Curve the fork tines. Once the body has been bent into a rounder shape, loosen and remove the adjustable wrench from the end of the fork. Wrap the tines of the fork with the protective material, and use the same needle nose pliers to clamp down over the protective material.
Position the pliers so they clamp down on two of the four fork tines. While one hand is holding the body of the fork, use downward pressure to bend two tines at a tine, following the natural curve of the fork tines.[8]
Once you curve two tines into a rounder shape, flip the fork to the other side, clamp the pliers down, and bend the other two tines.
Be sure to make your tine bends smooth and even. You can adjust and move the pliers in small increments to bend the tines at different points, but try to avoid making choppy and rough bends in the tines.[9] -
2Roll the outer fork tines. Use the tip of your jewelry pliers to grip the tip of one of the outside tines of the fork. Twist the pliers laterally, to roll the tine outward until the tip of the tine is rolled and touches the outside edge of the tine. Do this on both outside fork tines.
-
3Roll one of the inner fork tines. Use the tip of the jewelry pliers to grip the tip of one of the inner fork tines. Twist the pliers to roll the tine back on it self, rolling in the opposite direction of the curve of the bracelet and the natural curve of the tines.[10]
Roll the tine all the way down to the root of the tines. Release the small jewelry pliers and grip the needle nose pliers along the sides rolled up tine (the pliers should be parallel with the rest of the fork tines).
Twist the roll to the side, so it’s perpendicular to the fork tines. Then bend down the rolled tine so it can lay flat on the back of the fork root.
The rolled tine will most likely not be completely flesh against the fork root, so use the needle nose pliers to clamp down on the rolled tine, and press it flat against the fork root.[11] -
4Curve the other inner fork tine. In the same manner you rolled the outer fork tines to the sides until the tips met the edges of the tines, roll back the tip of the other inner fork tine.
Grip the inner tine with the small jewelry pliers, and twist the pliers to roll the tine back on itself, moving in the opposite direction of the natural curve of the tines.[12] Roll the tip of the tine backward until the tip touches the tine again. -
5Make adjustments. Use your hands to bend the bracelet and make any adjustments to the curvature or opening of the bracelet. You can pull apart or push together the bracelet ends to modify how large you want to bracelet opening to be.


Community Q&A
-
QuestionWill the tines stab me?You should bend them outward so they don't. The tines shouldn't be sharp anyway.

Things You'll Need
- Silver or silver plated fork
- Adjustable wrench
- Needle nose pliers
- Rounded jewelry pliers
- Piece of denim or corduroy fabric


References
- ↑ http://blog.kirstendanielle.com/2011/12/04/spoon-ring-tutorial/
- ↑ http://www.brighthub.com/environment/green-living/articles/64895.aspx
- ↑ https://www.youtube.com/watch?v=dWQ113rE014
- ↑ https://www.youtube.com/watch?v=dWQ113rE014
- ↑ https://www.youtube.com/watch?v=dWQ113rE014
- ↑ https://www.youtube.com/watch?v=dWQ113rE014
- ↑ https://www.youtube.com/watch?v=dWQ113rE014
- ↑ https://www.youtube.com/watch?v=dWQ113rE014
- ↑ https://www.youtube.com/watch?v=dWQ113rE014
About This Article
To make a fork bracelet, start by choosing a silver or sterling silver fork since these will be the easiest to bend. Next, hold the end of the handle in one hand and the root and tines of the fork in the other, and bend it into a “U” shape. If bending the fork by hand proves difficult, then cover the fork with a protective cloth, secure the handle with an adjustable wrench for leverage, and bend your fork into a bracelet shape. If you want to add some unique details to your bracelet, use the needle nose pliers to bend the tines into various shapes. To learn how to tell if the fork is pure silver, keep reading!