This article was co-authored by wikiHow staff writer, Hannah Madden. Hannah Madden is a writer, editor, and artist currently living in Portland, Oregon. In 2018, she graduated from Portland State University with a B.S. in Environmental Studies. Hannah enjoys writing articles about conservation, sustainability, and eco-friendly products. When she isn’t writing, you can find Hannah working on hand embroidery projects and listening to music.
There are 10 references cited in this article, which can be found at the bottom of the page.
The wikiHow Video Team also followed the article's instructions and verified that they work.
This article has been viewed 52,716 times.
Learn more...
Concertina books are origami-style pop up books that are fun to make and play with. You can try using scrap paper, an old map, or your very own design to make this interactive craft. Grab a few items out of your craft supplies to spend the afternoon making a concertina book with your friends or family.
Steps
Cutting and Folding the Paper
-
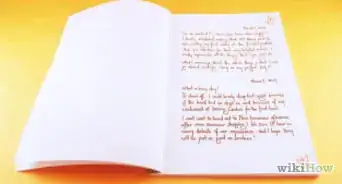
1Cut out six 3 in (7.6 cm) squares of lightweight paper. The center of your booklet can have normal, lightweight paper in it with whatever design you’d like. Try picking out some patterned paper, like stripes or polka dots, for a festive booklet.[1]
Tip: You can also cut out squares of white paper and then decorate them yourself.
-
2Fold 1 square in half to make a triangle. Spread one of your squares out flat so that it isn’t wrinkled with the wrong side of the patterned paper facing you. Grab one point of the square and fold it over to reach the opposite point to make a triangle.[2]
- Crease the paper well with your fingers so the fold stays in place.
Advertisement -
3Fold the triangle in half to make a smaller triangle. Grab the left point of the triangle and fold it over to the right point to make a smaller, tiny triangle. Crease the fold with your fingers so that it stays in place.[3]
- The more you crease your paper, the better your concertina book will fold in the end.
-
4Make a small square out of one side of the triangle. Keeping the paper folded up, gently push up one side of the triangle. Then, press on the crease of the triangle flaps to flatten it out and make a small square. This will leave one side pointed into a triangle while the other forms a perfect square.[4]
- If you push in on the fold that you made in the last step, the square will form easily.
-
5Make another small square out of the other side of the triangle. Use 2 fingers to keep holding the square you just made down so it doesn’t come undone. Gently press in on the pointed side of your paper to make another identical square on the other side of the paper.[5]
- You can let go of the paper once you’ve made that fold. It may unfold a little bit, but that’s okay!
-
6Repeat those folds for all of your squares of paper. Now, spread out all of your squares of paper and do the same folds on all of them. When you’re done, you should have 6 squares of paper that open up into a folded and crimped sheet.[6]
- Try to make sure all of your papers look the same so that they’ll all fold in the same direction.

Assembling the Book
-
1Glue the point of one square onto the point of another square. Grab one of your folded squares and unfold it so you can see the inside of the paper. Lay the paper flat and apply some glue to the point of the square closest to you. Then, grab another piece of paper and turn it upside down and press one of its points onto the glue.[7]
- You should have alternating pieces of paper so that you can see the pattern from every side.
- Try using a glue stick so you don’t have to wait for it to dry.
- This will create the first fold in your concertina book.
-
2Connect all of your squares together in one long, straight strip. Now, take the rest of your squares and glue them to each other in the same way, alternating up and down for each square. When you’re done, you should have one long strip of paper that’s slightly bouncy and can stand up on its own folds.[8]
- If you used liquid glue, set your paper aside for about 5 minutes to let it dry.
-
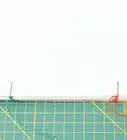
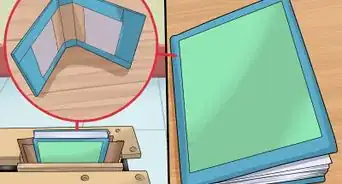
3Cut out two 4 by 4 in (10 by 10 cm) pieces of cardboard. You can use cardboard from a box or the back of a sketchbook. Try to make the pieces a little bit bigger than your squares of paper so that you have a good backing.[9]
- The cardboard will be the end pieces of your book to make it stronger and easier to unfold.
-
4Attach decorative paper to the cardboard pieces. Cut out 2 pieces of paper that are the same size as your cardboard pieces. Use a glue stick to attach them to the cardboard pieces so the outside of your book has a cute design on it.[10]
- You can use the same paper that you used for the inside of your book, or you can choose one with a different pattern for a pop of color.
-
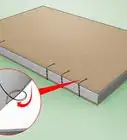
5Glue the cardboard pieces to either end of the paper strip. Add glue to the inside of your cardboard pieces, leaving the outside 1 in (2.5 cm) unglued. Press one end of the folded papers onto one piece of your cardboard, then press the other side onto the other one. Wait a few minutes for the glue to dry, then enjoy your concertina book![11]
- It might be easier to fold up your pieces of paper before gluing them to the cardboard so you can really press down on them.
Tip: Be gentle when you open and close your concertina book so you don’t accidentally rip it.

Warnings
- Use caution when you fold and unfold your book, or you could rip it.⧼thumbs_response⧽
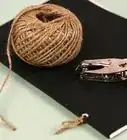
Things You’ll Need
- Ruler
- Scissors
- Lightweight paper
- Glue
- Cardboard
References
- ↑ https://www.youtube.com/watch?v=atyJwW7YbY4&feature=youtu.be&t=67
- ↑ https://www.youtube.com/watch?v=3R7TT1aH0fw&feature=youtu.be&t=14
- ↑ https://www.youtube.com/watch?v=3R7TT1aH0fw&feature=youtu.be&t=24
- ↑ https://www.youtube.com/watch?v=3R7TT1aH0fw&feature=youtu.be&t=27
- ↑ https://www.youtube.com/watch?v=3R7TT1aH0fw&feature=youtu.be&t=36
- ↑ https://www.youtube.com/watch?v=atyJwW7YbY4&feature=youtu.be&t=250
- ↑ https://www.youtube.com/watch?v=atyJwW7YbY4&feature=youtu.be&t=143
- ↑ https://www.youtube.com/watch?v=3R7TT1aH0fw&feature=youtu.be&t=89
- ↑ https://www.youtube.com/watch?v=68SencvnFIo&feature=youtu.be&t=41
About This Article