This article was co-authored by Annie Tao. Annie Tao is an award-winning Professional Lifestyle and Commercial Photographer and the Owner of Annie Tao Photography based in the San Francisco Bay Area. While some of her commercial clients include Starbucks, PayPal, Rice University, and United Airlines, Annie is also passionate about capturing genuine emotions and real moments in people’s lives. She has been recognized as Kodak’s Featured Photographer and has had work featured in The Wall Street Journal, Brides Magazine, and Glamour & Grace.
There are 10 references cited in this article, which can be found at the bottom of the page.
This article has been viewed 48,377 times.
Grainy photos are popular and timeless! This style of photo editing is often used by celebrities to make their images look like they were taken on a film camera. To quickly add grain to your photos, add a film-like filter to your images. Alternatively, use a photo editing programme to add graininess yourself. Both these methods are quick and easy, and will give you beautiful grainy photos.
Steps
Using Filters
-
1Open a photo editing app. There are a variety of fantastic free editing apps that you can download onto your smartphone. These have a variety of filters that will allow you to quickly and easily make your photo look grainy. Go to the App Store or GooglePlay Store and search for a photo filter app. Click Install on the app that you want and then wait for it to download.[1]
- Many apps are free but have features that you can unlock if you pay a few dollars. Consider upgrading if you really like the app, as the extra features can be worth the small price.
- 1967, Filmborn, RNI Films, FilterLoops, and Color Splash are great photo editing apps with a variety of grainy filters.
-
2Select the photo icon to choose the photo that you want to edit. Tap on the photo icon to open your photo gallery. Scroll through your photos and then tap on the one that you want to edit. Grainy filters look great on all types of photos, including portraits and landscape shots.[2]
- If the selected photo doesn’t automatically come onto your screen, look for a small green tick mark on the screen and tap it to bring up the photo.
Advertisement -
3Tap on the different filters to see what they look like. At the bottom of your screen, you will see a range of different filters. Each of these will give your photo a slightly different look. Tap on each of the filters to view the unique effects. Once you have found a filter that makes the photo look grainy, pixelated, and film-like, double-tap on that filter.[3]
- If you don’t like any of the filters, consider installing a different app, as each app will have unique filters.
-
4Adjust the intensity of the filter. Once you tap on a filter, a slider will appear. Slide it down to decrease the intensity of the filter or slide it up to increase it. If you want a more natural look, select a low intensity. If you want a bold and low-fi look, opt for a high-intensity.[4]
- If you want to compare the filter to the original image, simply press down on the photo. The image will revert back to the filter once you lift your finger off the image.
-
5Tap Save once you are happy with the image. Look for a Save option or a green tick mark. These allow you to save the edited image to your photo gallery. Tap the tick icon or the Save button and then open your gallery to view the saved image.[5]
- If the app asks to access your photo gallery, tap Yes to allows it to save the edited image to your phone.
Editing the Image Manually
-
1Open a photo editing programme. These programmes allow you to manipulate and change the look of your photos. Photoshop and Lightroom are popular and comprehensive programmes; however, they can be complex to use if you don’t have much editing experience and there is a small monthly fee to use the programmes. GIMP, PhotoScape, and Pixlr Editor are free options that are less complex and easier to use if you are beginner.[6]
- Search online for photo editing programmes to find more options.
-
2Increase the noise in your photo. Tap on the Noise settings and then pull the slider up to increase the noise and pull it down to decrease it. This makes the photo look grainier and accentuates each individual pixel. In Photoshop, Lightroom, and Pixlr Editor, the noise setting is located in the Filter toolbar.[7]
- In some photo editing programmes, this setting is called “grain.”
-
3Adjust the colour curve into an “S” shape. This helps to replicate the colours that are found in film photos. Click on the Curves menu. You will notice that there are 4 points sitting on a diagonal line. Slightly lower the second point from the bottom of the line and slightly raise the third point to create an “S” shape.[8]
- If you are using a basic online photo editing programme, you may not have a Curves setting. If this is the case, simply skip this step.
-
4Increase the clarity. This helps to give texture and detail to your photo, which makes your image look grainy and film-like. Click on the Clarity settings to open the clarity slider. Pull the slider to the right to increase the clarity. Adjust the clarity to your desired level of sharpness.
- Avoid using the sharpening tool instead of the clarity tool, as this can accentuate blemishes on the skin in the photo.
-
5Adjust the vibrancy settings to make the photo your desired colour. Open the Vibrance settings. This will bring up 2 sliders – a Vibrance slider and a Saturation slider. Pull the Vibrancy slider to the right to increase the sharpness of the colours. Pull the Saturation slider to the left to give the photo a vintage look.[9]
- Continue to adjust the vibrancy settings until they reach your desired levels.
-
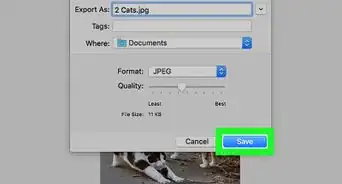
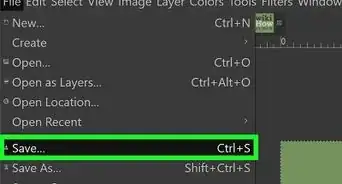
6Save the photo to your computer. Click on the File tab and then select Save As. A window will pop up with a text box. Type in what you want to call the file and then select where you want to save the photo. Open your files to find your freshly edited image![10]
Expert Q&A
-
QuestionCan you get a grainy look with a DSLR and no editing?
 Annie TaoAnnie Tao is an award-winning Professional Lifestyle and Commercial Photographer and the Owner of Annie Tao Photography based in the San Francisco Bay Area. While some of her commercial clients include Starbucks, PayPal, Rice University, and United Airlines, Annie is also passionate about capturing genuine emotions and real moments in people’s lives. She has been recognized as Kodak’s Featured Photographer and has had work featured in The Wall Street Journal, Brides Magazine, and Glamour & Grace.
Professional Photographer Yes! If you want a grainier, noisier look, turn the ISO up. The higher the ISO, the grainier your image will be.
 -
QuestionHow can I get a grainier look with a phone?
 Annie TaoAnnie Tao is an award-winning Professional Lifestyle and Commercial Photographer and the Owner of Annie Tao Photography based in the San Francisco Bay Area. While some of her commercial clients include Starbucks, PayPal, Rice University, and United Airlines, Annie is also passionate about capturing genuine emotions and real moments in people’s lives. She has been recognized as Kodak’s Featured Photographer and has had work featured in The Wall Street Journal, Brides Magazine, and Glamour & Grace.
Professional Photographer There are apps and filters you can use, but one thing you can do is take photos in dim light. The dimmer the light, the grainier your photo will be. Just make sure that you hold the phone still or you're going to get a blurry photo since you need a longer exposure.
References
- ↑ https://galoremag.com/lo-fi-vintage-effect-photo-filter-apps-photos-look-like-shit-in-a-good-way/
- ↑ https://youtu.be/sNVtKe4v1XQ?t=47
- ↑ https://youtu.be/TYNyZsBhR2w?t=295
- ↑ https://youtu.be/TYNyZsBhR2w?t=307
- ↑ https://youtu.be/sNVtKe4v1XQ?t=87
- ↑ https://www.amateurphotographer.co.uk/technique/photo_editing/how-to-choose-your-image-editing-software-68995
- ↑ https://youtu.be/AptCRD64Auk?t=1034
- ↑ https://youtu.be/AptCRD64Auk?t=228
- ↑ https://youtu.be/AptCRD64Auk?t=772


