This article was co-authored by wikiHow Staff. Our trained team of editors and researchers validate articles for accuracy and comprehensiveness. wikiHow's Content Management Team carefully monitors the work from our editorial staff to ensure that each article is backed by trusted research and meets our high quality standards.
This article has been viewed 18,120 times.
Learn more...
If you want to add a bit of design to your water bottles, it's very easy to add your own labels to your water bottles. You can either make your own designs using Microsoft Word or you can download pre-made label designs from the internet. Print your labels at home or at a printing store and attach them to water bottles you bought at the local supermarket.
Steps
Designing Labels in Microsoft Word
-
1Open Microsoft Word on your computer. Click the Microsoft Word program icon, then click "Blank Document" to start a new project. Even though Microsoft Word is a word processing application, it's one of the easiest platforms for designing water bottle labels.[1]
-
2Draw a text box that is 1.5 inches (3.8 cm) tall and 8.5 inches (22 cm) wide. In Word, click the "Insert" tab at the top of the screen and look to the far right for the "Text Box" option. Click on "Text Box" and use your mouse to draw a box on the blank page on screen.[2]
- To make the text box the right size, look to the top right hand corner of the screen. There should be a small section called "Size." This section allows you to enter an exact width and size for your text box.
Advertisement -
3Click the "Insert" tab and click "Online Pictures" to find a design online. Make sure you have your text box selected when you click the "Insert" tab. To select your text box, click on the outline or in the middle of the box.[3]
- After you click "Online Pictures," a new box will pop up. You can use the search option to perform an online image search for the design you want.
- For example, if you want your design to be blue and white, search for "blue and white" and you'll be presented with images matching those colors.
-
4Rotate and move the image to fit it in the text box. Once you've selected your image, click "Insert" at the bottom right of the "Online Pictures" tab to add it to your document. When the image is added to your document, click and drag it to your text box.[4]
- If the image doesn't automatically snap into the box at the correct size, you'll need to rotate it and stretch it to fit.
-
5Add a circle to your document from the "Shapes" section on the "Insert" tab. The circle will form the outline of a logo on your label. Go back to the "Insert" tab and click the down arrow on the "Shapes" option. From the drop down mention, select the circle shape. Stretch the circle so it fits the width of your text box.[5]
- On the toolbar, make the shape fill of the circle white. Make the shape outline the same color as the rest of your design.
-
6Add another text box to your document and make it the size of the circle. Here you'll be able to add text to your circle and logo. Type whatever text you'd like to see on your bottle into this new text box. Move the text box into your circle and angle the text so it fits the way you want it to.[6]
- If you want the label to say your name, write "[Your name]'s Water Bottle" in the box.
- Make sure that the shape fill and shape outline for this text box are set for "no fill" and "no outline."
-
7Group the text boxes together by holding CTRL and clicking on them. While holding the CTRL key, click the largest box with the design first, then click on the circle. Click on the actual text last. This will keep all the designs together in one group.[7]
-
8Save the document when you're finished with your design. If you want to change the label design in future, you can open this document and edit the label as you please. If you do come back and edit the label, use the "save as" function when you're finished and give the file a different name.
- This allows you to keep the original label and also create a separate file for the new label.


Printing and Cutting Labels
-
1Get cardstock or another type of paper to print on. Cardstock is the best paper to print your label on. Cardstock is thicker than most other types of paper but still has a lot of flexibility. You can buy cardstock paper at your local supermarket or stationery store.[8]
- If you decide to use a different type of paper, make sure it's durable enough to work as a water bottle label.
-
2Print the design you created in Microsoft Word. Open your saved design and click "Print." If you want to print your design at home, make sure your printer is capable of printing high quality images. If it isn't, you can transfer your label design file to a USB and bring it to the local print shop.[9]
-
3Print a pre-designed label. If you want to use a design you found online, you can print that and use it. Search online for a design that you like. Print the design at home or save it to a USB and bring it to a print shop.[10]
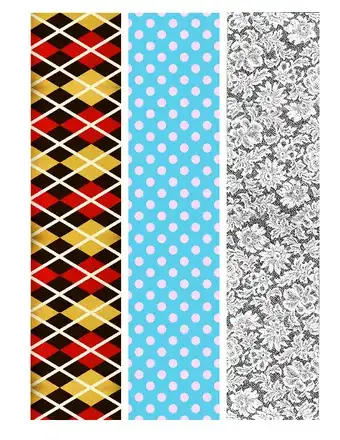
- You can also use any of the 3 label designs at the end of this article.
-
4Cut your printed labels out of the paper using a paper trimmer. The print shop or your home printer should have printed the labels in the middle of a sheet of paper. When you're cutting the label out, don't use scissors. Paper trimmers are much more accurate at cutting paper than scissors could ever be.[11]
- You can buy a paper trimmer at your local supermarket or stationery store.
- Your labels should be 1.5 inches (3.8 cm) tall and 8.5 inches (22 cm) wide if you print your Word designs.


Attaching Water Bottle Labels
-
1Remove the original labels from the water bottles you bought. The size of the bottles is up to you, but don't buy bottles bigger than 500 millilitres (17 fl oz) in size. The larger the bottle, the more tricky it becomes to attach a new label. Tear off the labels on the water bottles using your hands or a pair of scissors.[12]
-
2Wipe the sticky residue from the bottle using a damp cloth. The old labels were stuck to the bottle using glue and will probably leave behind a sticky residue. After you've removed the old labels, rub the sticky area with a damp cloth until the residue is completely removed from the plastic.[13]
- If the residue is difficult to remove with the cloth, use the rougher side of a dish sponge to scrub the residue.
-
3Attach your label to the bottle using double-sided tape. Place the double-sided tape over one side of your label, then position that side of the label on your bottle. Push down on the double-sided tape to stick it to the bottle. Wrap the rest of the label around the bottle and attach the other end of the label to the double-sided tape at the end.[14]
- Trim away any excess paper with scissors.
- If you need to, use double-sided tape to secure the label to the bottle where the two ends meet.


Samples
Things You'll Need
- A computer with Microsoft Word
- A printer or local print store
- Cardstock or any other durable paper
- Scissors
- Paper trimmer
- A cloth or a dish sponge
- Double-sided tape


References
- ↑ https://www.creativeramblingsblog.com/how-to-make-water-bottle-labels/
- ↑ https://www.creativeramblingsblog.com/how-to-make-water-bottle-labels/
- ↑ https://justagirlandherblog.com/make-labels-in-microsoft-word/
- ↑ https://www.creativeramblingsblog.com/how-to-make-water-bottle-labels/
- ↑ https://justagirlandherblog.com/make-labels-in-microsoft-word/
- ↑ https://justagirlandherblog.com/make-labels-in-microsoft-word/
- ↑ https://www.creativeramblingsblog.com/how-to-make-water-bottle-labels/
- ↑ https://love-the-day.com/make_your_own_water_bottle_label
- ↑ https://love-the-day.com/make_your_own_water_bottle_label
About This Article