wikiHow is a “wiki,” similar to Wikipedia, which means that many of our articles are co-written by multiple authors. To create this article, 14 people, some anonymous, worked to edit and improve it over time.
This article has been viewed 153,585 times.
Learn more...
If you want to give a simple gift this year, consider knitting a teddy bear. There are many different ways to make and knit teddy bears but by following some steps you will have a cuddly teddy bear in no time! Although this is a basic teddy bear pattern, it requires familiarity with knitting techniques and is not for beginners.
Steps
Knitting the Main Pieces of the Bear
-
1Choose your yarn and needles. Choose your yarn based on the color bear you would like to make. You want the knitting to be dense enough that the stuffing does not show through the material so use needles 2-3 sizes smaller than you would normally use for the yarn you have chosen.[1]
-
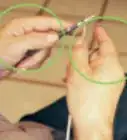
2Cast on 40 stitches. Casting on is the process of starting the first stitches on the knitting needle before beginning to knit. There are many different methods for casting on depending on your experience level and the look you want to try.
- Easy beginner methods include the backwards loop cast on and the long tail cast on.
Advertisement -
3Knit in garter stitch for 32 rows. Garter stitch is great for this project because it forms a sturdy and flexible piece of knitting. It is also a good stitch for beginners to learn and you can remember it with the poem “back, around, over and under.”
-
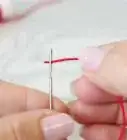
4Place a colored thread on the last row. When you reach row 32 place a colored thread in the middle of the row to mark the location of the neck.
-
5Continue to knit an additional 34 rows. Keep knitting in garter stitch for an additional 34 rows so that you end up with 66 total rows. At each end of this final row, place a colored thread. These colored threads mark where the body stops and the legs begin.
-
6Knit 20 stitches and continue for 39 rows. Knit 20 stitches, which is half the width of the pattern, and then continue for an additional 39 rows. Cast off at the end of these 40 total rows. This is your first leg.
-
7Turn the pattern around and stitch the other leg. Turn the pattern around and rejoin the yarn to the other 20 stitches on the body of the pattern. Knit 40 rows on this side of the pattern, completing the other leg. Once finished, cast off these stitches.
-
8Knit the first arm. Starting on a new section, cast on 20 stitches and then knit 40 rows. Cast off. This forms one of the arms of your teddy bear and will be attached later.
-
9Repeat this for the other arm. Again, cast on 20 stitches and then knit 40 rows to create the piece for the second arm of your teddy.


Assembling the Pieces
-
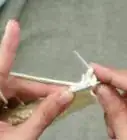
1Fold the body in half to create the head and body. Bring the left edge of your pattern to the right edge and sew down the edges to connect them. Sew them together from the top edge of the pattern where you cast on to the row with the marker at the top of the legs. Rotate the shape so that this seam is on the back of the teddy bear.
- Use a blunt tipped needle to sew the pieces together to make it easier.
- If you are a beginner, then you can use the backstitch to sew the pieces together. Starting from one side simply push the needle down through both layers and bring around the edge and push down through the same location to begin. Then move over one-quarter inch and bring the needle back up through both layers. Continue stitching until you reach the end of the seam.
-
2Sew the inside leg and foot seams. Now that the seam is on the back of the teddy bear there will be two pieces at the bottom that will form the legs. Sew from the top of the legs all the way down the inside seam to the bottom foot seam to close the legs. Do this on both legs.
- You can again use the backstitch to sew the seams.
-
3Stuff your teddy. Use cotton or any type of stuffing to fill the teddy bear. Do not overstuff but fill the teddy completely, including the legs and feet.
-
4Sew the head closed. Sew the top seam of your pattern shut to close the head. Try to round the corners slightly if possible. Again you can use the backstitch to connect the seams.
-
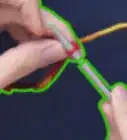
5Fold the arm pieces in half and sew along the edge. Fold the arm pieces in half lengthwise and sew along the long end and the bottom edge to make the arms and hands. You can again use the backstitch to sew these seams together if you would like.
-
6Stuff the arms and sew them closed. Stuff the arms with the same material you used for the body of the teddy bear. Then close the tops of the arms.
-
7Attach the arms. Attach the arms of the teddy bear to the body using a simple backstitch or other stitch that you prefer. The arms should be attached just below the neck on each side.


Finishing the Bear
-
1Sew across the corners to make the ears. Sew a rounded edge across the corners to connect the two layers and make the edges stick out like ears. To make them stick out a bit close your fingers at the base of the ears and pull them lightly before and after stitching.
- You can also do a gather stitch at the base of the ears to help them to stick out more. To knit a gather stitch you would knit a decrease across the length of the ear with a smaller needle size than you have been using.
-
2Gather around the neck. Do a gather stitch around the neck where you placed the marker for the neck. Again, you would knit a decrease at this location to bring the neck in and differentiate the head and body.
-
3Decorate your bear. Embroider the ears and face of use buttons for the eyes. You can also tie a ribbon around the neck of the teddy bear. You should also remove the markers you used earlier.
-
4Hug your new teddy bear! Enjoy your stuffed teddy bear or give it to a friend.


Community Q&A
-
QuestionWill the teddy be suitable for children under the age of three?
 Eye of the ligerCommunity AnswerAs long as any buttons or other accessories are sewn on firmly, it should be fine. If you are still worried, I suggest using yarn knots or felt for eyes, rather than buttons, so that there is no danger of the child swallowing the buttons.
 -
QuestionWhere I can get the free pattern for this teddy bear?Eye of the ligerCommunity AnswerRavelry is a great website for knitting patterns. It's easy to make an account, and there are plenty of free patterns there. I've been using Ravelry for years and never had to pay for a pattern. They have a lot of choices, so you can probably find a teddy bear pattern there.
-
QuestionWhat size needles should I use?
 SarshanCommunity AnswerYour pattern should specify the needle size you need (usually at the beginning before the stitch abbreviations/descriptions). For the most part, size is to your preference; I recommend using a needle size that's one below the recommended size for the chosen yarn so the gaps in the stitches are less noticeable.
About This Article
To knit the teddy’s body, begin by casting on 40 stitches and knit garter stitch for 32 rows. When you reach row 32, center a colored thread to mark where teddy’s neck will be. Then, knit another 34 rows garter stitch until you have 66 rows total. At each end of the final row, place a colored thread to mark where teddy’s legs go. For teddy’s first leg, knit 20 stitches half the width of teddy’s body, then continue for another 39 rows. Now, cast off. Turn over teddy’s body to knit the other leg and rejoin to the other 20 stitches on the body. Then, knit 40 rows to complete teddy’s second leg, and cast off. Now it’s time to knit teddy’s arms. Go to teddy’s upper body and on one side, cast on 20 stitches, then knit 40 rows. Repeat on teddy’s other side to complete the second arm. Keep reading for instructions on how to stitch the knitted pieces together to form your teddy bear and add its facial features.