Easy troubleshooting steps to fix your volume in Windows
This article was co-authored by wikiHow staff writer, Kyle Smith. Kyle Smith is a wikiHow Technology Writer, learning and sharing information about the latest technology. He has presented his research at multiple engineering conferences and is the writer and editor of hundreds of online electronics repair guides. Kyle received a BS in Industrial Engineering from Cal Poly, San Luis Obispo.
The wikiHow Tech Team also followed the article's instructions and verified that they work.
This article has been viewed 710,118 times.
Learn more...
Volume issues are very common on a Windows computer. Luckily, there are several options for troubleshooting your computer. Audio problems can usually be fixed by adjusting the settings or reinstalling the audio drivers. This wikiHow teaches you how to fix volume and sound issues on your Windows 7, Windows 8.0, Windows Vista, Windows XP, Windows 10, Windows 8.1 Update, or Windows 11 computer.
Things You Should Know
- Check your cables for damage. A damaged cable to affect the audio on your device.
- Use the built-in Windows audio troubleshooter to diagnose and fix common issues.
- Update your audio drivers if the issue seems to be your computer rather than your audio device.
Steps
Fixing Volume and Sound Loss Issues on Windows
-
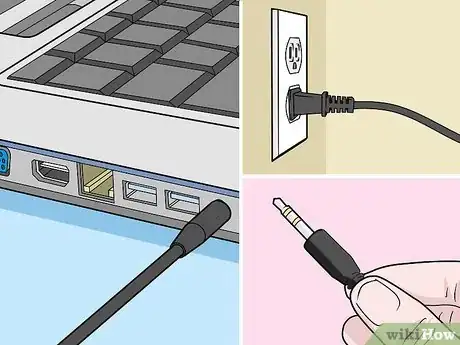
1Check the cables. If you are using an external device, such as speakers or headphones, check to make sure the cables are in good working order and connected to the proper audio port on your computer. If your speakers require a power source, make sure they are plugged into an electrical outlet and/or AC adapter.[1]
- If your volume is working but is too quiet, see our guide to increasing the volume on your computer.
-
2Check the volume. If you are using external speakers or headphones that have an independent volume, make sure the volume is turned up and that the "Mute" button is not engaged. You can also use the following steps to check the volume on your Windows computer:
- Click the Windows Start menu button.
- Type "Control Panel".
- Click Control Panel.
- Click Hardware and Sound.
- Click Adjust System Volume.
- Click the speaker icon to unmute any muted sounds (It will have a red circle with a line next to it).
- Click and drag to raise the slider bar under the “Device” column.
Advertisement -
3Check the sound and volume settings on individual applications. Check to see if you are having volume problems on all apps, or just one specific app. If you are experiencing volume problems on just one app, the problem may be with the sound settings for that app. For example, Spotify has a volume slider bar in the lower-right corner of the desktop app. You can also adjust the volume on YouTube videos by clicking the speaker icon and adjusting the slider bar. Games may have their own sound and volume settings in the Settings or Options menu.
-
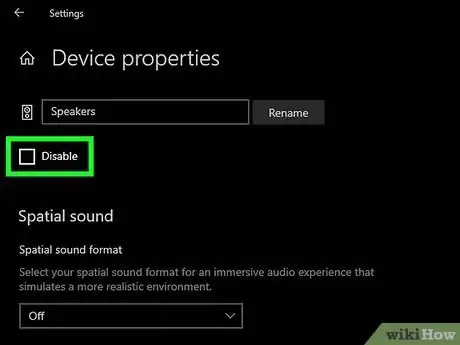
4Ensure your audio device is enabled. Use the following step to check to make sure your audio device is enabled:
- Windows 10:
- Click the Windows Start menu.
- Click the Settings/Gear icon.
- Click System.
- Click Sound in the menu to the left.
- Click Device Properties near the top of the Sound menu.
- Ensure the box next to "Disabled" is unchecked.
- Windows 11:
- Click the Windows Start menu.
- Type in and select “Settings”.
- Click Settings in the sidebar.
- Click Sound in the list of System menu options.
- Click Choose where to play sound to open a drop down menu of audio output devices.
- Click your preferred audio output device (for example, “Speakers”).
- If next to “Audio” under “General” the button says “Don’t Allow,” your audio is enabled for the audio output device. If it says “Allow,” click the button to disable the audio.
- Windows 10:
-
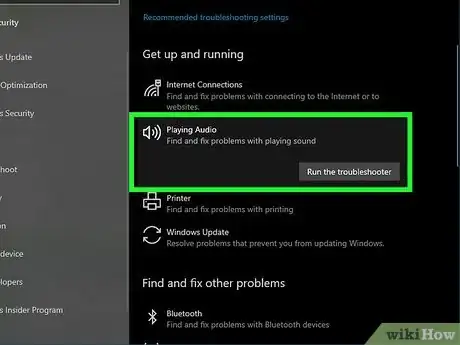
5Use a troubleshooter. Windows computers come with a built-in troubleshooting app that can help you fix volume issues. The Troubleshooter will ask you a series of questions that will help the troubleshooter determine the cause of your volume issue. It may also ask you to open specific settings and suggest that you make changes to the settings. Use the following steps to open the Windows troubleshooter:[2]
- Windows 10:
- Click on the Windows Start icon in the taskbar.
- Type "Troubleshoot Settings".
- Click Troubleshoot Settings.
- Scroll down and click Playing Audio.
- Click Run the Troubleshooter.
- Select your audio device (Realtek(R) audio for most people), and click Next.
- Follow the instructions to fix any audio problems detected.
- Windows 11:
- Click the Windows Start icon in the taskbar.
- Type in and open “Settings.”
- Type “troubleshoot” in the Settings search bar and select “Troubleshoot settings.”
- Click Other troubleshooters.
- Click Run next to “Playing Audio.” The troubleshooter will start running immediately.
- Select your audio device when prompted (Realtek(R) audio for most people) and click Next.
- Follow the instructions to fix any audio problems detected.
- Windows 10:
-
6See what playback device is selected. If the sound is not playing from your computer, this may be because the wrong playback device is selected. For example, if the computer is set to play sound through headphones, sound may not come out of external speakers. Use the following steps to see what playback device is selected:
- Click the Windows Start icon in the taskbar.
- Type "Control Panel".
- Click Control Panel.
- Click Hardware and Sound.
- Click Manage Audio Devices.
- Click the correct audio device (Realtek Audio for most people).
- Click Apply.
- You can also right-click on an audio device and click Test to test the audio device and listen for a sound.
-
7Restart the Audio Services process. Audio Services might not be running correctly and could be causing audio issues. To restart it:
- Click the Windows Start button in the taskbar.
- Type in “services” and select it in the results list. It has an icon of two gears.
- Right-click “Windows Audio” in the list of services.
- Click Restart.
- Click Yes (Windows 11 only).
- Repeat the restart process for “Windows Audio Endpoint Builder” and “Remote Procedure Call (RPC).”
-
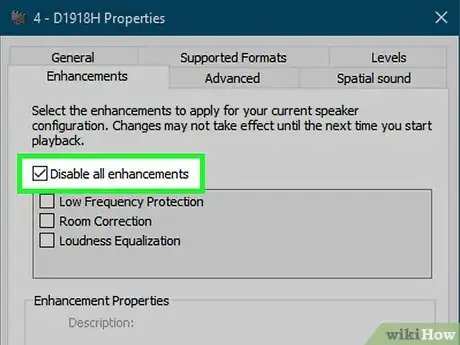
8Disable audio enhancements. Some audio enhancements can cause audio issues. Use the following steps to disable audio enhancements:
- Click the Windows Start icon in the taskbar.
- Type "Control Panel".
- Click Control Panel.
- Click Hardware and Sound.
- Click Sounds (Windows 10) or Sound (Windows 11).
- Click the Playback tab.
- Click an audio device.
- Click Properties.
- Click the Enhancements tab.
- Uncheck the "Disable all enhancements" or "Disable all sound effects".
- Click Apply.
- Repeat for all other sound devices.
-
9Select a different audio format. Use the following steps to select a different audio format:
- Click the Windows Start icon in the taskbar.
- Type "Control Panel".
- Click Control Panel.
- Click Hardware and Sound.
- Click Sounds (Windows 10) or Sound (Windows 11).
- Click the Playback tab.
- Click the correct audio device (Realtek Audio for most people).
- Click Properties.
- Click the Advanced tab.
- Use the drop-down menu at the top to select an audio format (i.e. 16-bit, 48000 Hz)
- Click Test.
- Select a different audio format if you hear no sound.
-
10Check the sound card. Most modern computers have a built-in Realtek sound chip used to process audio. However, some older computers may use a third-party sound card to process audio. If your computer speakers plug into a sound card on the back of your computer, you may need to open your computer and make sure the sound is installed properly. Use the following steps to make sure a sound card is connected to your computer:
- Click the Windows Start icon in the taskbar.
- Type "Device Manager."
- Click Device Manager.
- Double-click Sound, video and game controllers.
- Check to make sure an audio device is listed below "Sound, video and game controllers."
- If no device is listed, your sound card might be disconnected from your CPU. You can open your computer to check whether it is fully plugged in.
- If you open your computer, make sure to power it off and disconnect any cables before opening it.
-
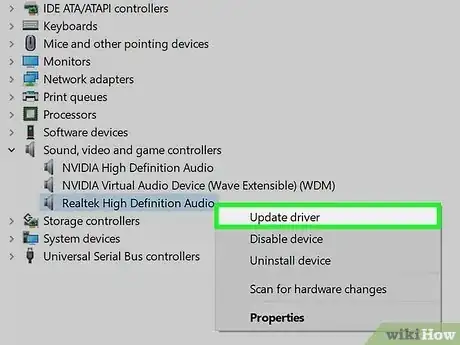
11Check for updates. Sometimes, your audio drivers may be out-of-date and causing problems on your computer. Use the following steps to check for driver updates:
- Click the Windows Start icon in the taskbar.
- Type "Device Manager."
- Click Device Manager.
- Double-click Sound, video and game controllers.
- Right-click your audio driver (Realtek Audio for most people).
- Click Update Driver.
- Click Search automatically for updated driver software
- Follow the instructions to install any new drivers.
-
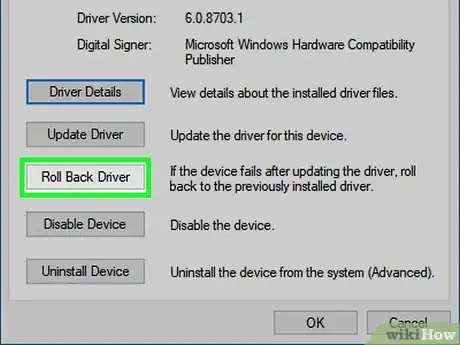
12Roll back your audio driver. If you started experiencing audio problems after a Windows update, you have the option to roll back your audio driver to the previous driver version. Use the following steps to roll back your audio driver:
- Click the Windows Start icon in the taskbar.
- Type "Device Manager."
- Click Device Manager.
- Double-click Sound, video and game controllers.
- Double-click your audio driver (Realtek Audio for most people).
- Click the Driver tab at the top.
- Click Roll Back Driver.
-
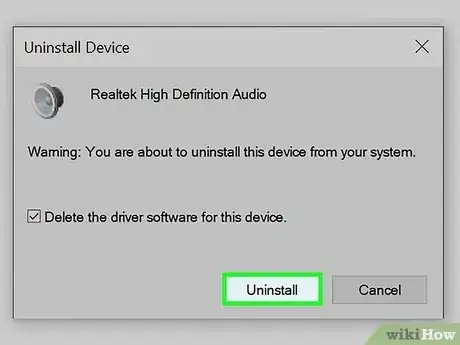
13Uninstall your audio driver and restart. This will prompt Windows to reinstall your sound drivers. Use the following steps to uninstall your audio drivers:
- Click the Windows Start icon in the taskbar.
- Type "Device Manager."
- Click Device Manager.
- Double-click Sound, video and game controllers.
- Right-click your audio driver (Realtek (R) Audio for most people).
- Click Uninstall Device.
- Click the checkbox next to "Delete the driver software for this device" (Windows 10) or “Attempt to remove the driver for this device” (Windows 11).
- Click Uninstall.
- Click the Windows Start menu.
- Click the power icon
- Click Restart.
-
14Look for “IDT High Definition Audio CODEC.” This driver appears on some devices and can cause audio issues. You can manually update the driver to resolve issues:
- Click the Windows Start icon in the taskbar.
- Type "Device Manager."
- Click Device Manager.
- Double-click Sound, video and game controllers.
- Check whether “IDT High Definition Audio CODEC” is listed under “Sound, video and game controllers.”
- If it’s there, right-click it and click Update driver.
- Click Browse my computer for drivers.
- Click Let me pick from a list of available drivers on my computer.
- Choose “High Definition Audio Device” and click Next.
-
15Restore Windows to a restore point. If you've tried everything and your sound still isn't working, you could try to restore Windows to a previous restore point. This will revert Windows back to the state when it previously functioned. This will also uninstall any apps, updates, and drivers installed since then. Use the following steps to restore Windows back to a restore point:[3]
- Click the Windows Start menu.
- Type Recovery.
- Click Recovery (it should say “Control Panel” beneath it).
- Click Open System Restore.
- Click Next.
- Click a restore point and click Scan for Affected Programs to display a list of programs that will be deleted.
- Click Close.
- Click Next.
- Click Finish.
Recovering the Volume or Sound Icon (Windows 10)
-
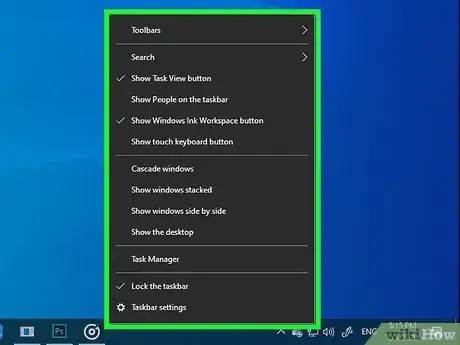
1Right-click the Windows taskbar. By default, the Windows taskbar is at the bottom of the screen. Right-clicking it displays a pop-up menu.
-
2Click Taskbar Settings. It appears at the bottom of the pop-up menu that appears when you right-click of the taskbar.
-
3Scroll down and click Select which icons appear on the taskbar. It's below the "Notification area."
-
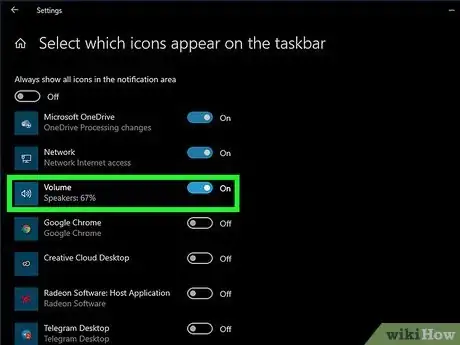
4Click the toggle switch next to "Volume". It's near the top of the menu. This displays the volume icon in the taskbar notification area to the right.
- If you still don't see the icon in the taskbar, click the icon that resembles a bracket pointing up on the left side of the notification area. This displays all available icons in the taskbar.
- You can click and drag icons in the taskbar to rearrange them.
Community Q&A
-
QuestionMy computer's audio keeps turning off over and over again. What can I do?
 Community AnswerTry resetting your computer, that is what I had to do, but you might want to back your computer up if you don't want to lose anything.
 -
QuestionHow do I turn on the volume?
 Community AnswerEither turn the knob on your speaker clockwise, or go to the bottom of the screen and click on the speaker symbol. Click and drag the arrow until you find the right volume.
 -
QuestionHow do I get into Windows on a Dell laptop?
 Community AnswerGet a Windows install USB or DVD with your preferred version of Windows on it. Boot into the BIOS and select your Windows install media/disk. Boot into the Windows setup, and install Windows.
References
- ↑ http://windows.microsoft.com/en-us/windows/no-sound-help#no-sound=windows-8&v1h=win8tab2&v2h=win7tab1&v3h=winvistatab1
- ↑ https://support.microsoft.com/en-us/windows/fix-sound-or-audio-problems-in-windows-73025246-b61c-40fb-671a-2535c7cd56c8#ID0EDBD=Windows_10
- ↑ https://support.microsoft.com/en-us/help/12415/windows-10-recovery-options
About This Article
1. Check the wires and cables on your external speakers.
2. Check the volume on your speakers and in Windows.
3. Check the audio settings on individual apps
4. Turn off audio enhancements.
5. Select a different bit-depth and Hz frequency in the Control Panel.
6. Use the troubleshooter in the Windows Settings menu.
7. Check your playback device in the Hardware and Sound settings in the Control Panel.
8. Check to make sure your sound card is properly installed.
9. Check for Windows Updates.
10. Uninstall and reinstall audio drivers.
11. Restore Windows to a previous restore point.
