X
wikiHow is a “wiki,” similar to Wikipedia, which means that many of our articles are co-written by multiple authors. To create this article, 49 people, some anonymous, worked to edit and improve it over time.
This article has been viewed 456,845 times.
Learn more...
No matter what type of optical disk you have, scratches can make the data inaccessible. Surprisingly, "sanding" down the scratches with toothpaste is an effective home remedy, if the scratches are small.
Steps
Part 1
Part 1 of 2:
Removing Surface Grime
-
1Inspect the scratches. Toothpaste works best for shallow scratches and scuffs on the reflective side.[1] It will probably not work on a deep scratch. Scratches on the non-reflective label side should never be rubbed, and may have caused irreparable damage.
- If you have deep scratches, consider sending the disk to a disk repair service. You could also try more abrasive treatments, such as a non-petroleum-based metal polish.[2]
-
2Dampen a soft, lint-free cloth. Lightly dampen a cotton or microfiber cloth. You'll use this to clean grime off the disk. If you skip this section, the toothpaste could rub dirt particles into the disk, making the scratch worse.
- Avoid any rough or dusty materials.
- If the disk is visibly greasy or dirty, wipe it under running water.
Advertisement -
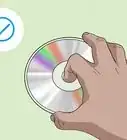
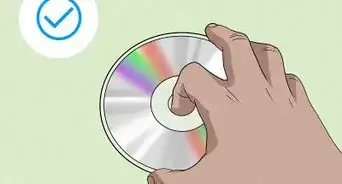
3Wipe the reflective side of the disk. Gently brush the wet cloth against the disk. Wipe each stroke outwards from the center, like a spoke on a bicycle wheel. Rubbing in circles increases the risk of damage.[3]
- Hold the disk by the rim to avoid adding additional dirt and oil from your fingers.
-
4Dry the disk carefully. A dry cloth is more likely to damage the disk. One of these methods of drying are recommended instead:
- Place face down on a couple layers of paper towel and wait until dry.
- Loosely wad a paper towel and brush from the center outward. Do not push onto the disk; the only pressure should come from the bending of the paper towel.[4]
- Let air dry.

Advertisement
Part 2
Part 2 of 2:
Buffing with Toothpaste
-
1Choose your toothpaste. You must use actual paste, not a gel toothpaste. The paste contains abrasive material that scrapes plaque off your teeth. This will sand down the scratched surface as well, hiding the scratch causing the laser to misread.[5]
- Baking soda toothpaste works well due to the extra grit.
- If you're lucky, your toothpaste will list an abrasion rating, called RDA. No one's tested how RDA affects disk cleaning, but a higher rating (120+) should work better.
-
2Apply a small amount of toothpaste to the polishing cloth. A small dab should be enough. As before, use a clean, lint-free cloth such as cotton or microfiber.
-
3Gently rub the toothpaste over the disk. Always move radially, from the center of the disk straight out to the rim. Do not rub in circular motions. Continue rubbing gently until the scratch is gone or nearly gone. This can take a few minutes.
- Do not polish harder in an attempt to speed up the process. This can cause further damage to the disk.
-
4Wash the disk off with cold water. Ensure that you remove all of the toothpaste. You may need to use a clean polishing cloth to remove residue, using the same wiping pattern.
-
5Dry the disk. You may wipe it with a dry cloth, but blotting with a paper towel is safer. You should notice that scratches are fainter or even completely gone. You may have made some additional tiny scratches, but provided that you did not press hard, these shouldn’t interfere with the disk.[6]
-
6Test out your disk. Place the disk into the appropriate drive and see if it works. If so, then you are done. If not, repeat the toothpaste treatment for a second round.
- If there is no noticeable improvement at all, try again with a grittier toothpaste, or with petroleum-free metal polish.
- If two rounds of polishing do not work, try sending it to a disk repair service. These can buff out the scratches with a special machine.


Advertisement
Community Q&A
-
QuestionCan I use regular toothpaste?
 Community AnswerAny toothpaste designed for adults should work.
 -
QuestionWill this work with PlayStation 1 games? If so, how?
 Community AnswerThis works with pretty much any disc or cd. Use the same method and it should be fine.
 -
QuestionWhat about PS4 games? Can I do the same thing?Community AnswerNo. PS4 discs are Blu-ray, different materials than regular discs. Take it to a Gamestop and they can fix it.
Advertisement
Warnings
- Don’t press too hard or polish the disk too many times, as you’ll risk damaging it even further.⧼thumbs_response⧽
- This method is designed to combat light damage by polishing away the surrounding areas. If your disk is severely damaged, you won’t be able to polish it deeply enough to “remove” the scratches without damaging the disk in the process. If this is the case, explore additional disk-repair options.⧼thumbs_response⧽
Advertisement
Things You'll Need
- Toothpaste (baking soda toothpaste recommended)
- At least two non-abrasive, lint-free cloths (e.g. a polishing cloth for glasses)
- Water
- Paper towel
-Microsoft-Sidewinder-Precision-Pro-Into-a-USB-Joystick-Step-14.webp)

References
- ↑ Popular Science on repairing scratched disks
- ↑ http://www.repairfaq.org/sam/cdfaq.htm
- ↑ http://www.repairfaq.org/sam/cdfaq.htm
- ↑ http://www.repairfaq.org/sam/cdfaq.htm
- ↑ http://www.makeuseof.com/tag/geeks-weigh-in-can-you-fix-a-scratched-cd-with-toothpaste-nb/
- ↑ http://www.makeuseof.com/tag/geeks-weigh-in-can-you-fix-a-scratched-cd-with-toothpaste-nb/
About This Article
Advertisement