This article was co-authored by Mitchell Newman. Mitchell Newman is the Principal at Habitar Design and its sister company Stratagem Construction in Chicago, Illinois. He has 20 years of experience in construction, interior design and real estate development.
There are 10 references cited in this article, which can be found at the bottom of the page.
This article has been viewed 20,069 times.
Tearing out your old worktop gives you an opportunity to transform your kitchen into something far more appealing. Any DIYer can fit their own worktops by either cutting worktop pieces to size or ordering them pre-cut. Sinks and cooktops are fitted the same way. Smooth, seal, and cover the rough edges to finish a worktop you’ll be proud to have assembled with your own 2 hands.
Steps
Cutting the Worktop Slabs
-
1Measure the size the worktop will be. Hold a measuring tape up along the wall to determine how much space you have available. If your old worktop is still in place, it can serve as a useful estimate. When building around a corner, plan on connecting 2 slabs or dividing a slab into 2 pieces with a diagonal cut.[1]
- For non-square worktops, measure out the space you have available, then carefully measure out how you’ll make your cuts.
- Wood worktops expand and contract a lot. When using them, leave 5 mm (0.20 in) between the wood and the wall. Leave 30 mm (1.2 in) between the wood and a freestanding oven.
EXPERT TIPMitchell Newman is the Principal at Habitar Design and its sister company Stratagem Construction in Chicago, Illinois. He has 20 years of experience in construction, interior design and real estate development.Construction Professional Mitchell Newman
Construction ProfessionalConsider the durability of whichever material you use. Mitchell Newman, the Principal of Habitar Design and Stratagem Construction, says: "Quartz is one of the best substances for countertops because it's very durable. It's also non-porous, which means it's very hard to stain it. It comes in a variety of colors, from a modern clear grey to styles that are veined like marble. Quartzite, or stone quartz, is another great option. It's hard to stain and is relatively uncommon, but it's a little more expensive. You also see granite, marble, and limestone worktops, but those are more porous."
-
2Draw the measurements on the worktops. Trace the dimensions you measured directly onto the worktop slabs. No matter what material you choose for your worktops, you can order them pre-cut. If you got pre-cut material, you will only need to do this if the worktops are too big or need to be divided.
- Worktop material can be wood, laminate, granite, or another material.
Advertisement -
3Tape over the measurements for visibility while cutting. Place some masking tape over each cutting line. Dark lines don’t show up well on dark worktops, and you’ll also be wearing safety goggles while the saw kicks up sawdust, so the yellow helps you stay on track. The masking tape can be removed when you finish the cuts.[2]
-
4Put on goggles and a face mask. Before sawing worktop pieces, take safety precautions. Put on goggles to shield your eyes from chipped material. Face masks offer extra protection, so they may be worth the cost.[3]
-
5Cut the worktop to shape. The type of saw you need depends on the material you’re cutting. A jigsaw can give you precise cuts on a variety of material. If you’re cutting stone, such as marble, use a diamond-tipped circular saw. Carefully cut off the excess material until you’ve formed the worktops you need.
- The cuts you make will be rougher than any factory-made cuts. Plan to hide your cuts against the wall or under a joining strip, if possible.
-
6Find the spots where you’ll put the sink and cooktop. Both of these features need plenty of space. To get the most accurate estimate possible, move the worktop to the location where you’ll install it. Locate your water line for the sink and your gas or electrical lines for the cooktop or hob, as that’s where you’ll need to cut the holes.[4]
- Never place these features on the joints between 2 worktop pieces.
-
7Trace the sink and cooktop on the worktop’s surface. An easy way to do this is to flip them over and lay them on the worktop’s surface. Masking tape and a marker pen are perfect for creating the guiding lines. Before cutting, move all the lines inward by 5 to 10 mm (0.20 to 0.39 in). This is because the edges of these features hang over the worktop so they don’t fall through.[5]
- Some sinks and cooktops come with templates you can trace on the worktop.
-
8Cut out the traced areas with a jigsaw. Put on your safety gear again and fire up the same saw you used before. Carefully cut out both holes. Remember that a cut that’s too small can always be fixed, but one that’s too big can’t.[6]
-
9File down the rough edges of the worktop. Pick up a fine file or sandpaper at the home improvement store. Smooth over both the utility holes and the outer edges of the worktop. When they feel level instead of sharp, the worktops are ready to be installed.


Installing the Worktop
-
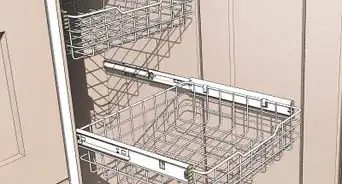
1Place the middle worktop on the support frame. When installing multiple worktop pieces, start with the one that’s furthest back or center. Have a few friends over to hoist the worktops onto the supports. Large worktops are heavy and contact with other surfaces can leave an unsightly scratch.[7]
- Make sure the worktop fits snugly on the supports and is flush with the wall.
-
2Get an aluminium joining strip. These strips are the simplest way to connect 2 worktop pieces without damage. You will not need them if you are installing only a single worktop slab. They can be ordered online or purchased at a home improvement store.[8]
- The strip comes with pre-drilled holes, so you won’t have to do that yourself. It’s very easy to install.
- Worktop pieces can also be joined together miter joints. This involves using a jig to cut shapes into the worktop’s edges. It’s a delicate project, so hire a skilled tradesperson.
-
3Mark the worktop’s width on the joining strip. Roll out the tape measure again if you threw away the measurements from earlier. The aluminum strip is meant to go on the edge of a worktop piece that will touch another piece. Trace the measurement on the strip so you can cut the strip to size.[9]
-
4Cut the joining strip to length. Once you know how long you need to make the strip, clamp it on your cutting table. Get out a hacksaw and remove the end you don’t need. To double-check, hold the joining strip up to the worktop’s cut edge.[10]
-
5Screw the joining strip to the worktop. Hold the joining strip up against the edge that will connect to the other worktop piece. Use 16 mm (0.63 in) wood screws in the pre-drilled holes to attach the joining strip to the worktop.[11]
- Spreading some silicone sealant over the edge first is a good way to guarantee waterproofing, but is not necessary.
-
6Slide the other worktop pieces into position. Lay the next worktop piece on the supports. The edges should already be filed down as needed by now. If you’d like, add a layer of silicone sealant to the edge that’ll go into the joining strip. Then, simply slide the worktop’s edge into the strip to fasten it in place.[12]
- The silicone sealant should work well for any worktop.
-
7Pick a drill bit with less depth than the worktop. A long drill bit will pierce the top of the worktop. That’s an unpleasant way to damage a new worktop, so compare your drill bit to the worktop’s thickness. Try to get one that can drill through the supports and into the worktop without coming out the top.[13]
- One trick is to use masking tape to mark the depth. For instance, get a 2 mm (0.079 in) gauge drill bit. Wrap the tape 38 mm (1.5 in) down from the tip and use it as a depth guide.
-
8Drill 3 holes in each support. It helps to use a clamp to hold the worktop in place as you drill. Reach below the worktop to find the wooden supports. Place a hole at either end of the support, then drill the third one in the middle. Do this with both supports, lining up the holes as best you can.[14]
- If your worktop has cabinets, also drill the supports in each one. That’s 3 holes per support or 6 total per section.
- Your worktop kit may come with brackets to install instead.
-
9Screw the worktop to the supports. Get 38 mm (1.5 in) screws. Place one in every hole you drilled. Twist them until they’re tight. When done correctly, the worktop won’t budge when you try to move it.[15]


Covering the Worktop’s Edges
-
1Measure the width of the worktop’s free edges. The part you want to measure is the outside edge where the material was cut. It should already be filed and smooth. You’ll need to measure how long the exposed edge is so you can cover it with a strip of a similar material.
- Another way to measure out the covering material is to tape it to the edge of the worktop.
- If you are using a non-synthetic surface, you won’t need to do this. Leave the smoothed edges exposed.
-
2Cut laminate strips to size. These strips will be included with the countertop. Mark out how long you need them to be, then use scissors to trim off the excess material. You may also need to cut a little off the top and bottom to make the strip fit perfectly on the worktop’s edge.[16]
- You’ll need 1 strip for every cut that’s still exposed. For one worktop or connected worktops, that’s 2 total.
-
3Spread contact adhesive over the strips and worktop edge. Contact adhesive is a super strength glue that’ll keep your worktop intact. Find some at the local home improvement store. Dip a brush in the adhesive and carefully paint it onto the laminate strip and the worktop’s edge.[17]
- To be safe, keep the area ventilated by opening a window. Cover the worktop’s surface so adhesive doesn’t drip on it.
-
4Leave the adhesive to dry for 15 minutes. Place the laminate strips on a towel on the counter with the adhesive side facing up. After about 15 minutes, the adhesive will have finished drying. Read the instructions on the adhesive’s container to figure out how long your specific brand needs to dry.[18]
-
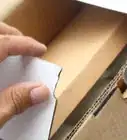
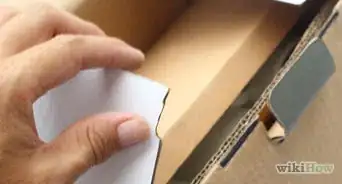
5Attach the laminate to the worktop’s edges. Once the adhesive has dried, pick up the laminate strips. Line them up against the worktop’s cut outer edges. They’ll stick in place once you press them to the edges.[19]
-
6File down rough edges on the laminate strips. Use a fine file or sandpaper to wear down the strips until they’re as smooth as the rest of the worktop. If the laminate sticks out at all, a crafting knife can help. Hold it flat against the worktop and carefully shave off the excess material.


Fitting the Sink and Cooktop
-
1Spread sealant over the cut inside edges of the worktop. Before fitting the sink or cooktop, protect the wooden supports from water damage. Many of these devices come with easy-to-use sealing putty. You may also buy PVC glue or silicone paste and brush it all over the sides of the hole you cut.[20]
-
2Fit the sink or cooktop into the hole. Lower each one into the holes you cut for them. When done correctly, they’ll fit snugly inside. The sink and cooktop won’t fall through because their tops overhang on the worktop surface.
-
3Screw the sink and cooktop into place. Whichever one you’re installing probably came with all the screws you need. If not, you can buy more at a hardware store. The size you need depends on the kind of sink or cooktop you have. Consult the owner’s manual for more information.[21]


Things You’ll Need
- Worktop pieces
- Jigsaw
- Hacksaw
- Drill
- Scissors
- Aluminum strips
- Worktop side strips
- Wood screws
- Silicone sealant or plumber’s putty
- Marker pen
- Masking tape
- File or sandpaper
- Safety goggles and facemask


References
- ↑ http://www.worktop-express.co.uk/media/wood_worktop_installation_aftercare_guide.pdf
- ↑ http://www.ultimatehandyman.co.uk/how-to/woodworking/cut-kitchen-worktop
- ↑ https://www.davesdiytips.com/fitting-a-kitchen/
- ↑ https://www.familyhandyman.com/kitchen/countertops/install-a-laminate-kitchen-countertop/view-all/
- ↑ https://www.davesdiytips.com/fitting-a-kitchen/
- ↑ http://www.diydoctor.org.uk/projects/fittingkitchensink.htm
- ↑ https://www.davesdiytips.com/fitting-a-kitchen/
- ↑ http://www.diybasics.co.uk/fitting-kitchen-worktops.html
- ↑ https://www.youtube.com/watch?v=lc6qaIDzeOg&feature=youtu.be&t=161
- ↑ https://www.youtube.com/watch?v=lc6qaIDzeOg&feature=youtu.be&t=161
- ↑ https://www.davesdiytips.com/fitting-a-kitchen/
- ↑ http://www.diybasics.co.uk/fitting-kitchen-worktops.html
- ↑ https://www.familyhandyman.com/kitchen/countertops/install-a-laminate-kitchen-countertop/view-all/
- ↑ https://www.youtube.com/watch?v=lc6qaIDzeOg&feature=youtu.be&t=207
- ↑ https://www.familyhandyman.com/kitchen/countertops/install-a-laminate-kitchen-countertop/view-all/
- ↑ https://www.davesdiytips.com/fitting-a-kitchen/
- ↑ https://www.thisoldhouse.com/how-to/how-to-laminate-countertop
- ↑ https://www.thisoldhouse.com/how-to/how-to-laminate-countertop
- ↑ https://www.todayshomeowner.com/video/how-to-reattach-plastic-laminate-countertop-edging/
- ↑ https://www.davesdiytips.com/fitting-a-kitchen/
- ↑ https://www.familyhandyman.com/kitchen/countertops/install-a-laminate-kitchen-countertop/view-all/
About This Article