wikiHow is a “wiki,” similar to Wikipedia, which means that many of our articles are co-written by multiple authors. To create this article, 10 people, some anonymous, worked to edit and improve it over time.
This article has been viewed 246,747 times.
Learn more...
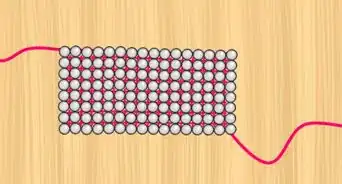
Peyote stitch is a pattern used to weave beads together using a needle and thread. This is still used in many traditional cultures in Africa to make symbolic headdresses and jewelry. However, even those who are from other cultures can benefit from knowing how to do peyote stitch. Depending on the stitch technique that is used, the resulting woven pieces could be flat strips, tubes, or flat round shapes, and can be used to create bags, jewelry, images, and other decorative elements. Read on to learn how to do peyote stitch. There are different types of peyote stitch and this tutorial features the even count peyote stitch.
Steps
-
1Lay the pattern you want to make before you. Learn and understand how to read it. It will always have an even number of horizontal rows.
-
2Read the first vertical row zig-zag. Refer to the picture for a visual reference. The first row is the one numbered in light blue.Advertisement
-
3Pick up the first beads of the correct colours and thread them on your thread (the light blue ones numbered as 1 to 10 in the picture).
-
4Read the second vertical row as numbered in the picture (the black beads numbered as 11 to 15 in the picture).
-
5Pick up the first bead of the second row and add it to your string of beads hanging on the thread.
-
6Push your needle back through the third bead from the top.
-
7Pull it tight so that the last bead of the first row and the first bead of the second row are centered horizontally on top of the other bead.
-
8Add the second bead from the second row to your thread.
-
9Push the needle through bead number four from the top. Continue this pattern until you have finished the second row (next you will push your needle back through the sixth bead, then the eighth, and then the tenth).
-
10Start the third vertical row in exactly the same way, but now reading from the bottom of your pattern to the top (you will now read the purple beads numbered from 21 to 25 in the picture).
-
11Continue in this fashion until you have finished your entire pattern.
-
12Work the thread back through your beaded mat in a zig-zag way to finish off. Cut the thread off after you have reversed it.
-
13Finished.
Community Q&A
-
QuestionWhat can I do if I am having trouble seeing well enough to thread a beading needle?
 Ryleigh HempeCommunity AnswerI have bought beading needles with collapsible eyes so you can easily thread a needle through the bigger hole and it will close itself as it passes through the bead. Look at Michael's or some other craft store in their jewelry/beading section.
 -
QuestionWhat does this stitch look like?
 Community AnswerAt the end of each stitch, your threaded beads should start looking like a zig zag pattern. If you think you've got the wrong stitch, try a brick stitch for a straighter pattern.
 -
QuestionCan you clarify the sentence about weaving your needle to the base row?
 Community AnswerStart with threading the red bead through the second purple bead. Pull it tightly. After this, skip the next purple bead and then thread the red bead through the fourth purple bead.
Warnings
- The thread might get knotted as you pull it through the beads. If this happens, do not yank on the thread. Rather undo the knot lightly with the tip of your needle.⧼thumbs_response⧽
Things You'll Need
- Seed beads
- Needle
- Thread
- Bead weaving pattern
- Scissors