This article was co-authored by wikiHow Staff. Our trained team of editors and researchers validate articles for accuracy and comprehensiveness. wikiHow's Content Management Team carefully monitors the work from our editorial staff to ensure that each article is backed by trusted research and meets our high quality standards.
The wikiHow Video Team also followed the article's instructions and verified that they work.
This article has been viewed 411,739 times.
Learn more...
Beaded earrings might seem difficult to make, but they are really very simple if you have the right tools and materials. You can easily create a beautiful pair of beaded drop earrings to give as a gift, to match a special outfit, or to sell as part of your handmade jewelry business.
Steps
Making a Basic Pair of Beaded Earrings
-
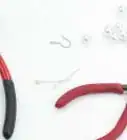
1Gather your materials. Making beaded earrings is quite easy. However, you will need to have some special materials ready before you get started. You will probably need to visit a craft store to find everything, or you can order your materials online. Before you begin, you will need:[1]
- Endpins (These are also known as headpins and look like a straight wire with a small button at the end.) Endpins are available in various thicknesses to accommodate different sizes of beads. Sometimes you will see the thickness mentioned by gauge (ga) on the packaging. In this case, a larger number (for example, 24 ga) indicates a thinner endpin, while a smaller number (for example, 20 ga) indicates a thicker headpin.
- Beads in the colors and types of your choice
- Round nose pliers
- Earring hooks
- Wire cutters
-
2Add your beads. First, put a spacer bead or a bead with a smaller hole than your other beads at the bottom of the endpin, then add the beads of your choice on the endpin.[2]
- Arrange the beads in the order you want them to create a colorful pattern.
- Experiment with different colors and styles.
- Use spacer beads to separate colors if desired.
Advertisement -
3Continue adding beads. Keep adding beads to the endpin until you have 1/4" to 3/8" (6mm to 1cm) of space remaining. It is important to leave some space so that the earrings will retain their movement and will not be stiff.[3]
- If you want your earrings to be shorter, use a pair of wire cutters to snip the headpin to the appropriate length.
-
4Use a pair of round-nose pliers to bend the top of your head-pin. Bend the head pin until it is at a 90 degree angle to the beads. This will help to secure the beads in place and begin the attachment to your earring hook.
-
5Bend the top of the endpin into a loop using the round-nose pliers. This loop allows you to add a post or wire to complete the earring at the end of the headpin with the round-nose pliers. Using the tip of the pliers as a guide, form the end of the headpin into a neat loop.[4]
- If there is any excess wire going out from the loop, then snip it at the base of the loop using a pair of wire cutters. Make sure to wear eye protection when you do this because the wire may fly up towards your face.
-
6Add the earring hook. Next you will need to attach the earring hook to the loop. Do this before you close the loop all the way. Then, use your round nose pliers to close the loop.[5]
-
7Make your second earring and enjoy! After you have created one earring, you will just need to make a second earring in the same manner, and you will have a completed pair of beaded earrings! Try them on, give them as a gift, or add them to your stock of handmade jewelry to sell.


Customizing Your Earrings
-
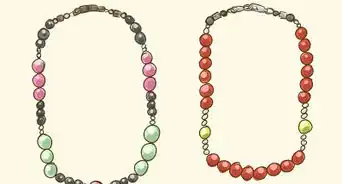
1Include a central bead or pendant. Instead of making your earrings with a sequence of small beads only, you can use a larger decorative bead or a pendant as a way to make your earrings stand out more. Try putting one large, interesting bead near the bottom or center of your earrings, or attach a pendant to the bottom of your endpin.
- You can find endpins that have a rounded wire end, which is useful for hanging pendants from.
- Unless the pendant already has a jump ring attached, you will need to get some jump rings to attach the pendant. These are small metal ring that you open and close with pliers to attach them to the wire endpin.
-
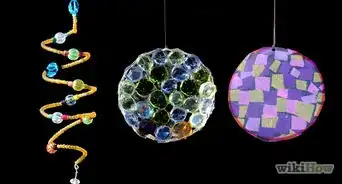
2Experiment with wire wrapping. Wire wrapping is a jewelry making technique that can make your hand-crafted earrings look even more intricate and beautiful. You can use pliers to wire wrap large beads and stones, which you can use as a pendant for earrings.
- This technique takes some practice and patience to learn, so plan on doing some experimental pieces before you are ready to make earrings.
-
3Use a different type of base. Endpins are the classic type of earring base that jewelers use for earrings, but you can also use other types of bases to give your beaded earrings a different design. See what types of earring bases are available at your local crafting store and do some experimentation.
- For example, if you want your earrings to have more movement, then you could use some fishing line as the base for your beads instead.[6] Or, you may be able to find some hoop earrings that are thin enough to slide your beads onto.


Community Q&A
-
QuestionHow can I make them prettier?
 Community AnswerUse beads you like. Make it so each pair of earrings has certain clothes to go with it.
 -
QuestionWhat are the tools that I need to use for this?Community AnswerYou will need headpins or eyepins, earring hooks, beads, chain nose pliers, round nose pliers, and wire cutters.
-
QuestionWhat do you do if you don't have earring bases?
 Eva GordilloCommunity AnswerYou could try making them with head pins or strong wire. Make sure you sand them down and clean them before you put them in your ears! Or you could take some off of earrings you have that you don't want.
Warnings
- Remember to wear eye protection whenever you use wire cutters. While making beaded jewelry is quite safe compared with a lot of other crafts, a small snipped piece of wire can be propelled with a lot of force in an unpredictable direction.⧼thumbs_response⧽
Things You'll Need
- Endpins
- Round-nose pliers
- Wire cutters
- Beads
- Earring hooks

References
- ↑ http://inmyownstyle.com/2013/01/how-to-make-elegantly-simple-drop-earrings.html
- ↑ http://inmyownstyle.com/2013/01/how-to-make-elegantly-simple-drop-earrings.html
- ↑ https://www.youtube.com/watch?v=ZwPOLdAkkgw
- ↑ http://inmyownstyle.com/2013/01/how-to-make-elegantly-simple-drop-earrings.html
- ↑ http://inmyownstyle.com/2013/01/how-to-make-elegantly-simple-drop-earrings.html
- ↑ http://thesweetestoccasion.com/2013/04/diy-seed-bead-earrings/
About This Article

To make a basic pair of beaded earrings, start by putting a spacer bead at the bottom of the endpin, then begin your design. Continue adding beads until you have about ¼ inch of room left. Then, use round-nose pliers to bend the top of your head-pin until it’s at a 90 degree angle to the beads to help secure everything in place. If you want to add a post or wire to complete the earring, use pliers to bend the top of the endpin into a loop. Finally, attach the earring hook to the loop before fully closing it. To learn how to customize your earrings, keep reading!