This article was co-authored by Amy Guerrero. Amy Guerrero is an Arts and Crafts Specialist and the Owner of Sunshine Craft Co., a crafting studio based in Phoenix, Arizona. Amy specializes in macrame, DIY crafting, and teaching fiber arts. She offers monthly in-person and online workshops along with having developed a range of DIY craft kits for at-home projects. Amy holds a BS in Industrial Design from Philadelphia University. She worked as a graphic designer before starting her own business. Sunshine Craft Co. is a creative hub that offers a wide range of workshops, tools, and resources for any craft project to inspire creativity and community engagement.
There are 10 references cited in this article, which can be found at the bottom of the page.
This article has been viewed 38,690 times.
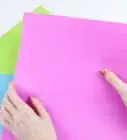
Cutting a straight line through a piece of paper with scissors can be tricky. But with the right pair of scissors and a guiding line, it’s a piece of cake! Use a ruler and a pencil to mark a light line or fold a crease into the paper that you can cut along. You can also improve your straight cuts by using a pair of scissors designed for your dominant hand and holding them correctly.
Steps
Marking a Line with a Pencil
-
1Lay the piece of paper on a clean, flat surface. Clear a table, desk, or workstation so it’s clean and free of dirt, debris, or obstructions. Place the paper on the surface so it lies completely flat and there aren’t any bumps or raised sections.[1]
- An uneven surface will affect your ability to draw a straight line.
-
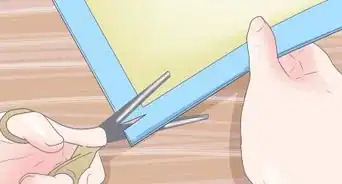
2Place a ruler where you want to cut a straight line on the paper. Choose where you want to cut a straight line on the piece of paper. Take a wooden or metal ruler and place it on the paper so it lies flat where you want to cut it. Line up the back of the ruler with the edge of the paper so you can make a line across it.[2] [3]Advertisement
-
3Mark a light line along the ruler with a pencil. Apply pressure to the ruler with your non-dominant hand so it doesn’t wiggle or slide on the paper. Take a pencil mark along the side of the ruler, tracing a faint line onto the paper. Follow the entire length of the ruler to form a long, straight line.[4]
- Make a light marking so the line won’t be visible after you cut the paper.
Tip: If the ruler isn’t long enough to go all the way across the piece of paper, mark a line, then move the ruler and line it up with the line that you made so you can mark another one.
-
4Remove the ruler and pick up the piece of paper. Once you’ve made a line on the paper, take off the ruler and set it aside so it’s out of the way. Pick up the piece of paper in your non-dominant hand so the line is facing up toward you.[5]
- Holding the paper upright will make it easier for you to cut along the marked line.
-
5Cut along the marked line with a pair of scissors. Hold the piece of paper against the edge of the scissors and make your cuts along the straight line on the paper. Open the scissors all the way and cut the paper carefully so it doesn’t move around. Once you make 1 cut, move the scissors deeper into the drawn line and make another cut. Continue cutting until you reach the other side of the piece of paper.[6]
- Avoid dragging the scissors through the paper or you may not cut a straight line.


Making a Crease
-
1Fold the paper where you want to make a straight cut and crease it. Take 1 end of the paper and fold it over to connect it with the other side of the paper. Make sure the fold is where you want to cut your line. Use your fingers to squeeze the fold to form a crease.[7] [8]
- Adjust the fold before you crease the paper so you don’t leave an indentation in it.
- Run your fingers up and down the crease to make it more visible.
-
2Smooth out the paper by folding it the opposite way. Once you’ve made a straight crease, take the piece of paper and fold it the opposite way along the crease. Use your fingers to gently form another crease at the fold. Then, open the paper back up and smooth it out on a flat surface.
- You should still be able to slightly see the crease on the paper.[9]
-
3Cut along the center of the crease to make a straight line. Take a pair of scissors and line up the blade with the center of the crease at the edge of the paper. Cut across the paper, following the center of the crease as a guide. Continue cutting until you reach the other side of the paper.[10]
Holding Scissors Correctly
-
1Use a pair of scissors made for your dominant hand. Select the correct pair of scissors to make straighter cuts on paper. Choose a pair of right-handed scissors if you’re right-handed and left-handed scissors if you’re left-handed.[11]
- Left-handed scissors are designed so the top blade is on the left, which allows you to see your cutting line better.
Did You Know? Some scissors are labeled as ambidextrous with handles that are designed to fit into either hand. But the positioning of the blades are often on the right side, making them more effective for right-handed users.
-
2Place your thumb through the smaller hole on the scissor handles. Hold the pair of scissors so the smaller hole is on top. Fit your thumb through the hole from the right side if you’re right-handed or the left side if you’re left-handed. Allow the bottom handle of the scissors to rest in your hand.[12]
- If the scissors have 2 of the same size holes, hold the scissors so the top blade is on the same side as your dominant hand.
-
3Insert your index and middle fingers into the larger hole on the handles. Once you’ve fit your thumb into the top hole, slide the index and middle fingers of the same hand into the larger bottom hole. Keep a gentle squeeze on the handles so the scissors remain closed until you’re ready to use them. Curl your ring and pinkie fingers into your hand so they’re out of the way.[13]
- Insert your ring finger into the larger hole if there’s enough room.
- Make sure the scissors fit comfortably and aren’t squishing your fingers.
-
4Open and close the scissors with your thumb for stability. Line up your scissors with the paper you want to cut. Keep your index and middle fingers still so they don’t move. Move your thumb up to open the scissors and move it down to close them and cut the paper. Continue cutting along the paper to make a straight line.[14]
- Using just your thumb to open and close the scissors will minimize your hand movement and keep the scissors more stable.


Warnings
- Always keep the scissors pointed away from you so you don’t accidentally hurt yourself.⧼thumbs_response⧽
- Never run with scissors!⧼thumbs_response⧽
References
- ↑ https://youtu.be/o6OB2EOEd-U?t=34
- ↑ Amy Guerrero. Arts & Crafts Specialist. Expert Interview. 28 April 2021.
- ↑ https://youtu.be/6-6Ds2Bsbxg?t=431
- ↑ https://youtu.be/_186EFmniXs?t=95
- ↑ https://www.ot-mom-learning-activities.com/how-to-use-scissors.html
- ↑ https://www.ot-mom-learning-activities.com/how-to-use-scissors.html
- ↑ Amy Guerrero. Arts & Crafts Specialist. Expert Interview. 28 April 2021.
- ↑ https://youtu.be/fv01OSODCBA?t=3
- ↑ https://youtu.be/6-6Ds2Bsbxg?t=511
- ↑ https://youtu.be/6-6Ds2Bsbxg?t=525
- ↑ https://www.ot-mom-learning-activities.com/how-to-use-scissors.html
- ↑ https://www.canchild.ca/system/tenon/assets/attachments/000/000/597/original/dcd_scissor_skills_2013.pdf
- ↑ https://www.nhsggc.org.uk/kids/resources/ot-activityinformation-sheets/scissor-skills/
- ↑ https://www.ot-mom-learning-activities.com/how-to-use-scissors.html
About This Article