This article was co-authored by wikiHow Staff. Our trained team of editors and researchers validate articles for accuracy and comprehensiveness. wikiHow's Content Management Team carefully monitors the work from our editorial staff to ensure that each article is backed by trusted research and meets our high quality standards.
The wikiHow Video Team also followed the article's instructions and verified that they work.
This article has been viewed 401,249 times.
Learn more...
Batteries are an essential part of everyday life. They allow you to carry electronic devices on the go without having to plug them into a wall outlet. A battery is able to generate electricity by passing electrons between two different metals (one positively charged and one negatively charged). The electrons create a current as they pass through a solution containing molecules that carry the charged particles back and forth between the two different metals.[1] With a few simple steps, you can create a very simple battery using two different metals and a lemon.
Steps
Making a Single Lemon Battery
-
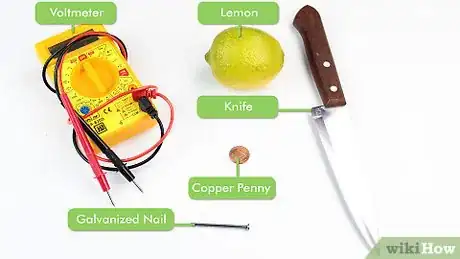
1Gather your materials. To make a lemon battery you will need a copper penny, a galvanized nail, a lemon (10 total), a knife, and a voltmeter. Adult supervision is recommended, especially while handling the knife. Rinse the penny with a light detergent to ensure you are working with a clean surface.[2] Any lemon will do, but a lemon with a thinner rind will make a better battery.
- If you have one, a strip of copper will work better than just a penny.
- Galvanized nails have a zinc coating that is important to this experiment.[3] They can be found in any standard hardware or home improvement store.
- Aluminum foil can be substituted for the nail if you don’t have one.
- A voltmeter can be purchased at a hardware or home improvement store.
-
2Squeeze the lemon without breaking its skin. You can roll the lemon on a table applying a small amount of downward pressure. The squeezing action releases the juices inside the lemon needed for the battery to work.
- The acidity of the juice in a lemon makes it ideal for this sort of chemical reaction. It contains the solution of molecules necessary to carry electric current between the two metal ends of a battery.[4]
Advertisement -
3Cut a small slit through the rind in the middle of the lemon. The slit needs to be large enough to insert the copper penny about halfway into the lemon. Adult supervision is recommended for this step. You want the penny to stay firmly in place so don’t cut the slit too large.[5]
-
4Insert the penny and the nail into the lemon. The penny should fit nicely into the slit you’ve already made. The nail should be pushed into the lemon about 2 centimeters away from the penny. These items will serve as the positive and negative ends of your battery.
- The metals need to be close to each other in order for the necessary chemical reaction to take place.[6]
- Be careful not to have the nail and penny touch within each lemon. If they touch, the battery will short circuit and you won’t get any voltage.
- Make sure the penny and the nail are deep enough to be in contact with the juice of the lemon.
-
5Attach the voltmeter clips to the nail and penny. Using the end clips of the voltmeter, attach one clip to the nail and the other clip to the penny. You should see a small increase in voltage on the voltmeter. If the voltmeter is reading a negative value, simply switch the clips on the nail and penny and it should change to a positive voltage.
- If the voltage is very low, try moving the nail closer to the penny.
Making a Multi-Cell Lemon Battery
-
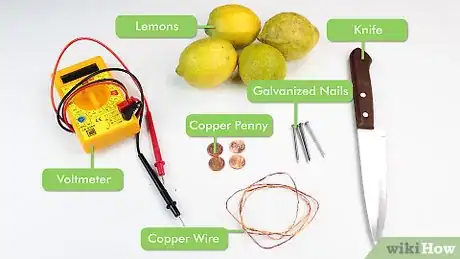
1Gather your tools. A multi-cell battery is when you connect multiple batteries together. In this case, you will link multiple lemon batteries together. To make a multi-cell lemon battery you will need four copper pennies, four galvanized nails, four lemons, a knife, 15 inches of copper wire, wire cutters, a ruler, and a voltmeter. Any lemon will do, but a lemon with a thinner rind will make a better battery.
- Adult supervision is strongly recommended, particularly when using the knife.
- Clean the penny with a light detergent to maintain a clean working surface.[7]
- If you have one, a lobster claw will do.
- Galvanized nails have a zinc coating that is important to this experiment[8] and can be found at a local hardware or home improvement store.
- Aluminum foil can be substituted for the nail if you don’t have one.
- You can link as many lemons together as you’d like to increase the voltage.
-
2Squeeze the lemons without breaking their skin. Gently roll each lemon across a tabletop, applying a small amount of downward pressure. Squeezing the lemons in this way releases the juices inside the lemon needed for the battery to work.
- The acidity of the juice in a lemon makes it ideal for this sort of chemical reaction. The molecules in the juice will carry the electric current between the two metal ends of the battery.[9]
-
3Cut the copper wire into five 3-inch pieces. Adult supervision is recommended for this step. Measure out 3-inch pieces of wire and snip them using the wire cutters. They don’t have to be exactly 3 inches, you just need enough wire to wrap around a penny and a nail.
-
4Connect a penny and a nail with one piece of wire. You are going to make copper-wrapped nail and penny pairs. Take a bit of wire and wrap it a few times around the penny and then take the other end and wrap it around the top of the nail. The penny and nail will be inserted into separate lemons so be sure to leave enough space (about 1.5 inches) between them.[10]
- Ensure the wire is wrapped tightly around each piece. The battery will not function as well without proper contact between each connection.
- You should have three penny and nail pairs when you are finished.
-
5Wrap a piece of wire around just one penny and one nail. The battery will begin with a single copper-wrapped penny and end with a single copper-wrapped nail. Just as you did before, take a piece of wire and wrap it a few times around a penny. Using a separate piece of wire, wrap that a few times around the top of the nail.[11]
- Again, wrap the wire tightly around each piece to make good connections.
-
6Cut a small slit through the rind in the middle of the lemon. The slit should be large enough to insert the copper penny about halfway into the lemon. Adult supervision is recommended for this step. The penny needs to stay firmly in place so make sure the slit isn’t too large.[12]
-
7Insert the single copper-wrapped penny and nail into the first and last lemons, respectively. Line up all four of your lemons and choose one to be the first and one to be the last. Stick the copper-wrapped penny into the slit you cut into the top of the first lemon in the chain. Insert the copper-wrapped nail into the last lemon in the chain.
- It is not super important that all of your lemons stay lined up as long as the single penny and nail are stuck into separate lemons.
-
8Insert the copper-wrapped penny and nail pairs into separate lemons. Each lemon will ultimately have one penny and one nail sticking out of it. The first lemon in the chain will already have a penny, so stick the nail end of a pair into the first lemon. The second lemon will get the penny from that pair. The second lemon will also get the nail from the second pair of copper-wrapped pennies and nails.[13]
- Continue alternating between pennies and nails until you reach the last lemon which will already have a single copper-wrapped nail.
- Be careful not to have the nail and penny touch within each lemon. If they touch, the battery will short and you won’t get any voltage.
-
9Attach the voltmeter clips to the free end wires. Using the end clips of the voltmeter, attach one clip to the copper wire attached to the nail and the other clip to the copper wire attached to the penny. You should see an increase in the voltage reading on the voltmeter. If the voltmeter is reading a negative value, simply switch the clips between the nail and the penny and it should change to a positive voltage.
- If the voltage is very low, try moving the nails closer to the pennies in each lemon and make sure all of the wires are in contact with each penny and nail.
Community Q&A
-
QuestionWill this work with oranges?
 Community AnswerYes, as they also contain citric acid.
 -
QuestionCan I use one lemon to make a lemon battery?
 Community AnswerYes, but you will have to follow the steps in the pictures and words as long as the circuit is complete.
 -
QuestionCan I use an LED bulb instead of a voltmeter?
 Quinn CookCommunity AnswerYes, it will still be powered if you have multiple lemons. An LED uses approximately 4V.
Warnings
- Always be careful when working with electricity.⧼thumbs_response⧽
- Power in a single cell isn't strong. You will require several linked together to light a light bulb (two or more cells make a battery).⧼thumbs_response⧽
Things You'll Need
- Galvanized nail (zinc metal)
- Penny (small copper coin)
- One lemon (if you need more voltage to light an LED bulb for example you need at least 4 lemons)
- Scissors or knife
- Voltmeter (optional)
References
- ↑ http://americanhistory.si.edu/fuelcells/basics.htm
- ↑ http://www.scientificamerican.com/article/generate-electricity-with-a-lemon-battery/
- ↑ http://www.wisegeek.org/what-are-galvanized-nails.htm
- ↑ http://www.education.com/science-fair/article/lemon-power/
- ↑ http://www.scientificamerican.com/article/generate-electricity-with-a-lemon-battery/
- ↑ http://www.education.com/science-fair/article/lemon-power/
- ↑ http://www.scientificamerican.com/article/generate-electricity-with-a-lemon-battery/
- ↑ http://www.wisegeek.org/what-are-galvanized-nails.htm
- ↑ http://www.education.com/science-fair/article/lemon-power/
About This Article
To create a battery from a lemon, roll the lemon on a hard surface to get the juices flowing. Next, cut a small slit through the rind in the middle that's big enough to insert a copper penny about halfway. Insert the penny, then insert a nail about 2 centimeters away. They need to be inserted deep enough to touch the lemon's juices, but they can't touch each other. Then, using the end clips of a voltmeter, attach one clip to the nail and the other to the penny. You'll see a small increase in voltage on the voltmeter -- you just created a single-cell battery! For help creating a multi-cell lemon battery, scroll down!
