This article was written by Susan Stocker and by wikiHow staff writer, Emily Liu. Susan Stocker runs and owns Susan’s Green Cleaning, the #1 Green Cleaning Company in Seattle. She is well known in the region for outstanding customer service protocols — winning the 2017 Better Business Torch Award for Ethics & Integrity —and her energetic support of green cleaning practices.
There are 9 references cited in this article, which can be found at the bottom of the page.
This article has been viewed 21,190 times.
How long has it been since you deep cleaned your refrigerator? Luckily, you can clean and disinfect both the exterior and interior pretty quickly with white vinegar and a little elbow grease. Read on and follow the steps to get your fridge sparkling clean!
Steps
Cleaning the Exterior
-
1Mix equal parts vinegar and water in a spray bottle. White vinegar is an excellent and effective cleaning agent because it kills germs, cuts through grime, and helps destroy odors. You probably already have some in your pantry![1]
- Alternatively, make the mixture in a bowl or cup and apply it with a cloth.
- Combining equal parts apple cider vinegar and water also works well.
-
2Spray the solution on all exterior sides of the fridge. If you’re using a spray bottle, just spray it directly on with 1 or 2 sprays. If you’re using a cleaning cloth, moisten the cloth with a couple drops of the solution or until it’s fully dampened before applying the cloth to the fridge.[2]
- If you want to be really thorough, don’t forget the top of the fridge too.
Advertisement -
3Wait 10-15 minutes and wipe the surfaces with a clean cloth. After you wipe the flat surfaces, be sure to get the door handles, edges, seals, and other crevices. If the surface isn’t clean enough for you after a single application, you can repeat the process until the grime is gone.[3]
- If your fridge is stainless steel, wipe in the direction of the stainless steel’s grain.
- For stainless steel fridges, you can also polish the surface after wiping down the vinegar solution: add 2-3 drops of olive oil to a microfiber cloth, and then buff in the direction of the grain. Repeat once a week or as needed.[4]

Disinfecting the Inside
-
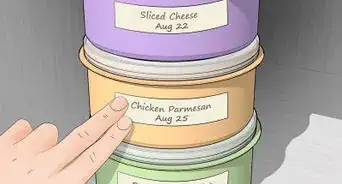
1Move the food to a cooler and take out the shelves, drawers, and racks. Take all of your food out and move it to a cooler so that you can access the entire interior. This also prevents your food from spoiling while you clean.[5]
- You don't need to unplug your fridge for this.
-
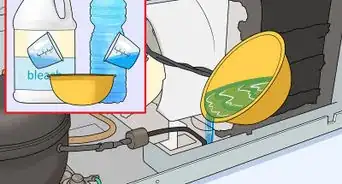
2Spray the surfaces generously with a vinegar-water solution. Mix equal parts vinegar and water in a spray bottle. Coat the fridge interior with the solution. Don't forget the inside of the fridge door! Wait a few minutes so the vinegar can cut through any grime.[6]
- You can use apple cider vinegar in place of white vinegar.
-
3Wipe down the interior with a clean rag or towel. Work from top to bottom so accidental drips don't land on surfaces you have already cleaned. Use a soft toothbrush to clean inside any hard-to-reach nooks and crannies.[7]
- Repeat the process as many times as you need to get rid of stubborn grime.
-
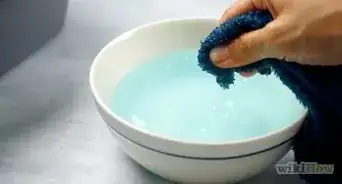
4Wash the shelves and drawers with hot, soapy water. Use a sponge and scrub each piece by hand. Rinse everything thoroughly and place the pieces on a clean towel to air-dry.[8]
- If the interior pieces are made of glass, don't stick them immediately in hot water since cold surfaces can crack. Let them come to room temperature first.
- If you want to be extra thorough, wipe your food and drink containers down with hot, soapy water.
-
5Put the removable parts and food back into the fridge. Once everything is dry, you're all set! Put the shelves and drawers back in place first. Then, put the food and drink items back.[9]
-
6Place a bowl of vinegar inside the fridge if you need to remove odors. To neutralize any lingering smells, just fill a glass or bowl halfway with white vinegar and stick it on a stable shelf in your fridge where it won't get knocked over. Replace the vinegar every few days until the smell is gone.[10]

Handling the Freezer
-
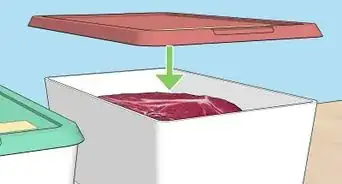
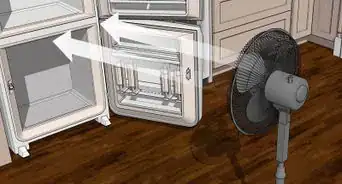
1Pack the frozen food in a cooler with ice and unplug the appliance. Unplugging the fridge helps the freezer to defrost.You don’t need to worry about the food in the fridge; it should stay cold for 4 hours—just don’t open the fridge door while you’re cleaning the freezer.[11]
-
2Take out and hand wash any removable organizers. If your freezer has detachable shelves and drawers, remove them to clear out the inside of the freezer. Wash them by hand in the sink with hot, soapy water and let them air-dry on a clean towel.
-
3Spray the inside of the freezer liberally with a vinegar-water solution. Combine equal parts hot water and vinegar and transfer the solution to a spray bottle. Coat the top, bottom, and sides of the freezer interior with the mixture. Don’t forget the inside of the door and any nooks and crannies.[12]
- If you have jam spills or any other hard to clean spills, try soaking them with a little bit of olive oil to break them apart.
-
4Wipe down the inside thoroughly with a cloth or towel. For any stubborn spots, let the vinegar solution sit on the surface for 10 minutes before wiping it away. Repeat as needed until the interior is nice and clean.[13]
- Use an old toothbrush to scrub stubborn spots and in any crevices.
-
5Put the shelves, drawers, and food back into your freezer. Once the inside of the freezer is dry, put any removable parts back into place. Plug in the appliance and let the freezer get cold. Then, put the food items back.[14]

Things You’ll Need
- White vinegar or apple cider vinegar
- Spray bottle
- Olive oil (optional)
- Microfiber cloth (optional)
- Clean towel, cloths, or paper towels
- Bowl or cup
- Toothbrush (optional)

Expert Interview
Thanks for reading our article! If you'd like to learn more about cleaning refrigerators, check out our in-depth interview with Susan Stocker.
References
- ↑ https://www.bhg.com/homekeeping/house-cleaning/tips/cleaning-with-vinegar/
- ↑ https://www.bhg.com/homekeeping/house-cleaning/tips/how-to-clean-a-refrigerator/
- ↑ https://www.bhg.com/homekeeping/house-cleaning/tips/how-to-clean-a-refrigerator/
- ↑ https://www.apartmenttherapy.com/olive-oil-stainless-steel-cleaning-36832354
- ↑ https://www.bhg.com/homekeeping/house-cleaning/tips/how-to-clean-a-refrigerator/
- ↑ https://www.apartmenttherapy.com/how-to-clean-the-inside-of-your-fridge-in-30-minutes-or-less-202073
- ↑ https://www.bhg.com/homekeeping/house-cleaning/tips/how-to-clean-a-refrigerator/
- ↑ https://www.cdc.gov/foodsafety/pdfs/5-steps-to-clean-your-refrigerator.pdf
- ↑ https://www.cdc.gov/foodsafety/pdfs/5-steps-to-clean-your-refrigerator.pdf
- ↑ https://www.bobvila.com/articles/baking-soda-in-fridge/
- ↑ https://www.merrymaids.com/cleaning-tips/quick-tips/how-to-clean-a-freezer/
- ↑ https://www.thekitchn.com/how-to-clean-the-freezer-cleaning-lessons-from-the-kitchn-206364
- ↑ https://www.thekitchn.com/how-to-clean-the-freezer-cleaning-lessons-from-the-kitchn-206364
- ↑ https://www.thekitchn.com/how-to-clean-the-freezer-cleaning-lessons-from-the-kitchn-206364
- ↑ https://www.goodhousekeeping.com/uk/house-and-home/household-advice/a684998/how-clean-is-your-fridge/
About This Article