This article was co-authored by Clark Hill and by wikiHow staff writer, Janice Tieperman. Clark Hill is a Plant Specialist and the Vice President of Operations at Platt Hill Nursery, a garden center and nursery based in the Chicagoland area of Illinois. Clark and the Platt Hill Nursery plant experts are committed to educating others about plants and providing advice to plant owners. Platt Hill Nursery aims to make gardening an easy and sustainable activity for everybody.
There are 8 references cited in this article, which can be found at the bottom of the page.
wikiHow marks an article as reader-approved once it receives enough positive feedback. In this case, 80% of readers who voted found the article helpful, earning it our reader-approved status.
This article has been viewed 274,367 times.
A koi pond can be a beautiful, calming addition to your garden or your backyard. You may have a larger koi pond with many different koi or a smaller pond with only a few koi. Cleaning a koi pond may seem like a big project, but with a few supplies and steps, you can ensure your koi thrive in their pond.
Steps
Weekly Maintenance
-
1Replace 10-15% of the pond water each week. Koi ponds are constantly losing water through evaporation, which lowers the overall water quality. Once a week, grab a bucket and scoop out 10-15% of the water in the pond. Then, refill the pond with fresh water.[1]
- Always dechlorinate any tap water that you use to refill your pond.
-
2Empty your pond’s pump baskets and skimmers once every few days. These filters can fill up with muck quickly, so it’s a good idea to clean them out multiple times during the week. If too much muck collects in these filters, your pond’s water quality may go down.[2]
- Clear away any extra debris from the surface of the koi pond with a skimmer net.
Advertisement -
3Add beneficial bacteria to your koi pond once a week. Beneficial bacteria is a powder that helps maintain a healthy ecosystem in your koi pond. Check the label on the container to see how much powder you need—the total amount depends on the size of your pond. Then, mix the powder into a glass of warm water, so it dissolves quickly. Drizzle the mixture in different sections of your koi pond, so it spreads out evenly.[3]
- You can buy containers of beneficial bacteria online from shops specializing in aquatics.


Gathering Your Supplies
-
1Put the spray attachment on your garden hose. Make sure you have access to a garden hose that runs properly with fresh, lukewarm water. You should put the spray attachment on the hose so it is easy to use when you rinse and wash out the koi pond.[4]
-
2Look for a skimmer net. Skimmer nets can be found at your local pet store or online. Look for a skimmer net that has a square end, as it will make it easier to push the net off the sides of the pond to pick up any debris. You can also use the skimmer net on a regular basis to maintain your koi pond and make sure the water stays clean.[5]
-
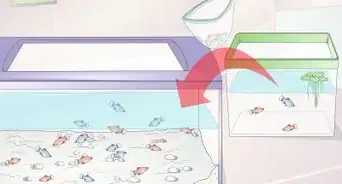
3Get a holding container large enough for the koi. If you decide to remove your koi from the pond before you clean it, you will need a container that is large enough for the koi to hang out in while you do the pond cleaning. The container should be wide enough for your fish and deep enough for at least one foot of pond water.[6]
-
4Look for dechlorinator at your local pet store. Dechlorinator will be used to remove the chlorine from the replacement tap water in the pond once it is clean. It is important that you dechlorinate the water before you put the koi back in the pond so the water is healthy for them.[7]
-
5Invest in a pond vacuum. The vacuum will make it easier to remove leaves and sludge from the bottom of the pond. Pond vacuums can be found at your local pet store or online. If you do not have access to a pond vacuum, you can also use a shop vacuum, though it may not work as well.[8]
- Keep in mind a complete clean of the pond could interfere with algae growth in the pond. But if your koi pond is really dirty from the winter or from poor maintenance, you may want to use a vacuum for a more thorough clean.


Preparing the Pond for Cleaning
-
1Clean the pond in the spring. The best time to clean your koi pond is at the beginning of spring, when the pond has started to thaw from the winter. Try to plan for an annual pond clean at the beginning of spring when the weather starts to warm up, your koi become more active, and the water is not yet full of bacteria and algae.
- You can do a fall cleaning if you are not able to clean the pond during the spring. In the fall, your pond may become full of fallen leaves and debris as the trees change, so you may think about doing a clean. However, you should try to maintain the koi pond during the spring, summer, and fall so the once a year clean is easier to do.[9]
-
2
-
3Drain the pond. You can use the pond pump to drain the water. Make sure you send the water into an area of your yard that has good drainage. Pumping out the water will make it easier to clean the sludge and debris at the bottom of the tank.[12]
- As you pump out the water, make sure you leave about one foot of water at the bottom of the pond so your fish can swim around. You can then leave your koi in the pond as you wash the pond and clean out any debris. You may decide to leave the koi in the pond if your pond is large and you do not want to deal with taking out all the koi.
- If you decide to remove your koi from the pond, you should pump out about one foot of water into the holding container meant for your fish. This way, you can transfer the fish into the container in water that they are used to swimming in to avoid shocking them.
- You don't need to drain the pond every year to clean it.[13]
-
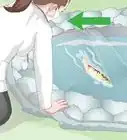
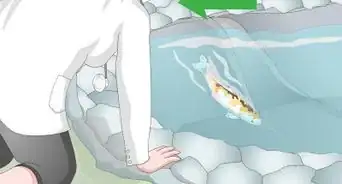
4Remove the koi if your pond is small. If you have a small koi pond and you want to give it a complete clean, you can remove your koi from the pond. This is a messy task, so you should wear old clothing and be prepared to get your hands dirty.[14]
- Use the skimmer net to scoop the koi out and place them gently in the holding container of pond water. Once you have all the koi in the container, you should cover the container with netting or a breathable lid so the koi do not jump out.[15]
- Place the container in a shaded area in your yard, away from sunlight. This will ensure the koi stay healthy and happy while you clean the pond.
-
5Take out the pond pump and any water accessories. You should give the pond pump a rinse with the pond water and run the filter through the pond water until it is clean if the pump is not self cleaning. Do not use tap water to clean the filter, as this can destroy the good bacteria in the filter.[16] [17]
- You should also take out all water accessories in the pond, like water plants or water features. You can then place the plants in a shaded area of your yard and cover them with newspaper to protect them. You should place underwater plants in a container of clean water.
- If you have any water features in your pond that are made of non-natural materials, such as plastic items, you can use a toothbrush to scrub and clean them so they are ready to go back into the pond once it is clean.[18]
-
6Let the sun dry the empty pond for one hour. Once you have emptied out the pond, you can take a one hour break and let the sun dry out any newly exposed algae in the pond. This will make it easier for you to get rid of debris and algae once you actually wash out the pond.[19]


Washing the Pond and Refilling It
-
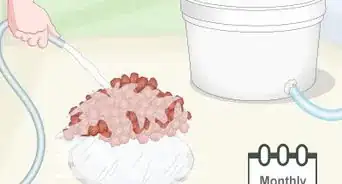
1Use the hose and the vacuum to clean the pond. Take out the water hose with the spray nozzle and blast away at the debris and sludge at the bottom of the pond. Make sure you keep the velvet type of algae lining the pond intact, as this is beneficial algae and should not be disturbed.[20]
- Use the hose to wash any other attached features on the pond, such as a waterfall or rocks around the perimeter of the pond. Never use any chemicals to clean the pond, only water, as chemicals can introduce toxic substances into the pond environment.
- You can then use the pond vacuum to remove any sludge at the bottom of the pond that is hard to get out with the hose. You may come across very smelly goo, decomposed plants, or even a dead frog or fish. Remove it all so the pond is free of any bad bacteria or debris.
- The sludge on the bottom of your pond does contain beneficial bacteria, so you don't need to remover it completely.[21]
-
2Put the pump and the accessories back in the pond. Once you have washed out the pond so it is free of debris and sludge, you should put the pond pump and the pond accessories back in the pond.[22]
- If you have water plants, you may wait until you fill the pond with new water to place them back in the pond.
-
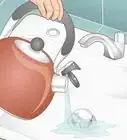
3Refill the pond with water. Use the garden hose to refill the pond. Usually, koi ponds are not very deep, around two to three feet deep.
- Once the pond is filled with new water, add the dechlorinator to the water to remove the chlorine in the water. Turn on the pond pump and allow the water to circulate in the pond for five to ten minutes.[23]
- To avoid shocking your fish, you should dump some of the water from the holding container and replace it with the new pond water. Do this several times to allow your koi to get used to the new water. The fresh water will be colder than the water your fish are used to and exposing them to water can shock them.[24]
-
4Put the koi back in the pond. Once your koi have been given enough time to get used to the new pond water in the holding container, use the skimmer net to gently place the koi back in the clean pond.[25]
- If you did not remove your koi from the pond, you can skip this step.


Community Q&A
-
QuestionWhat do I do if there are babies in the water?
 Community AnswerLeave them alone to grow. If you disturb the habitat too much, they could die or get eaten. Once they are big enough, you can clean with ease. If the pond was too dirty, the adult fish most likely wouldn't breed to begin with. If you really want to clean and ensure their survival, set up a tank inside the house and get it running with a filter. Keep in mind you need to let the tank run for a few days before adding fish.
 -
QuestionHow can I stop the algae? My pond is neon green and no chemicals are working.
 Community AnswerMove your fish to a temporary tank or pond, drain the old one, clean it completely, refill it, re-cycle it, and put the fish back. Then, cover the pond with a roof to prevent it from happening again.
 -
QuestionHow long can I keep my koi in a container?
 CaeiiaTop AnswererDepending on the container, when they get to be the size of your hand, you might need to get a bigger place. They grow fast.
Things You'll Need
- A skimmer net
- A holding container
- Dechlorinator
- A garden hose with a spray nozzle
- A pond vacuum


References
- ↑ https://www.pondtrademag.com/essential-tips-taking-care-koi-pond/
- ↑ https://www.pondtrademag.com/essential-tips-taking-care-koi-pond/
- ↑ https://www.youtube.com/watch?v=Tx6lzMsUhTs&t=3m49s
- ↑ https://www.angieslist.com/articles/how-clean-your-backyard-koi-pond.htm
- ↑ http://www.watergarden.org/Seasonal-Care
- ↑ https://www.angieslist.com/articles/how-clean-your-backyard-koi-pond.htm
- ↑ http://www.watergarden.org/Seasonal-Care
- ↑ http://www.watergarden.org/Seasonal-Care
- ↑ http://www.koi-pond-guide.com/koi-pond-cleaning.html
- ↑ Clark Hill. Plant Specialist & VP of Operations, Platt Hill Nursery.
- ↑ https://www.angieslist.com/articles/how-clean-your-backyard-koi-pond.htm
- ↑ https://www.angieslist.com/articles/how-clean-your-backyard-koi-pond.htm
- ↑ Clark Hill. Plant Specialist & VP of Operations, Platt Hill Nursery.
- ↑ https://www.angieslist.com/articles/how-clean-your-backyard-koi-pond.htm
- ↑ http://www.watergarden.org/Seasonal-Care
- ↑ http://www.clarkekoi.com/koi-keeping-basics.html
- ↑ http://www.watergarden.org/Seasonal-Care
- ↑ https://www.angieslist.com/articles/how-clean-your-backyard-koi-pond.htm
- ↑ https://www.angieslist.com/articles/how-clean-your-backyard-koi-pond.htm
- ↑ http://www.watergarden.org/Seasonal-Care
- ↑ Clark Hill. Plant Specialist & VP of Operations, Platt Hill Nursery.
- ↑ https://www.angieslist.com/articles/how-clean-your-backyard-koi-pond.htm
- ↑ http://www.watergarden.org/Seasonal-Care
- ↑ https://www.angieslist.com/articles/how-clean-your-backyard-koi-pond.htm
- ↑ https://www.angieslist.com/articles/how-clean-your-backyard-koi-pond.htm
- ↑ https://assets.newmediaretailer.com/83000/83169/koi_feeding_chart.pdf
About This Article

To clean a koi pond, start by scooping out any debris floating on the surface of the pond with a net. Then, use a pond pump to drain the pond except for 1 foot of water so your koi fish can still swim around. Next, use a hose with a spray nozzle to blast away any debris and sludge in the pond, and use a pond vacuum to suck up debris along the bottom. When you're finished, refill the pond with water and add a dechlorinator to remove any chlorine. For tips on removing your koi fish if you have a small pond, read on!