This article was co-authored by Ryaan Tuttle. Ryaan Tuttle is a Home Improvement Specialist and the CEO of Best Handyman, Inc. in Boston, Massachusetts. With over 17 years of experience, he specializes in building home service businesses, focusing on creating scalable and efficient brands. With the help of his global team, the companies have achieved over 10+ million in sales and received recognition through magazine features, and enjoy partnerships with wikiHow and Jobber field service software. Boston Magazine and LocalBest.com have named Best Handyman Boston the Best Handyman in Boston. Ryaan holds Construction Supervisor and Home Improvement Contractor Licenses.
This article has been viewed 13,445 times.
Wood carving is an ancient hobby and artform that is very rewarding when you see your designs begin to take shape. To get started, all you need is the right kind of wood, a carving knife, a sharpening stone, and maybe a gouge for carving things like wooden spoons. With some practice and a lot of patience, you’ll eventually be carving all kinds of things out of wood!
Steps
Beginning to Carve Wood
-
1Start carving with softwoods like balsa, basswood, pine, or butternut. These are popular choices to begin wood carving because they are much easier to carve than hardwoods. Get basswood or balsa from a local craft shop, and buy pine or butternut at a lumber yard.
- Basswood and balsa are very soft, fine-grained woods that are the easiest for beginners to carve.
- Pine and butternut are more coarse-grained woods, but are still easy enough for beginners to carve.
- When you choose wood to carve, avoid pieces with knots or growth rings. These will be difficult to carve around.
-
2Get a wood carving knife and a ceramic sharpening stone. A purpose-built knife for wood carving with a fixed blade and a long handle is the most comfortable tool to carve wood with. Buy the knife and a ceramic sharpening stone at a woodworking store, craft shop, or order them online.
- A beginner’s wood carving knife costs as little as $15 USD, and you can get a sharpening stone for less than $10 USD.
Advertisement -
3Sharpen your knife when it stops making clean cuts. Push the blade of the knife across the sharpening stone at a 10-20 degree angle. Bend your elbow slightly to keep the angle steady. Keep your wrist locked while you move the knife across the stone. Switch the knife between hands to sharpen both sides of the blade.
- Keeping your knife sharp is an important part of wood carving safety. It is much more likely that you will cut yourself with a dull knife than with a sharp one.
-
4Wear a wood carving glove on the hand that holds the wood. Use a leather hide work glove or purchase a glove designed for wood carving. You just need 1 glove for your non-dominant hand. The hand that holds the knife, your dominant hand, will be glove-free.
- You can protect the thumb on your cutting hand with a leather thumb guard designed for wood carving.


Using Basic Wood Carving Techniques
-
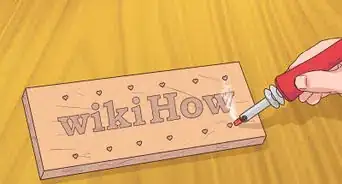
1Trace out your design with a pencil before you start to carve. Lightly outline your idea for the design on the piece of wood you want to carve. This will guide you during the process as your piece begins to change shape and help you visualize the final product.
- The outline doesn’t need to be detailed. It just helps to keep you oriented while you carve away different pieces of the wood.
-
2Hold your knife with your dominant hand and stabilize it with your other thumb. Hold your piece of wood in your non-dominant hand, and your knife in your dominant hand. Place the thumb of your non-dominant hand on the back, blunt side of the knife.[1]
- For example, if you are right handed, then hold your knife firmly in your right hand and your wood piece in your left hand. Place the sharp side of your knife where you want to make a cut and press your left thumb against the back side of the blade.
-
3Use a scooping motion with the knife to carve away pieces of wood. Carve by rotating the wrist of your dominant hand to scoop away pieces of wood. Use the thumb you placed on the back of the knife as a brace to keep the knife from slipping. This method is called the push stroke and gives you the most control over your cuts.[2]
- The basic wood carving cut is called a straightaway cut. This is used most during the first stages of a carving to get the rough shape. Make several long, thin cuts away from your body to shrink the wood to the shape and size you want for your design.
- You can also use your carving knife in the same way you would use a knife to peel an apple. This cut is called the pull stroke, or pare cut, and is used to create finer details in your piece. Just be very careful not to slice your thumb!
- The less you angle your knife, the thinner the pieces of wood you carve away will be. Use sharper angles to cut away larger pieces as you shape your carving, and less of an angle to cut away thin pieces and add finer details to your design.
- Keep the proportions of your design in mind as you carve. You can try to carve a realistic looking piece, exaggerate the proportions, or a combination of both. You’re the artist!
-
4Cut with the grain of the wood as much as you can. The darker streaks running through the wood are the grain. Cut parallel to these grains in the direction that provides the least resistance. This is called cutting with the grain.[3]
- If the wood seems like it is tearing or chipping when you cut, then you are probably cutting against the grain. Flip the wood around and cut the other way. If it seems easier, then this is the correct way to cut with the grain of your piece of wood.
- It’s ok to make short cuts diagonally or across the grain if you need to do it to complete your design. Just avoid cutting upwards against the grain as this will cause it to tear and chip.
-
5Work in stages to get the basic shape first then refine the shape. Make larger cuts to remove more wood and get the rough shape of your design first. Gradually make smaller and finer cuts as your piece takes shape until you achieve your envisioned design.
- Once you are happy with the overall shape of your design, you can use the tip of the carving knife to add fine details. For example, if you are carving a person or animal, then you can use the tip of the knife to carve fine lines that look like hair.
-
6Use a gouge to create hollow areas or curves on your wood. Secure your piece to a work surface with clamps or a vice. Hold a gouge with an overhand grip in your non-dominant hand, place the curved blade against the wood, then push on the bottom of the handle with your dominant hand to gouge out pieces of wood.[4]
- Gouges come in all different sizes and can be used to hollow out large, shallow areas, or to create small, fine details on your pieces.
-
7Use an electric dremel tool instead of hand tools to experiment. Dremel tools are an electric rotary tool that are used to carve wood, among other things. Learn the basics of how to use a dremel tool and experiment with different dremel bits on wood to create designs.
- Wear safety goggles when you use a dremel because woodchips can fly towards your face.
- Make sure to always secure your wood pieces with clamps or vices before you use a dremel tool to carve them.


Carving a Wooden Spoon
-
1Get a straight, flat piece of wood that you want to carve. You will need a piece of wood that is 0.5–0.75 in (1.3–1.9 cm) thick, 10–12 in (25–30 cm) long, and 2–3 in (5.1–7.6 cm) wide to make a kitchen spoon. Make sure that there are no knots or deformities in the wood.[5]
- You can alter the measurements and experiment with different kinds of wood to create a wide variety of wooden spoons.
- If it is your first spoon, it is best to go with an easy-to-work softwood like pine until you get the hang of it. Then you can move on to carving spoons out of more difficult hardwoods.
- Some good hardwoods to carve spoons from are soft maple, poplar, cherry, and black walnut.
-
2Draw an outline for the spoon on a piece of paper. Fold a piece of paper in half in the center and draw half of the outline of the spoon design you want against the fold. Cut it out while the paper is still folded to get a completely symmetrical outline.[6]
- There are endless possibilities for spoons you can create. Serving spoons usually have wider, deeper bowls and shorter handles. Mixing spoons have more shallow bowls and longer handles. It’s completely up to you what style of spoon to carve, and there are no wrong designs!
-
3Trace the outline onto your piece of wood with a pencil. Unfold the outline that you cut out and place it flat in the middle, and with the grain, on your piece of wood. Trace all the way around it lightly with a pencil and remove the template. Draw in the shape of the bowl that you will carve out.[7]
- Try to line up the template with the grain of the wood as straight as possible so that it runs straight through the whole spoon.
-
4Secure your piece of wood in a vice on a workbench. Place the flat sides of the piece of wood in the vice and tighten it to hold it in place. Make sure that it is level before you start carving.[8]
- If you don’t have a vice, you can also use clamps to clamp the piece of wood down flat to a work surface.
-
5Use a gouge to scoop out the bowl of the spoon. Hold a sharp gouge with an overhand grip in your non-dominant hand and place the tip of the gouge in the center of the outline you drew. Push against the bottom of the handle of the gouge with your dominant hand and press the gouge into the wood with slicing and scooping motions.[9]
- You can start carving across the grain with the gouge to get the rough shape of the bowl. Use lighter cuts with the grain of the wood to deepen and smooth out the bowl.
- It helps to use overlapping cuts until you reach the outline of the spoon’s bowl. For example, overlap the blade of the gouge right next to your first cut then scoop out the piece of wood right next to it for your next cut.
-
6Use a carving knife to shape the outside of the bowl and the handle. Adjust the position of the wood in your vice to allow you to carve around your outline. Cut with the grain and use a scooping motion to carve away chunks of wood that are outside of your outline.[10]
- Carve away bigger pieces at first to get the rough shape, followed by progressively smaller cuts to smooth it out and refine the shape.
- Work on the handle last since it is the most delicate part. You don’t want to put too much pressure on it and have it break while you are shaping the spoon.
- If you are carving your first spoon, it is better to make it at least 1 in (2.5 cm) thick so that it doesn’t snap easily. It’s ok to end up with a chunky spoon for your first time!
- You can leave the top and bottom of the handle, where your fingers would go while using it, flat.
-
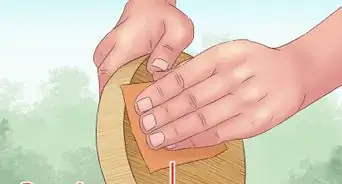
7Sand down bumps and ridges on the spoon until it is smooth. Start with a rough sandpaper like 60-grit, then move to a medium sandpaper like 150-grit, and finally use a 220-grit sandpaper to completely finish the spoon. Round and smooth all the edges until you are content with the finish.[11]
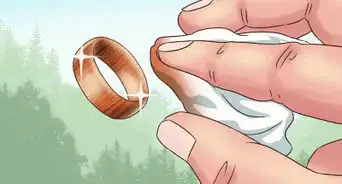
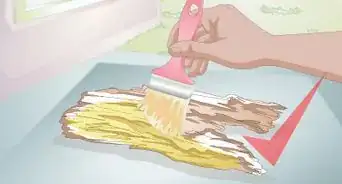
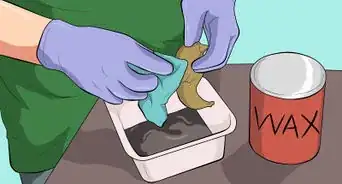
- You can rub food-grade oil, like tung oil or sesame oil, into your spoon with a lint-free cloth to complete the finish and preserve the wood. Let it cure for 2-3 days in a cool and dry spot before you put it to use.


Things You’ll Need
Carving a Wooden Spoon
- Straight, flat piece of wood
- Paper
- Pencil
- Vice
- Gouge
- Carving knife
- Sandpaper from 60-grit to 220-grit
- Food-grade oil such as tung oil or sesame oil (optional)

References
- ↑ http://www.thesculpturestudio.com/howToCarveWood.html
- ↑ http://www.thesculpturestudio.com/howToCarveWood.html
- ↑ http://www.thesculpturestudio.com/howToCarveWood.html
- ↑ https://thebackyardgnome.com/basic-essential-wood-carving-tools-for-beginners/
- ↑ http://www.woodworkersjournal.com/how-to-carve-wooden-spoon/
- ↑ http://www.woodworkersjournal.com/how-to-carve-wooden-spoon/
- ↑ http://www.woodworkersjournal.com/how-to-carve-wooden-spoon/
- ↑ http://www.woodworkersjournal.com/how-to-carve-wooden-spoon/
- ↑ http://www.woodworkersjournal.com/how-to-carve-wooden-spoon/
About This Article

If you want to carve a piece of wood, start by choosing a softwood that is easy to carve, like balsa, basswood, or pine. Once you have a nice block of wood, lightly trace your idea for the design on the side so you can visualize the final product. Then, hold your knife with your dominant hand and place your other thumb on the back side of the blade for stabilization. To make cuts, rotate the wrist of your dominant hand to scoop away pieces of wood, as this will give you the most control over your cuts. As you carve, make larger cuts to remove a lot of wood and get a rough shape before gradually making smaller and finer cuts to get your envisioned design. For more tips, like how to carve a wooden spoon, read on!