This article was co-authored by Sarena Nelson. Sarena Nelson is a Private Chef and the Founder of Chef Sarena, based in Palm Springs, California. With over 10 years of experience, she specializes in customized menus for private events, has worked in 5-star restaurants, and has helped small restaurants redesign their menus. She earned her degree from Le Cordon Bleu School of Culinary Arts in Pasadena, California.
There are 9 references cited in this article, which can be found at the bottom of the page.
wikiHow marks an article as reader-approved once it receives enough positive feedback. In this case, several readers have written to tell us that this article was helpful to them, earning it our reader-approved status.
This article has been viewed 499,099 times.
Your poor ancestors had to skin the hide of the might lemon with nothing but stone knives. Nowadays there are many kitchen tools that can do the job, and even one woodworking tool that found accidental success with chefs: the microplane.[1] A grater or vegetable peeler will get the job done as well, or you can pick up a paring knife and learn how grandpa did it in the savannah.
Steps
Zesting with a Microplane or Grater
-
1Rinse the lemon. Cleaning fruit is especially important when you plan on eating the peel. Scrub vigorously under hot, soap water with your fingers or a clean sponge.
-
2Set your tool over a cutting board. A microplane produces a very fine zest, perfect for baking and cooking. If you don't have this tool, use the smallest holes on an ordinary grater. Position it as follows:
- Microplane or flat grater: Hold the handle closest to you, with the end set against the cutting board at a 45º angle. If the flat grater is unstable, grate over a bowl with the grater resting against the edge.
- Box grater: Place it flat over the cutting board, with the finest side facing the hand holding the lemon. Push down on the handle to prevent sliding.
Advertisement -
3Grate the yellow skin only. Zest just enough to get through the yellow skin, avoiding the bitter white pith underneath. Many graters can pierce through this layer in a single movement. Be gentle if you are not using a microplane.
- Graters will only grate in one direction. Microplanes can grate in either, but it's usually easier to push down, then lift the lemon back to the top.
-
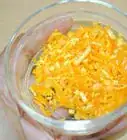
4Rotate the lemon and repeat. Once the white pith is exposed, rotate the lemon and zest the next strip of peel. Repeat until most of the peel is removed, or until you have enough zest for your recipe.
- There's no need to get every bit from the ends or from flecks of remaining yellow.


Zesting with a Cocktail Zester
-
1Use a traditional zester for spiral cocktail garnishes. The original "zester" looks like a small claw with tin teeth or sharp holes. This creates thin strips of peel for garnishing drinks.
- When a recipe calls for zest, it means finely minced or grated peel instead. You can use this tool, but you'll need to chop the peel finely afterward.
- A traditional lemon twist is actually easier to make with a vegetable peeler, as described below.
-
2
-
3Run the zester across the lemon in long strips. Press the teeth of the zester against the skin and drag it across the lemon. For decorative, extra long strips, rotate the lemon as you go.


Zesting with a Vegetable Peeler
-
1Wash the lemon. As always, wash your fruit thoroughly with soapy water. You'll be eating this peel, so you don't want any pests or pesticides on it.
-
2Create zest for recipes. This tool is not ideal if you want the zest for recipes, but it will work if you have no other options. Drag the vegetable peeler slowly and gently over the upper surface of the peel. Try to get as little of the white peel as possible. Once a strip of peel is removed, mince it as finely as you can to create zest.
- This zest will be less flavorful than grated zest, and especially microplaned zest. You may want to use more to make up for this, but keep in mind the pieces will also be more noticeable and less attractive.
-
3Create lemon twists for cocktails. Remove a short, wide strip of zest as described above. Hold the strip with the peel side down over the drink, then twist it with your thumbs and forefingers to release oils onto the drink. Rub the strip against the glass rim for additional flavor, then drop it onto the drink surface.[4]
- The bitter white pith will be especially noticeable in a cocktail. The underside of the strip should have several pores where the yellow skin is visible. If there's a thick white layer instead, carefully scrape off some of the pith with a paring knife.[5]


Zesting with a Paring Knife
-
1Choose a sharp, small paring knife. The paring knife is probably the most difficult tool for this job, but it has its benefits. You don't have to clog your kitchen with a one-use tool, and a sharp knife makes clean, dry cuts compared to the wet, sticky clumps other methods can produce. Keep reading to learn the technique.[6]
-
2Cut off both ends of a clean lemon. After washing the lemon, cut off both ends where they begin to taper. Rest a cut surface flat on the cutting board.
-
3Slice off a thin strip of zest. Cut off a strip of rind from the side of the lemon, right where it meets the white pith. It may be easiest to start near the center of the lemon, where it bulges outward.
-
4Remove the white pith. Hold the strip flat against the board with one hand, yellow side down. Press the knife blade flat on top of the strip, with the blade pointing away from your hand. Scrape the top of the strip at a slight angle, removing most of the white pith.
-
5Julienne the strip. All this means is "cut it into thin strips." To avoid poking your fingers, hold the lemon peel in place with your fingers curled down into a "claw" shape. In this position, your knuckles are closer to the blade than your fingertips. As long as you keep the sharp edge of the knife below the level of your knuckles, you are unlikely to hurt yourself even if the knife slips.
-
6Dice the peel. Gather the thin strips in a tight row, than rotate them 90º. Cut the other way using the same technique as above. Try to make the zest pieces as small as possible.


Community Q&A
-
QuestionAll of the zest stays in the grater when I use it. What am I doing wrong?
 CaeiiaTop AnswererIt's natural for the zest to stick, but you can use a bit of oil on the grater to prevent sticking. Otherwise, just keep grating until you have enough zest or the grater is clogged, then dislodge the zest by hitting the grater against a side of a bowl.
 -
QuestionCan lemon zest be frozen?CaeiiaTop AnswererYes, that's an easy way to store it. Just make sure it is relatively dry when freezing.
-
QuestionShould lemon zest be toasted before going into a dessert?
 Community AnswerIt depends on what you're making and how you're making it. If you are making a custard, you don't have to toast the zest because it gives the custard a natural taste and creamy consistency, but you may want to toast the zest for desserts like pies because it can add a nice crunchy texture.
Things You'll Need
- Soap and water
- Cutting board
- Grater, vegetable peeler, knife or microplane
Expert Interview
Thanks for reading our article! If you'd like to learn more about zesting a lemon, check out our in-depth interview with Sarena Nelson.
References
- ↑ http://www.nytimes.com/2011/01/12/dining/12united.html
- ↑ http://www.efsa.europa.eu/en/efsajournal/pub/2880
- ↑ http://tna.europarchive.org/20130513091226/http://www.food.gov.uk/news-updates/news/2010/oct/morph2
- ↑ http://drinks.seriouseats.com/2011/02/cocktail-101-how-to-garnish-a-cocktail-citrus-twist-lemon-twist-peel.html
- ↑ http://drinks.seriouseats.com/2011/02/cocktail-101-how-to-garnish-a-cocktail-citrus-twist-lemon-twist-peel.html
- ↑ http://www.cupcakeproject.com/2014/01/how-to-zest-with-a-knife-and-why-you-should-bother.html
- ↑ http://www.joyofbaking.com/Lemons.html
- ↑ http://whatscookingamerica.net/lemons.htm
- ↑ http://whatscookingamerica.net/Q-A/LemonZest.htm
About This Article

To zest a lemon, start by cleaning it thoroughly with water and soap. Then, hold a grater over a cutting board at a 45° angle and gently run the lemon down it. If you don't have a grater, you can use a knife or vegetable peeler to cut off the outer yellow peel from the fruit. If needed, dice up the peel into smaller pieces before adding it to your recipe.