This article was co-authored by Bryan Hamby and by wikiHow staff writer, Megaera Lorenz, PhD. Bryan Hamby is the owner of Auto Broker Club, a trusted auto brokerage in Los Angeles, California. He founded Auto Broker Club in 2014 out of a passion for cars and a unique talent for customizing the car dealership process to be on the buyer’s side. With 1,400+ deals closed, and a 90% customer retention rate, Bryan’s focus is to simplify the car buying experience through transparency, fair pricing, and world class customer service.
There are 11 references cited in this article, which can be found at the bottom of the page.
This article has been viewed 56,638 times.
If you’re selling a recreational vehicle (RV), it’s a good idea to fill out a bill of sale. While it’s not required in every state, this document is still a valuable record of your transaction for both the buyer and the seller.[1] The requirements for a bill of sale vary from one place to another, but we’ll talk you through the basics in this article.
Steps
Basic Bill of Sale
-
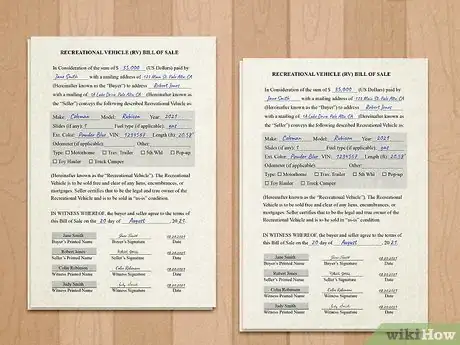
1Include the price you and the buyer agreed on. This is typically one of the first items you’ll put on the bill of sale.[2] Write something like “In consideration for the sum of $,” followed by the price.
- This information usually appears at the top of the form, but in some cases it can go underneath information such as the date or the type of RV you are selling.
-
2State the name and address of the buyer and seller. After specifying the price of the RV, write “paid by,” followed by the name and mailing address of the buyer (or purchaser). Follow this with “to,” then insert the name and address of the seller.[3]
- Alternatively, fill out the purchaser’s information at the top of the form, then place the seller’s name and address in the “certification” section below the details of the sale. This is the section where the buyer, seller, and witnesses sign the bill of sale.[4]
- If you like, you can insert “(Hereinafter known as the “Buyer”)” and “(Hereinafter known as the “Seller”)” after the names and addresses of each party. However, some forms keep it simple and just put “Buyer:” and “Seller:” before the name and address of each party.
Advertisement -
3Specify that you’re selling an RV. Somewhere on the form, you will need to indicate what kind of vehicle you are selling. In addition to stating that it’s an RV, you may also need to check a box or write down exactly what kind of vehicle it is.[5]
-
4Fill in any relevant details about the RV, including the VIN. At minimum, provide the make, model, and vehicle identification number (VIN) for your RV.[8] You might also need to write down the registration and license plate number, if applicable. Additionally, you may wish to include details such as:
- The color or the RV
- The year your RV was made
- The length or weight of the vehicle
- What kind of fuel it takes (if applicable)
- The odometer reading (if applicable; depending on the type of RV it is, this is required in some states)
- Whether you are including a trailer or other add-ons
-
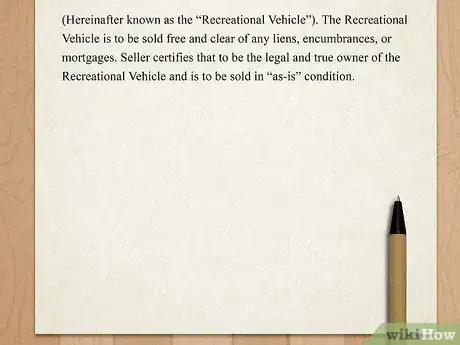
5Include a statement that you are selling the RV free and clear. Also, state clearly that you are the legal owner of the vehicle and have the right to sell it. If you’re selling the vehicle without a warranty, note that you’re selling it “as is.”[9] A typical example of the phrasing is:
- “The Recreational Vehicle is to be sold free and clear of any liens, encumbrances, or mortgages. Seller certifies to be the legal and true owner of the Recreational Vehicle and that it is to be sold in “as-is” condition.”
-
6Add the date of the sale agreement. Somewhere on the bill of sale, write out the date of sale. Some forms place this information on the top of the form, while others may include it further down (e.g., after the buyer and seller information, or underneath the statement regarding the terms of the sale).[10]
- Or, to avoid any confusion about the date, you can write out, “on the __ day of [month], [year].” For instance, “on the 4th day of August, 2021.”
-
7Get the buyer, seller, and witnesses to sign the bill. At the bottom of the form, leave spaces for the buyer’s and seller’s signatures. Depending on where you live, you may also need to get signatures from 1 or 2 witnesses. Have each signer date their signature.[11]
-
8Attach a certificate of acknowledgment from a notary. Depending on where you live, you may need to get your bill of sale notarized. This involves having the various parties sign in front of a notary, who will then acknowledge that all the signers are who they claim to be.[14] If an acknowledgment is required in your area, ask the notary to fill out a certificate, which may include the following information:
- Your state and county (or other locality information, if you live outside the U.S.)
- The date
- The name of the notary
- The names of the buyer, seller, and anyone else signing the bill of sale
- A statement from the notary verifying the identities of everyone involved, as well as the legitimacy of the signing
- The notary’s signature, official seal, and the date on which their commission expires
-
9Make copies for the buyer and seller. Depending on where you live, the bill of sale might be required to prove that the buyer now owns the RV. Make sure that everyone involved has their own copy for their records.[15]
Local Requirements
-
1Call your DMV to find out if a bill of sale is required. Not every state requires you to fill out a bill of sale when you sell a vehicle.[16] To find out if you need one, call your local department of motor vehicles or visit their website.[17]
- Even if a bill of sale isn’t required where you live, it’s still a good idea to write one out.[18] Keeping a record of a major transaction can help prevent future misunderstandings or disputes between the buyer and the seller.
-
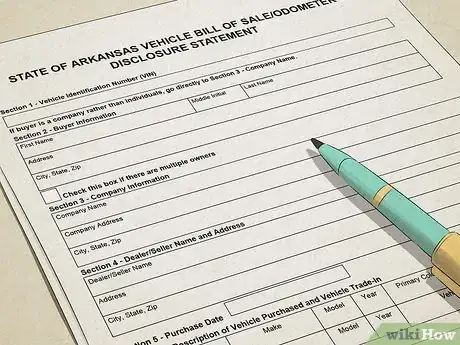
2Check your DMV website for bill of sale forms. In some areas, you may not need to draft your own bill of sale. Visit your local DMV or department of transportation (DOT) website and see if any appropriate forms are available to download, or do a search online using terms like “RV bill of sale New Mexico” or “bill of sale trailer Illinois.”
- Some states, like Massachusetts, have specific bill of sale forms for RVs.[19] Other states, such as Connecticut, provide an all-purpose bill of sale template for any kind of vehicle.[20]
- Using a pre-written bill of sale for your state will not only save you some time and effort, but will also ensure that you’re including all the required information.[21]
-
3Find out if your state has any special requirements. The information that must be included in a bill of sale may vary from one area to another. If your DMV or DOT doesn’t provide its own template, call and ask what information you need to include.
- For example, some states may require your bill of sale to include a detailed odometer disclosure.[22]
-
4Fill in any additional forms to prove the transfer of ownership. In many states, a bill of sale alone isn’t enough to prove ownership of a vehicle. Typically, the new owner will also need other paperwork, such as a certificate of title. In some specific cases, however, a bill of sale alone may be enough to prove the transfer of ownership.
- For instance, in Indiana, a bill of sale alone is sufficient in cases where the former owner wasn’t required to obtain a certificate of title, or where the vehicle was abandoned and sold at auction.[23]
-
5Ask a lawyer for advice if you still have questions. If you’ve written your own bill of sale and you’re not sure whether it meets local requirements, a lawyer can look it over for you and determine if anything is missing. Talk to a lawyer who specializes in commercial or business law.
- Depending on where you live, you may be able to get free or low-cost legal advice about your bill of sale. If you live in the U.S., look for information about affordable legal services here: https://www.usa.gov/legal-aid.
Sample Bill of Sale
References
- ↑ Bryan Hamby. Professional Auto Broker. Expert Interview. 11 June 2019.
- ↑ https://www.nasdaq.com/articles/how-write-bill-sale-car-2017-11-09
- ↑ https://www.nasdaq.com/articles/how-write-bill-sale-car-2017-11-09
- ↑ https://www.flhsmv.gov/pdf/forms/82050.pdf
- ↑ https://www.in.gov/bmv/titles/proof-of-vehicle-ownership-bill-of-sale/
- ↑ https://www.cyberdriveillinois.com/departments/vehicles/license_plate_guide/truck_and_trailer_plates/rv.html
- ↑ https://www.mass.gov/doc/recreation-vehicle-safety-law-summary/download
- ↑ https://www.in.gov/bmv/titles/proof-of-vehicle-ownership-bill-of-sale/
- ↑ https://www.nasdaq.com/articles/how-write-bill-sale-car-2017-11-09
- ↑ https://transportation.wv.gov/DMV/DMVFormSearch/DMV-7-TR-EN.pdf
- ↑ https://esign.com/wp-content/uploads/RV-Bill-of-Sale-Form.pdf
- ↑ https://www.nasdaq.com/articles/how-write-bill-sale-car-2017-11-09
- ↑ https://www.flhsmv.gov/pdf/forms/82050.pdf
- ↑ https://transportation.wv.gov/DMV/DMVFormSearch/DMV-7-TR-EN.pdf
- ↑ https://www.nasdaq.com/articles/how-write-bill-sale-car-2017-11-09
- ↑ Bryan Hamby. Professional Auto Broker. Expert Interview. 11 June 2019.
- ↑ https://www.nasdaq.com/articles/how-write-bill-sale-car-2017-11-09
- ↑ Bryan Hamby. Professional Auto Broker. Expert Interview. 11 June 2019.
- ↑ https://www.mass.gov/doc/sample-bill-of-sale-for-off-highway-vehicles-and-snowmobiles/download
- ↑ https://portal.ct.gov/-/media/DMV/20/29/h31pdf.pdf
- ↑ Bryan Hamby. Professional Auto Broker. Expert Interview. 11 June 2019.
- ↑ https://www.dfa.arkansas.gov/images/uploads/motorVehicleOffice/OdometerStatement.pdf
- ↑ https://www.in.gov/bmv/titles/proof-of-vehicle-ownership-bill-of-sale/








-BILL-OF-SALE_sample.webp)


