This article was co-authored by Josh Goldbach and by wikiHow staff writer, Hunter Rising. Josh Goldbach is an Outdoor Education Expert and the Executive Director of Bold Earth Adventures. Bold Earth leads adventure travel camps for teenagers all over the world. With almost 15 years of experience, Josh specializes in outdoor adventure trips for teens both in the United States and internationally. Josh earned his B.A. in Psychology from Eckerd College in St. Petersburg, Florida. He’s also trained as a wilderness first responder, a Leave No Trace master educator, and a Level 5 Swiftwater rescue technician.
There are 13 references cited in this article, which can be found at the bottom of the page.
This article has been viewed 1,008 times.
A night camping in the great outdoors is such a relaxing getaway, but not so much when your tent has holes or leaks. That’s where a tent footprint comes in handy. A footprint, also called a groundsheet or ground cloth, is a great piece of gear to keep your tent safe and dry throughout the night. Before you go and get one for yourself, there are a few things to keep in mind. When you finish reading our guide, you’ll know why a tent footprint is important for camping and how to choose the best one for your tent.
Things You Should Know
- Use a footprint to protect your tent from wear and tear, add a layer of waterproofing, and insulate the floor.
- Pick a tent footprint that fits underneath your tent without extending past the edges.
- Lay the tent footprint on the ground where you want to set up camp. Assemble your tent so the edges of the footprint are underneath it.
- Make a DIY tent footprint by laying Polycro, Tyvec, or a camping tarp underneath your tent.
Steps
Tent Footprint Usages & Benefits
-
1A footprint protects your tent from normal wear and tear. When you set up your tent, the bottom rubs against the ground, which could puncture holes or tear the material. Even setting your tent up on flat ground wears away at the bottom of your tent over time. If you lay out a footprint first, then your tent doesn’t come into contact with the ground, which extends its lifetime.[1]
- Footprints also are easier to shake out and clean off than the bottom of your tent.
-
2Tent footprints add an extra layer of waterproofing. If it rains when you’re out camping, there’s always a chance the water could soak through the bottom of your tent. With a waterproof footprint underneath your tent, it will take at least twice as much water before any moisture starts leaking through.[2]Advertisement
-
3A footprint insulates you from the ground. If you’re hiking through the mountains or camping in the winter, an extra layer between the cold ground and your sleeping bag makes a big difference. Your tent footprint puts another layer between you and the ground so it can help you stay warm and dry throughout the entire night.[3]
-
4A footprint helps you choose where to set up camp. Since a footprint is about the same size as the bottom of your tent, lay the sheet out on the ground to see if your tent will fit there. If there’s ample space for the footprint, then you can easily pitch your tent there. And you know pitching your tent can take forever; this way you won't waste time setting up in too small of a spot! [4]
-
5Footprints have a variety of other uses you can try too. Even if you’re not setting up camp, a tent footprint is still handy to keep in your pack. You could lay it out as a makeshift picnic blanket if you need to take a break from hiking, or you can wrap one around yourself to protect yourself from a chilly gust of wind. Or, if you stop for a quick break mid-hike, you can lay your materials out on your footprint, keeping them fresh and debris free.[5]


Do I need a tent footprint?
-
1Use a footprint if your tent floor has a denier rating below 30. The denier rating measures the weight of the footprint’s thread, and a higher number means tougher fabric.[6] Check the denier rating of your tent in the manual that came with it. If you have a lower denier rating, like a lightweight backpacking tent, then it’s a good idea to bring a footprint to help your tent last longer. If the floor already has a rating of 30 or above, then you’re safe to get by without one.[7]
- That said, even if you don’t need one for your tent, using a footprint will still help extend its lifetime so you can keep using it for camping. Plus, footprints are a lot cheaper and easier to replace.
-
2Skip using a footprint if it makes ultralight backpacks too heavy. Even though 4–8 ounces (110–230 g) doesn’t sound like a lot, it still adds to the total weight if you’re trying to pack light or go on a backpacking trip. If you already have a full pack and a lot to carry, you can get by without a footprint. Just be sure to find a camping spot that’s dry and free from debris.[8]


Choosing a Tent Footprint
-
1Get a tent footprint that’s about the same size as your tent. Most tent manufacturers make footprints that are custom-sized to fit their products, so try to get one that’s made for your specific tent if you can.[9] If you aren’t sure what size you need, set up your tent and measure the edges of the floor. Then, pick a footprint that’s either the same size or 1–2 inches (2.5–5.1 cm) smaller than your tent.[10]
- Tent footprints typically cost between $40–90 USD depending on the size and material.
- Take the shape of your tent into consideration and get a circular footprint or hexagonal footprint if you need to.
- You can get a larger footprint than your tent’s floor, but moisture may pool on the surface and soak through the bottom of your tent. Larger footprints are also heavier and take up more space when you’re packing.
-
2Pick a footprint with a denier rating of 30 or higher. For your standard camping trip, a 30 denier rating will work perfectly. If you want to prepare for the harshest elements, like cold temperatures and snow, then the highest-rated denier will keep you the most protected. [11]
- Denier ratings usually are a number followed by the letter D. For example, a tent footprint labeled “70D” has a 70 denier rating.
- Tent footprints usually weigh between 4–8 ounces (110–230 g). Higher denier ratings will be on the heavier end while lower ratings are lighter.


Setting Up Your Tent Footprint
-
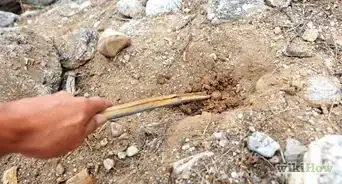
1Lay your tent footprint flat on your campsite. Spread your footprint out on the ground to see if there’s enough space for your tent. Try to pick a flat, grassy spot if you can so you can sleep comfortably. Otherwise, find a nice clean place without any rocks, roots, or debris sticking out of the ground. Smooth your footprint so it doesn’t bunch up under your tent.[12]
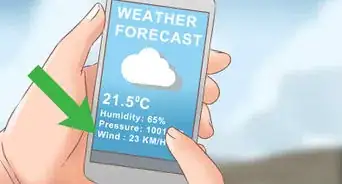
- Make sure your campsite is set up on high ground since water can run downhill when it rains and get your tent wet.
-
2Assemble your tent on top of the footprint. Lay your tent floor out so it extends past the edges of the footprint. Follow the instructions that came in the package to pitch your tent. Don’t stake your tent in the ground just yet since you may need to connect the footprint.[13]
- Be careful not to move or drag the tent off of the footprint as you assemble it since you could rip or poke a hole in the floor.
-
3Connect the footprint to your tent if there are clips or buckles. If you have a footprint made for your specific tent model, check its corners for any fasteners. Attach the clips or buckles to the poles in the corners of your tent. Then, stake your tent through the loops in the tent (and the footprint if it has any). That way, your footprint will stay in place during a storm, and it won't let any water through.[14]
- If your footprint doesn’t have any fasteners, then just leave it flat underneath your tent. The weight of your gear inside will keep the footprint in place.
-
4Fold any excess footprint underneath your tent. Water can pool on your footprint and get the bottom of your tent wet if it extends past the edges. You shouldn’t see any of your footprint once you assemble your tent on top. If you do, tuck the loose edge underneath your tent so it’s completely hidden. Fold in the remaining sides of the footprint so you can keep your tent waterproofed.[15]


DIY Alternatives
-
1Polycro Polycro is a thin plastic sheet that can range in thickness from 0.7–1.5 millimeters, and it works great if you want something ultralight for a backpacking trip.[16] Unfold your sheet of Polycro and trace the shape of your tent onto it. Cut the Polycro out about 2 inches (5.1 cm) smaller than your outline so it’s smaller than your tent’s floor.[17]
- A 72 by 96 inches (1.8 m × 2.4 m) sheet of Polycro usually weighs about 3.65 ounces (103 g), so it’s one of the lightest options to use as a DIY tent footprint. However, they don’t offer as much protection from the elements since they’re so thin.
- Polycro offers additional waterproofing, but it’s not as durable as other footprints or alternatives.
-
2Tyvek Tyvek is a lightweight synthetic fabric that’s normally used to wrap homes during construction, but they make great makeshift footprints as well.[18] Just get a large piece of Tyvek and assemble your tent on top of it. Trace the edges of your tent onto the Tyvek, and cut 2 inches (5.1 cm) inside of the outline so the footprint is smaller than the floor.[19]
- Tyvek weighs about 0.14 ounces (4.0 g) per 1 sq ft (0.093 m2), so a footprint for an average 2-person tent weighs about 3–4 ounces (85–113 g).[20]
- Tyvek is more durable than Polycro sheeting, but they still may wear out faster than a standard tent footprint.
-
3Camping tarp Camping tarps are usually for protecting the top of your tent from the rain and sun, but they can pull double-duty and protect the tent’s floor too. Get a tarp that’s larger than the size of your tent. Since camping tarps are the thickest and most durable, they’ll offer the most protection from wear and tear or harsh elements. Just avoid cutting them down to the size of your tent and instead fold the loose edges underneath your tent.[21]
- Camping tarps are usually the heaviest options and are a little bulkier than other footprint materials, so they’re not a great choice if you’re trying to pack light.


References
- ↑ https://youtu.be/Ll8SE1Jp970?t=50
- ↑ https://www.nationalparksbackpacker.com/do-you-need-a-tent-footprint/
- ↑ https://thegeekycamper.com/insulate-tent-winter-camping-tips/
- ↑ https://intothebackcountryguides.com/backpacking-skills/do-you-need-a-footprint-for-your-backpacking-tent
- ↑ https://elegantcamping.com/what-is-a-tent-footprint/
- ↑ https://elegantcamping.com/what-is-a-tent-footprint/
- ↑ https://intothebackcountryguides.com/backpacking-skills/do-you-need-a-footprint-for-your-backpacking-tent
- ↑ https://www.switchbacktravel.com/does-your-backpacking-tent-need-footprint
- ↑ https://thegeekycamper.com/insulate-tent-winter-camping-tips/
- ↑ https://youtu.be/P4yG6YlwjhM?t=110
- ↑ https://wildernesstimes.com/tent-footprint/
- ↑ https://www.nps.gov/subjects/camping/finding-and-setting-up-a-campsite.htm
- ↑ https://elegantcamping.com/what-is-a-tent-footprint/
- ↑ https://intothebackcountryguides.com/backpacking-skills/do-you-need-a-footprint-for-your-backpacking-tent
- ↑ https://www.nps.gov/subjects/camping/finding-and-setting-up-a-campsite.htm
- ↑ https://www.switchbacktravel.com/does-your-backpacking-tent-need-footprint
- ↑ https://wildernesstimes.com/tent-footprint/
- ↑ https://youtu.be/e4Q_khI-o9M?t=48
- ↑ https://wildernesstimes.com/tent-footprint/
- ↑ https://www.switchbacktravel.com/does-your-backpacking-tent-need-footprint
- ↑ https://youtu.be/gTI8uZkymXY?t=144
About This Article