This article was co-authored by Ryaan Tuttle. Ryaan Tuttle is a Home Improvement Specialist and the CEO of Best Handyman, Inc. in Boston, Massachusetts. With over 17 years of experience, he specializes in building home service businesses, focusing on creating scalable and efficient brands. With the help of his global team, the companies have achieved over 10+ million in sales and received recognition through magazine features, and enjoy partnerships with wikiHow and Jobber field service software. Boston Magazine and LocalBest.com have named Best Handyman Boston the Best Handyman in Boston. Ryaan holds Construction Supervisor and Home Improvement Contractor Licenses.
This article has been viewed 83,101 times.
Whether you are backpacking and need to hang a hammock to sleep at night, or you’re simply setting up a backyard hammock for somewhere to rest and relax, tying the right knot is essential to securely fastening the rope to the anchor. You can tie your hammock with a bowline hitch on each side for a non-adjustable option, or you could pair a bowline hitch with a taut line hitch on the opposite side to easily adjust the height of your hammock.
Steps
Tying a Bowline Hitch
-
1Hold the end of the rope in your dominant hand and make a loop. Leave enough excess rope on the end to wrap around your hammock’s anchor 2-3 times. Make the loop large enough that you could easily pass your first through it.[1]
- Buy a paracord or something similar that can hold at least 700 to 1,000 pounds (320 to 450 kg). You can buy these at sporting goods stores.
- Most hammocks come with loops on the ends that can be connected to a carabiner and rope, but you will most likely need to buy the paracord separate from the hammock.
-
2Wrap the end of the rope around the tree or anchor 2-3 times. Keep the loop in your dominant hand and pass the rope around the anchor, pulling it tight after each wrap. This will help keep your hammock at the desired height.[2]
- If you’re using a tree as your anchor, the bark will help the rope stay in place and you won’t need to wrap it around as many times.
- If your anchor is really wide, you may need to have another person help you wrap the rope around it.
Advertisement -
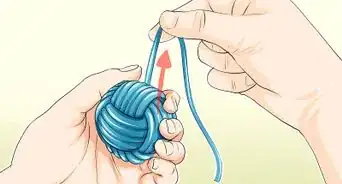
3Pass the working end of the rope up through the first loop you made. If you find that the end of the rope is short, start over, giving yourself more slack the second time around. You need to have about 2 feet (0.61 m) of rope to work with, especially if you are new to tying knots. Make the 2 ropes parallel to each other when you finish.[3]
- Having some excess rope to work with will make it less likely you drop your knot while you’re tying it.
-
4Pull the end under the long strand and then back through the loop. Hold the short end of the rope so that it is pointing toward the anchor, so the 2 strands will no longer be parallel to each other.[4]
- For extra security, repeat this process of threading the working end down, under, and back up through the loop.
-
5Pull the rope tight to form your bowline hitch. Give it a firm tug to ensure the knot stays in place. You can either tie another bowline hitch at the other anchor, or you can use the taut line hitch to make an adjustable knot to finish hanging your hammock.[5]
- An adjustable knot is advantageous, especially if you aren’t sure of how low the hammock will swing once you actually get in it. The taut line hitch allows you to tighten or loosen the slack of the hammock.
-
6Attach the bowline knot to your hammock with a carabiner. Thread the carabiner through the bowline knot and then connect the carabiner to the hammock, which will either come with a rope specifically for the purpose of hanging it or it will have a loop of rope at the end that can be used. Press in the hinged section of the carabiner and loop it through the end of the hammock, then release the hinged section to secure the carabiner.[6]
- Carabiners can be purchased at sporting goods stores or even at your local home goods store.


Making a Taut Line Hitch
-
1Wrap the rope around your anchor. If you’re using a tree as an anchor, wrap the rope around the tree 1-2 times. If you’re using a pole or other hammock stand, wrap the rope 3-4 times. Leave enough rope on the working end so you can create your knot—about 1 to 2 feet (0.30 to 0.61 m) of rope should be sufficient.
- Taut line hitches are often used for hanging up clotheslines or food bags, so this knot can come in handy for many other things!
-
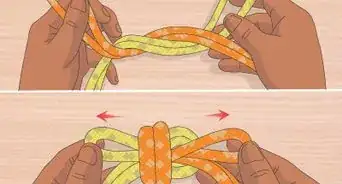
2Cross the end of the rope over the long strand and make 3 loops. Thread the loops around the long strand so they are enclosed in a big loop (end with the shorter rope pointing toward the anchor rather than pointing toward your body). Pull the loops tight.[7]
- These 3 loops are what form the “tube” that allows the rest of the rope to slide back and forth, adjusting the slack of the hammock.
-
3Pull the short end of the rope down parallel to the long strand. Pull the working end back down after you make the loops so it is on the left hand side, while the longer strand remains on the right hand side (if you are looking down at the rope).[8]
-
4Pass the end under the long strand and then up through the lower loop. Make a “Q” shape with the rope. Make sure this part of the knot is closer to your body than the 3 loops you made earlier. If you find that you are running out of rope, start over and give yourself a little more slack. It’s important that you tie a knot securely rather than quickly.[9]
- Try practicing these knots several times beforehand to get more comfortable with the process.
-
5Pull the rope to tighten your knot. Check that it slides up and down the rope easily, making it simple for you to adjust the height of your hammock. Use this knot on one side of your hammock and the bowline hitch on the other side. That way you will have 1 hitch that is adjustable.[10]
- Using 2 taut line hitches won’t provide enough stability for your hammock, so if you aren’t planning to use the bowline hitch, make sure you know of another knot you can use on the opposite side.
-
6Hook your hammock carabiner through the taut line hitch. Use the rope attached to the end of the hammock. If there isn’t a rope, you can simply hook the carabiner through the corner of the hammock itself (this is most common if your hammock is make of rope rather than a canvas material).
- If your carabiner is starting to get rusty, replace it with a new one from a sporting goods store.


References
- ↑ https://www.netknots.com/rope_knots/bowline
- ↑ https://www.backpacker.com/skills/the-best-knots-for-hammock-camping
- ↑ https://www.backpacker.com/skills/the-best-knots-for-hammock-camping
- ↑ https://www.backpacker.com/skills/the-best-knots-for-hammock-camping
- ↑ https://www.netknots.com/rope_knots/bowline
- ↑ https://www.netknots.com/rope_knots/bowline
- ↑ https://www.backpacker.com/skills/the-best-knots-for-hammock-camping
- ↑ https://www.backpacker.com/skills/the-best-knots-for-hammock-camping
- ↑ https://www.backpacker.com/skills/the-best-knots-for-hammock-camping
About This Article

Wherever you’re hanging your hammock, tying a hammock knot will keep it safe and secure while you rest. To tie a bowline hitch, first hold the rope in your dominant hand and make a loop in the end, leaving about a foot of rope after it. Then, wrap the other end without the loop tightly around your tree or anchor 2 or 3 times. Pass the end through the loop and hold the 2 ends parallel. Next, hold the short end of the rope so that it is pointing toward the anchor, and pull both ends tight. Finally, thread the carabiner through your bowline knot and connect the carabiner to your hammock. For more tips, including how to tie an adjustable hammock knot, read on!