This article was co-authored by wikiHow Staff. Our trained team of editors and researchers validate articles for accuracy and comprehensiveness. wikiHow's Content Management Team carefully monitors the work from our editorial staff to ensure that each article is backed by trusted research and meets our high quality standards.
The wikiHow Video Team also followed the article's instructions and verified that they work.
This article has been viewed 218,588 times.
Learn more...
Slip knots are a great addition to handmade jewelry. They allow you to easily adjust the length of a piece by sliding the knot up or down. These knots also look pretty and add detail to a necklace or bracelet. To make slipknots on a necklace, start by doubling the necklace length then add pendants or beads to the cord. Form the slip knot by looping and wrapping the cord. Once done, adjust the slip knots on the necklace to make it bigger or smaller based on your needs.
Steps
Measuring and Decorating the Cord
-
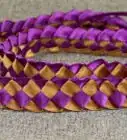
1Use leather or waxed cotton cord. Look for cord that is 1 to 2 millimetres (0.0 to 0.1 in) in width so it is just thick enough to knot.[1]
- Pick the cord color based on the pendant or beads being used for the necklace. A darker colored cord will make a pendant or beads stand out more.
-
2Make sure the necklace cord is at least 48 inches (121.9 cm) long. A necklace with slip knots has to fit over your head and sit nicely around your neck. You need a minimum 24 inches (61.0 cm) of cord to fit the necklace over your head. Add more cord if you want the necklace to sit lower around your neck. Next, double the length of cord so there is enough cord to make the knots.
- Triple the normal amount of cord if you want the knots to sit close together on the necklace.
- For example, if you start with 24 inches (61.0 cm) of cord, you double that amount to 48 inches (121.9 cm) so you have enough cord. Or you can triple it to 72 inches (182.9 cm) for a longer necklace.
Advertisement -
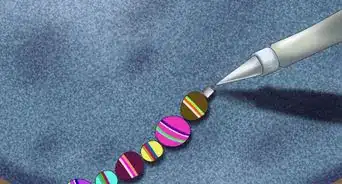
3Position the pendants or beads. Secure a pendant on the cord with a cow hitch knot or a square knot. String beads on the cord and secure them with knots or crimp beads.[2]
- Add any items to the necklace, before you make knots on the necklace.
- If you prefer a plain necklace, skip this step.
-
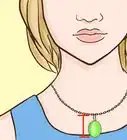
4Verify the necklace position. Before tying the knot, hold the ends of the cord together and slide it over your head to confirm you can put it on easily. Then, make sure it sits at a prefered spot around your neck. Keep in mind it will be nearly half its length once you tie the slip knots.


Making the Slip Knot
-
1Lay the necklace on a flat surface. Place the ends of the necklace on top of the cord, doubling the cord to form 2 layers of cord. Make sure the pendant or beads are at the center of the cord. The ends should run straight up from the pendant or beads.[3]
-
2Fold the cord in half 4 to 5 inches (10 to 13 cm) from one end. Use your finger to fold the cord, to form a V-shaped mark.[4]
- The cord marked with the V-shape will be the section that you use to tie the slip knot.
-
3Lie the V-shaped fold on top of the straight cord. Hold both pieces of cord with your thumb and forefinger. Keep your thumb on top of the V-shaped mark. You now have 1 straight cord and 2 other short cords formed by the V-fold cord.
-
4Form the knot. Take the short end of the V-fold cord and loop it around the 2 other cords. Hold the short cord end and place it behind the other 2 cords. Make sure to loop the end around the other 2 cords away from the V-fold, not towards it.[5]
- Make sure to loop the end over 2 cords, not 1, as this will result in an incorrect knot.
-
5Wrap the V-fold cord 2-3 times around the other cords. Hold your thumb over the V-shaped mark as you wrap the cord around the other 2 cords. Keep the straight cord taut as you wrap, moving down the straight cord. You should have 2-3 nice tight wraps.[6]
-
6Remove your thumb and thread the end of the V-fold through the knot. Take your thumb off of the V-fold. Hold the end of the V-fold cord and pass it through the wrapped cord, threading it above the straight cord. Let it hang out of the first wrap you made. Pull the end tight with your fingers to secure the knot.[7]
-
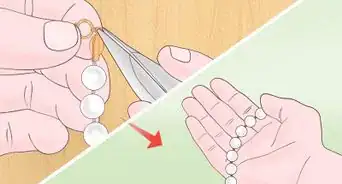
7Cut the end with scissors. Once you have tightened the knot, cut off excess cord with scissors. Make the cut right underneath the knot so the end is flush to the knot. This will ensure the knot stays in place and the end does not get caught on anything.[8]
-
8Repeat the knot on the other side of the necklace. Follow the same steps to make the second slip knot. Snip off any extra cord on the end once you have finished wrapping and securing the knot.
- Make sure the knots sit at the same spot on the cord so they are aligned on the necklace.
-
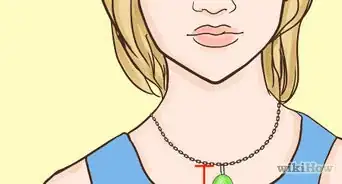
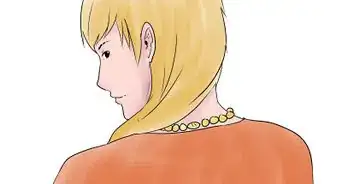
9Try on the necklace and adjust it as needed. Once both slip knots are tied, put the necklace over your head and let it sit on your neck. Place a finger over the slip knot and use your other hand to slide the knot up or down to make the necklace longer or shorter. Check that both knots sit evenly so the necklace is straight around your neck.[9]
- Try wearing the necklace at different lengths by pulling the slip knots up or down. Have fun by wearing it low or high based on your outfit or mood for the day.
Community Q&A
-
QuestionWill this work on nylon or rayon cord, or do I need leather for friction to keep the knots from sliding while wearing the necklace?
 T. ChinsenTop AnswererThe sliding knot will work for all types of cord. The key is to form a snug knot rather than a loose one. If it is loose, it will not slide properly.
Things You’ll Need
- 48 inches (121.9 cm) of leather or waxed cotton cord
- Pendants or beads
- Scissors


References
- ↑ https://www.savvyhomemade.com/make-a-homemade-necklace-or-pendant-the-basics/
- ↑ http://jewelrymakingjournal.com/adjustable-sliding-knot-necklace-tutorial/
- ↑ https://www.savvyhomemade.com/make-a-homemade-necklace-or-pendant-the-basics/
- ↑ http://jewelrymakingjournal.com/adjustable-sliding-knot-necklace-tutorial/
- ↑ http://jewelrymakingjournal.com/adjustable-sliding-knot-necklace-tutorial/
- ↑ https://www.netknots.com/rope_knots/slip-knot
- ↑ http://jewelrymakingjournal.com/adjustable-sliding-knot-necklace-tutorial/
- ↑ https://www.savvyhomemade.com/make-a-homemade-necklace-or-pendant-the-basics/
- ↑ http://jewelrymakingjournal.com/adjustable-sliding-knot-necklace-tutorial/
About This Article

To tie necklace slipknots, start by laying the necklace on a flat surface. Place the ends of the necklace on top of the cord to form 2 layers. Next, fold the cord in half 4 to 5 inches from one end. Lie the V-shaped fold on top of the straight cord, then take the short end of the V-fold cord and loop it around the 2 other cords. Wrap the V-fold cord 2 to 3 times around the other cords to make nice tight wraps. Thread the end of the V-fold through the wrapped cord and then through the straight cord to make the knot. Finally, pull the end tight with your fingers to secure it. Repeat the folding and looping process on the other side to make your second knot. To learn how to decorate your slipknot, keep reading!