This article was co-authored by wikiHow Staff. Our trained team of editors and researchers validate articles for accuracy and comprehensiveness. wikiHow's Content Management Team carefully monitors the work from our editorial staff to ensure that each article is backed by trusted research and meets our high quality standards.
There are 9 references cited in this article, which can be found at the bottom of the page.
The wikiHow Video Team also followed the article's instructions and verified that they work.
This article has been viewed 39,113 times.
Learn more...
Tying a knot in a single strand after you've threaded your embroidery needle is helpful when you're starting a new project. There are two main ways to tie the knots, and all you'll need is a needle, thread, and scissors. Make a simple knot for an easy method, or wrap the thread around your needle to make a knot that's big. The most important thing to remember is to make a knot that's thick enough that it won't slide through the eye of your needle. With just a few seconds of time, your thread will be knotted and ready!
Steps
Creating a Simple Knot
-
1Thread the needle by sliding the thread through the needle’s eye. Cut a strand of thread long enough for your specific project using sharp scissors so the end doesn’t fray. Carefully slide the end of the thread through the eye of the needle and pull the thread through so it doesn’t fall back out.[1]
- Wetting the end of your thread makes it easier to slip through the eye hole.
-
2Wrap the thread around your finger to form a small loop. Take the end of the thread where you’d like to form the knot and wrap it around your finger. Hold the thread together and take your finger out to reveal a loop.[2]Advertisement
-
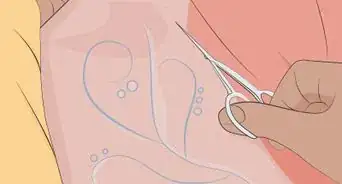
3Push the tail end of the thread through the loop. Tuck the loose end of your thread through the loop. If the thread is too short to go through the loop and stay there, try making your loop over again and leaving yourself more thread to stick through the loop.[3]
-
4Pull the thread tight to form the knot. Tug on the end of the thread that you put through the loop so that it tightens. Once the thread is pulled as tightly as possible, you have your knot![4]
-
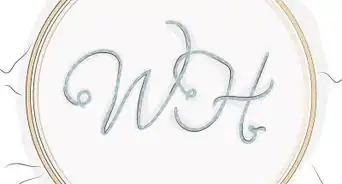
5Add 2-3 more knots on top of the first knot to make it thicker, if needed. If your thread is especially thin, it’s important to make a couple more knots on top of the first one so that your knot won’t slide through the eye of the sewing needle. Repeat the same steps to make additional knots, but be careful to tie your knots right on top of the first one so that it creates a larger clump.[5]
- Guide the second or third knots over the first knot using your fingers.

Wrapping Thread around the Needle
-
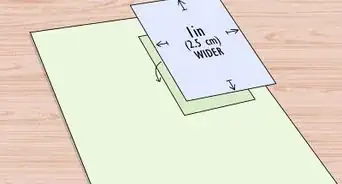
1Thread your needle so it’s ready to form a knot. Cut a strand of thread in whichever color you’d like to use for your project. Slide an end of the thread through the eye of the needle and pull that end through 2–3 in (5.1–7.6 cm) so it won’t fall back through.
- It helps to wet the end of the thread before you slide it through the needle’s eye.
- Your knot will be made at the end of the thread.
-
2Make a small ‘X’ with the needle and loose end of the thread. Form a large loop so that the tip of your needle is facing the end of your thread. With just the tips of the needle and thread, form an 'X' shape by crossing the needle underneath the end of the thread. Hold this up in the air so you can manipulate it easier.[6]
- Hold your needle in one hand and the loose thread end in the other hand.
-
3Hold the loose thread end against the needle so it doesn’t move. Use your finger to press the thread against the needle to keep it in place. It’s important that this end doesn’t move around so that your knot forms easily.[7]
-
4Wrap the thread around the needle point 2-3 times. Take the thread near the tip of the needle and begin wrapping it around the needle. Do this 2-3 times, or until your knot is bigger than the needle's eye so it won't slip through. Wrap the thread tightly so it’s right against the needle.[8]
- Wrapping the thread around the needle 3 times will give you a bigger knot than only wrapping it around the needle twice.
-
5Pull the needle up while holding onto the wrapped thread to make a knot. Use one finger to hold the wrapped section of thread in place while you use the other hand to pull up on the needle. The wrapped section will slide down and off the needle. Keep pulling the needle up until the wrapped thread forms a knot near the end.[9]
- This is similar to how you might make a French knot while embroidering.

Warnings
- Be careful when working with the needle so that you don't accidentally poke your fingers.⧼thumbs_response⧽

References
- ↑ https://www.youtube.com/watch?v=PQklQCBWEWI#t=5s
- ↑ https://www.youtube.com/watch?v=nUl3YN3cFYY#t=5m45s
- ↑ https://www.youtube.com/watch?v=PQklQCBWEWI#t=15s
- ↑ https://www.youtube.com/watch?v=nUl3YN3cFYY#t=5m51s
- ↑ https://certainslantoflight.com/the-foundations-of-great-embroidery-splitting-floss-threading-the-needle-and-stretching-your-fabric/
- ↑ https://www.youtube.com/watch?v=PQklQCBWEWI#t=1m2s
- ↑ https://www.youtube.com/watch?v=PQklQCBWEWI#t=1m8s
- ↑ https://www.youtube.com/watch?v=iPbSiyKXrbI#t=5s
- ↑ https://www.youtube.com/watch?v=iPbSiyKXrbI#t=8s
About This Article