This article was co-authored by wikiHow Staff. Our trained team of editors and researchers validate articles for accuracy and comprehensiveness. wikiHow's Content Management Team carefully monitors the work from our editorial staff to ensure that each article is backed by trusted research and meets our high quality standards.
There are 11 references cited in this article, which can be found at the bottom of the page.
The wikiHow Video Team also followed the article's instructions and verified that they work.
This article has been viewed 204,822 times.
Learn more...
Tie dyed socks are fun and easy to make. While the entire family can enjoy this activity, some of the chemicals used can cause skin irritation, so adult supervision is advised. Once your dye is mixed, you’ll be ready to prepare the socks for dyeing. After that, you only need to apply the dye, and you’ll soon have a spiffy pair of tie dye socks.
Steps
Mixing the Dye
-
1Protect yourself and your work area. Wear rubber gloves and clothes that you won’t mind getting dye on. Cover your work area with a drop cloth, large sheets of newspaper, or a layer of cardboard.
- Fabric dye can stain your clothes, your skin, and just about any other surface.
- Rubber gloves will protect your hands from dye stains and will also shield them from caustic soda ash used later.
- You may also want to wear a smock or apron over your clothes to add another layer of protection against the dye. Tie dying can be a messy process.
- Another alternative is to dye outdoors so there’s no chance of staining indoor tables and floors.
-
2Mix tie dye with warm water in a bowl. Dissolve your nontoxic fabric dye in water according to the instructions on the package of dye. Some dyes may need to be heated on a stovetop. Warm water from the tap may be sufficient for others.
- While dye requirements will vary, generally you’ll mix 2 tsp (10 ml) of dye with 1 tbsp (15 ml) salt and 1 cup (237 ml) of warm to hot water.
- Most dyes should be mixed thoroughly with a fork or whisk. Poorly mixed dye may be thin or inconsistent.
- Repeat this procedure for as many colors as you want. A color scheme of one to four colors is usually best. Including more may look too busy.[1]
Advertisement -
3Pour your dye into bottles. Transfer each concentrated dye solution into an empty squeeze bottle, like the kind used for condiments. These bottles can be bought at most grocery stores and general retailers.[2]
- You could also transfer the dye into small bowl or buckets and dip-dye your socks instead of squirt-dying them.
- Dip dying works especially well if you only plan on using one or two colors.
-
4Add more hot water as needed. Pour enough hot water into the bottle to fill it to the top. After that, seal the bottle and shake it well to evenly distribute the dye. Make sure the lid is closed tightly or your finger is covering it or else you’ll end up spraying dye everywhere.
- If dip-dying your socks, add enough water to each bowl as needed in order to cover a couple of socks.

Preparing the Socks for Dyeing
-
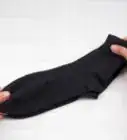
1Choose clean, white, cotton socks. Wash your socks as you would normally before you tie dye them. Cotton holds dye the most effectively, so the socks you choose should be at least 80 percent cotton. Spandex and polyester will not dye.[3]
- You need to use white socks in order to get the brightest and most visible dye color.
-
2Combine soda ash and water. But first, put on some rubber gloves. Soda ash is caustic and can cause burns. Use a long-handled wooden spoon to mix roughly ¾ cup (177 ml) of the soda ash and 1 gallon (3.8 L) of warm water in a large bucket.
- Soda ash can be harmful to small children and pets. Keep an eye on the solution at all times.
- To dispose of soda ash, dilute it with water and then mix in the neutralizing agent that came with the ash. After that, dilute the solution with a large amount of water and pour it down the drain.[4]
- Soda ash is a dye fixer. It ensures effective bonding of the dye with the fabric. Not all fabric dyes will require the use of soda ash, but most do.
-
3Soak your socks uncovered in the solution for at least 5 minutes. You can soak your socks in the soda ash solution for up to an hour or so. However, once the fabric is removed, it should be dyed within 30 minutes of the soda ash treatment.[5]
- Stir the socks every now and then with the long-handled spoon as they soak.
- When done, remove the socks from the solution with the spoon and wring them out while wearing gloves.
-
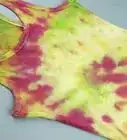
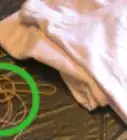
4Tie your socks off. Use rubber bands to tie off sections of your socks so that the dye will create patterns. Tying rubber bands in various ways will yield different designs in the tie dye. Common rubber band patterns include:
- Stripes, made by wrapping three to four rubber bands around the foot of the sock and along the leg of the sock as well.
- Spirals, made by gathering the fabric into a twist and then fastening the twist with rubber bands.[6]
- Circles, made by pinching off a section of the material and tying it off about 1 inch (2.5 cm) down with a single rubber band. This works well for heels.
- Ring patterns, made by slipping buttons or pennies into the socks. Tie these off with rubber bands to hold the button or penny when dyeing.[7]


Dying the Socks
-
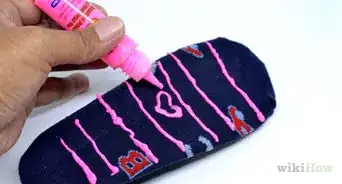
1Apply the dye. Lay the tied-off socks flat on your work surface. Squirt the dye onto your socks using your squirt bottles. Apply the dye around the tied-off portions of the material. Use the nozzle of the bottle to direct dye into the fabric folds.[8]
- As you apply the dye, try to avoid leaving too many patches of empty, colorless space in between different colors.
- If dunk-dying the socks, place them in your bowl of dye and let them sit anywhere from 1 to 20 minutes. You can create multi-colored socks by dipping one section at a time into various colors.[9]
-
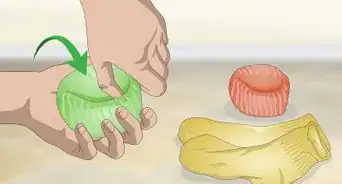
2Place the socks in plastic bags. Seal the socks in plastic bags and let them sit in a warm area for 24 hours. A warm temperature will bring out a vibrant color in the dye. When you remove the socks from the bag the following day, the bag should be steamy and warm inside.
- If the weather is warm and bright, you can sit the socks out in direct sunlight as the dye sets.
- During seasons of cooler weather, you should let the socks rest in a warm indoor location.
- At minimum, the dyed socks should sit in an area that is at least 70 °F (21 °C).
- If the dye is taking too long to dry in the plastic bag, insert paper towels in with the socks to soak up excess dye.
-
3Rinse the socks in cool water. After the dye has set, remove the socks from the bag and strip away the rubber bands, buttons, and pennies. Place the socks under cool running tap water and rinse them until the water runs clear.
- If you have a conventional washing machine, you could also put the socks through a cool rinse cycle.
- If you have an energy efficient washing machine that does not use as much running water, hand-rinsing your socks is a better option.[10]
-
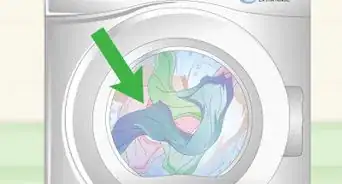
4Wash the socks in cold water. After rinsing the socks, wash them separately in your washing machine using cold water and regular detergent. This will help lock the dye into the fibers of the fabric so the colors last longer.
- Wash your socks separately a few times before throwing them in with other other clothes to prevent the dye from running.
- Your socks should be dried according to their fabric care instructions. In most cases, using your dryer is perfectly fine.

Community Q&A
-
QuestionDo I have to use soda ash?
 Community AnswerNo, you don't have to. Soda ash is used only if you want the colors to be strong.
 -
QuestionWhere could I buy plain white socks and tie dye from?
 Community AnswerWalmart or stores like it for the socks (they need to be cotton). You can get tie dye from craft stores like AC Moore.
 -
QuestionDo they make black cotton socks that are “bleachable”? Do they have to be white?
 Community AnswerYou don't have to use white but the color will show up on lighter colors, and depending on the color, it might not even show up on black. But you can bleach black socks although it probably won't turn out white, it will most likely turn into a light orangey pink color.
Warnings
- Always wear gloves when handling dye and soda ash. Dye can stain easily and soda ash can cause skin irritation.⧼thumbs_response⧽
- It is wise to wash your tie dyed socks apart from other clothes for the first few washings. It can take quite some time before the dye no longer runs.⧼thumbs_response⧽
Things You'll Need
- Rubber gloves
- Fabric dye
- Apron or smock
- Mixing bowls
- Buckets
- Water
- Salt
- Squeeze bottles
- Long-handled wooden spoon
- Soda ash
- Rubber bands
- Buttons or pennies (optional)
- Resealable plastic bags
- Washing machine
- Detergent


References
- ↑ http://www.sciencebuddies.org/science-fair-projects/project_ideas/Chem_p019.shtml?from=Blog#procedure
- ↑ https://www.ritdye.com/techniques/creative-techniques/how-to-tie-dye-using-the-squirt-bottle-method/
- ↑ http://www.pburch.net/dyeing/FAQ/socks.shtml
- ↑ http://www.jsia.gr.jp/data/handling_01e.pdf
- ↑ https://www.stevespanglerscience.com/lab/experiments/the-science-of-tie-dye/
- ↑ http://www.bystephanielynn.com/2015/06/tie-dye-folding-techniques-16-vibrant-tie-dye-patterns-tiedyeyoursummer.html
- ↑ http://www.guidepatterns.com/how-to-tie-dye-socks-in-14-unique-ways.php
- ↑ http://craftingagreenworld.com/2011/07/24/how-to-tie-dye/3/
- ↑ http://pbskids.org/zoom/activities/do/tiedyedsocks.html
About This Article

To tie-dye socks, start by mixing non-toxic fabric dye with warm water and salt in a bowl, using a separate bowl for each color you want to use. Then, soak some white, cotton socks in a bowl of soda ash and water for at least 5 minutes, which will help the dye adhere to them. Next, remove the socks, and tie up different sections of each sock with rubber bands so that the dye creates patterns on them. Finally, dip the socks in the dye, and let them sit in a plastic bag for 24 hours before washing them. To learn how to tie-dye socks using a squeeze bottle, scroll down!