This article was co-authored by Daniel Stoescu. Daniel Stoescu is a Master Electrician and the Owner and Operator of Home Tech Solutions, LLC in Hampton, Virginia. With over a decade of experience, Daniel specializes in wiring residential, commercial, and light industrial structures. The Home Tech Solutions team has over four decades of combined experience and offers comprehensive solutions for residential electrical needs.
There are 9 references cited in this article, which can be found at the bottom of the page.
wikiHow marks an article as reader-approved once it receives enough positive feedback. This article received 22 testimonials and 94% of readers who voted found it helpful, earning it our reader-approved status.
This article has been viewed 390,790 times.
Capacitors are voltage storage devices used in electronic circuits, such as those found in heating and air conditioning fan motors and compressors. Capacitors come in 2 main types: electrolytic, which are used with vacuum tube and transistor power supplies, and non-electrolytic, which are used to regulate direct current surges. Electrolytic capacitors can fail by discharging too much current or by running out of electrolyte and being unable to hold a charge. Non-electrolytic capacitors most often fail by leaking their stored charge.[1] There are several ways to test a capacitor to see if it still functions as it should.
Steps
Using a Digital Multimeter With Capacitance Setting
-
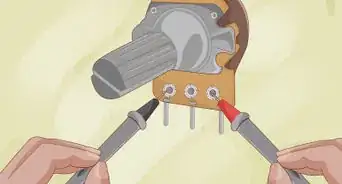
1Disconnect the capacitor from the circuit it is part of.[2]
-
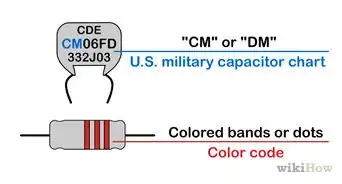
2Read the capacitance value on the outside of the capacitor. The unit for capacitance is the farad, which is abbreviated with a capital “F.” You may also see the Greek letter mu (µ), which looks like a lowercase “u” with a tail in front of it. (Because the farad is a large unit, most capacitors measure capacitance in microfarads; a microfarad is a millionth of a farad.)Advertisement
-
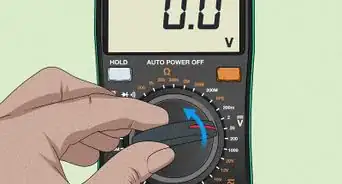
3
-
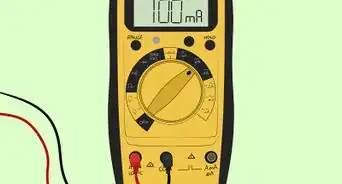
4Connect the multimeter leads to the capacitor terminals. Connect the positive (red) multimeter lead to the capacitor anode lead and the negative (black) lead to the capacitor cathode lead. (On most capacitors, especially electrolytic capacitors, the anode lead is longer than the cathode lead.)[5]
- You might need to press a function button to activate a measurement.[6]
-
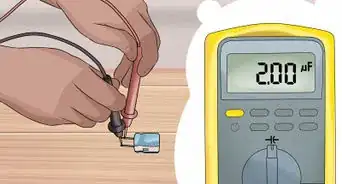
5Check the multimeter reading. If the capacitance reading on the multimeter is close to the value printed on the capacitor itself, the capacitor is good. If it’s significantly less than the value printed on the capacitor, or zero, the capacitor is dead.[7]


Using a Digital Multimeter Without Capacitance Setting
-
1Disconnect the capacitor from its circuit.
-
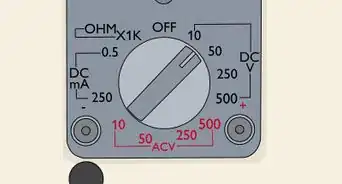
2Set your multimeter to its resistance setting. This setting may be marked with the word “OHM” (the unit for resistance) or the Greek letter omega (Ω), the abbreviation for ohm.
- If your unit has an adjustable resistance range, set the range to 1000 ohm = 1K or higher.
-
3Connect the multimeter leads to the capacitor terminals. Again, connect the red lead to the positive (longer) terminal and the black lead to the negative (shorter) terminal.
-
4Observe the multimeter reading. Write down the initial resistance value, if you wish. The value should soon revert to what it was before you connected the leads.
-
5Disconnect and reconnect the capacitor several times. You should see the same results as on the first test. If you do, the capacitor is good.
- If, however, the resistance value does not change on any of the tests, the capacitor is dead.[8]


Using an Analog Multimeter
-
1Disconnect the capacitor from its circuit.
-
2Set your multimeter to its resistance stetting. As with the digital multimeter, it may be marked “OHM” or with an omega (Ω).
-
3Connect the multimeter leads to the capacitor terminals. Red lead to positive (longer) terminal, black lead to negative (shorter) terminal.
-
4Observe the results. Analog multimeters use a needle to display their results. How the needle behaves determines whether or not the capacitor is good.
- If the needle initially shows a low resistance value then gradually moves towards infinity, the capacitor is good.
- If the needle shows a low resistance value and doesn’t move, the capacitor has been shorted out. You’ll need to replace it.
- If the needle shows no resistance value and doesn’t move or a high value and doesn’t move, the capacitor is an open capacitor (dead).[9]


Testing a Capacitor With a Voltmeter
-
1Disconnect the capacitor from its circuit. You may, if you wish, disconnect only 1 of the 2 leads from the circuit.[10]
-
2Check the capacitor’s voltage rating. This information should be printed on the outside of the capacitor as well. Look for a number followed by a capital “V,” the symbol for “volt.”
-
3Charge the capacitor with a known voltage less than, but close to, its rated voltage. For a 25V capacitor, you could use a voltage of 9 volts, while for a 600V capacitor, you should use a voltage of at least 400 volts. Let the capacitor charge for a few seconds. Be sure to connect the positive (red) lead from the voltage source to the positive (longer) capacitor terminal and the negative (black) lead to the negative (shorter) terminal.
- The greater the discrepancy between the capacitor’s voltage rating and the voltage you’re charging it with, the longer it will take to charge. Generally, the higher voltage of the power supply you have access to, the higher the voltage ratings of the capacitors you can test with ease.[11]
-
4Set your voltmeter to read DC voltage (if it’s capable of reading both AC and DC).
-
5Connect the voltmeter leads to the capacitor. Connect the positive(red) lead to the positive (longer) terminal and the negative (black) lead to the negative (shorter) terminal.
-
6Note the initial voltage reading. This should be close to the voltage you supplied the capacitor with. If it isn’t, the capacitor is no good.
- The capacitor will discharge its voltage into the voltmeter, causing its reading to drop back to zero the longer you have the leads connected. This is normal. Only if the initial reading is much lower than the expected voltage should you be concerned.[12]


Shorting the Capacitor Terminal
-
1Disconnect the capacitor from its circuit.
-
2Connect leads to the capacitor. Again, connect the positive (red) lead to the positive (longer) terminal and the negative (black) lead to the negative terminal.
-
3Connect the leads to a power supply for a short time. You should leave these connected for no longer than 1 to 4 seconds.
-
4Disconnect the leads from the power supply. This is to prevent damage to the capacitor when you perform the task and to reduce the likelihood of your getting an electric shock.
-
5Short the capacitor terminals. Be sure to wear insulated gloves and not to touch anything metal with your hands when you do this.
-
6Look at the spark created when you shorted the terminal. The possible spark will give you an indication of the capacity of the capacitor.
- This method will only work with capacitors that can hold enough energy to produce a spark when shorted.
- This method is not recommended because it only can be used to determine if the capacitor can hold a charge, capable of sparking when shorted, or not. It can not be used to check if the capacity of the capacitor is within the specifications.
- Using this method on larger capacitors could result in serious injury or even death!


Community Q&A
-
QuestionHow can I test a fuel pump?
 Community AnswerIf electric, when you turn the key to the "ON" position you should be able to hear a clicking from the tank. If it clicks and the car wont run, open the line at one end. This is the fuel line that feeds the fuel rail. Now have someone watch the line as you turn your key to on. If no fuel comes out find the fuel filter, disconnect the end that feeds the filter and have someone turn the key just to the "on" position. Be careful -- gas could shoot out of the line! If gas comes out, change your filter then see if it starts. If no gas comes out of the line, I would change the fuel pump out. Please be careful when messing with any fuel accessories.
 -
QuestionIf the plastic housing on a capacitor is busted, is that a sign of a bad capacitor?
 Community AnswerYes, it is. That is the easy way of checking for bad capacitors. Busted caps or stuff leaking out are good signs of a bad capacitor.
Things You’ll Need
- Analog or digital multimeter (or dedicated ohmmeter)
- Voltmeter
- Insulated gloves
- Power supply, preferably an adjustable power supply
- Metal tool for shorting capacitor test (such as a screwdriver)
- Capacitor to test
References
- ↑ https://electric-shocks.com/testing-capacitor/
- ↑ Daniel Stoescu. Master Electrician. Expert Interview. 16 August 2021.
- ↑ Daniel Stoescu. Master Electrician. Expert Interview. 16 August 2021.
- ↑ Daniel Stoescu. Master Electrician. Expert Interview. 16 August 2021.
- ↑ http://www.learningaboutelectronics.com/Articles/How-to-test-a-capacitor
- ↑ Daniel Stoescu. Master Electrician. Expert Interview. 16 August 2021.
- ↑ http://electricaltechnology.org/2013/06/how-to-check-capacitor-with-digital.html
- ↑ http://electricaltechnology.org/2013/06/how-to-check-capacitor-with-digital.html
- ↑ http://electricaltechnology.org/2013/06/how-to-check-capacitor-with-digital.html
- ↑ www.angelfire.com/electronic/funwithtubes/Testin g_caps.html
- ↑ www.angelfire.com/electronic/funwithtubes/Testing_c aps.html
- ↑ http://www.learningaboutelectronics.com/Articles/How-to-test-a-capacitor
- ↑ http://www.learningaboutelectronics.com/Articles/How-to-test-a-capacitor
- ↑ https://electric-shocks.com/testing-capacitor/
- ↑ http://www.hvac-for-beginners.com/capacitor-testing.html
About This Article

To test a capacitor using a digital multimeter with a capacitance setting, start by disconnecting the capacitor from the circuit it’s a part of. Next, read the capacitance value on the outside of the capacitor, and set your multimeter to its capacitance setting. Then, connect the multimeter leads to the capacitor terminals. Once everything is hooked up, check the reading. If it’s close to the value printed on the capacitor, it’s good. However, if the number is significantly less than the value printed on the capacitor setting, it’s dead. To learn how to use a digital multimeter without capacitance setting, keep reading!