This article was co-authored by wikiHow Staff. Our trained team of editors and researchers validate articles for accuracy and comprehensiveness. wikiHow's Content Management Team carefully monitors the work from our editorial staff to ensure that each article is backed by trusted research and meets our high quality standards.
There are 11 references cited in this article, which can be found at the bottom of the page.
The wikiHow Video Team also followed the article's instructions and verified that they work.
This article has been viewed 8,966 times.
Learn more...
Unfortunately, single-use plastic has become the bane of human existence. If you’re trying to cut back on the amount of plastic you use at home, it’s not that difficult. There are a lot of ways you can store vegetables without using plastic. However, you may find it harder to purchase vegetables that aren’t somehow wrapped or stored in plastic. Once you get those veggies home, use the following ideas to store them using glass or metal containers, silicone resealable bags, or cotton produce bags.
Steps
Getting Veggies Ready for Storage
-
1Use cotton or mesh produce bags when shopping. Purchase cotton or mesh produce bags at a grocery store, a store that specializes in green products, or online. They come in a variety of sizes and most come with a drawstring to tie them closed. Use them instead of the plastic bags supplied by the store or farmer’s market when shopping for produce.[1]
- You can also buy terry cloth bags that not only work as shopping bags but as storage bags as well.
-
2Remove all twist ties or elastic bands from your veggies. Before you put any of your veggies away, remove any bindings (tie tabs, twist ties, elastics, tape) from your them. Also, remove any other ‘unnatural’ items attached to your veggies (stickers, labels, UPC codes) or containers in which your veggies are stored (mesh bags, plastic containers).[2]
- Unfortunately, there may be situations where you find it nearly impossible to purchase veggies without some sort of plastic packaging.
- Look for veggies that have the least amount of packaging as possible. Buy veggies in the bulk or open-stock section.
- Remember to recycle or reuse any packaging you can’t help but buy.
Advertisement -
3Cut the greens off veggies like carrots and radishes. When you get your carrots, turnips, radishes, and parsnips home, cut off any greens still attached before you store them. In some cases, you can keep the greens to use separately (in salads) or put them in the compost.[3]
- Leave corn-on-the-cob inside their husks for storage. Don’t remove the husks till you’re ready to cook them.
- Purchase brussel sprouts on their stems if you’re able to. The stems help keep the brussel sprouts fresh longer.
-
4Avoid cleaning or rinsing veggies before storing them. In general, moisture encourages bacteria growth. If you wash your veggies before storing them, you’re adding moisture. That moisture may cause bacteria to grow more quickly on your veggies, which will make them rot faster. In order to store your veggies for as long as possible, don’t wash them until you’re ready to use or eat them.[4]
- If your veggies are dirty and you want to clean them up before storing them, wipe them off with a dry towel or even a soft brush.
-
5Separate fruits and veggies for storage to prevent accelerated ripening. One of the cardinal rules of vegetable storage is to never keep your vegetables and fruits together. Unfortunately, a lot of fruits naturally produce ethylene gas and many veggies are sensitive to it. Storing them together will ripen and then rot your veggies faster than if they're stored separately.[5]
- The following fruits produce ethylene: apples, bananas, cantaloupe, nectarines, papayas, peaches, pears, and plums.
- The following vegetables are sensitive to ethylene: asparagus, broccoli, cabbage, cauliflower, celery, collard greens, green beans, kale, lettuce, mushrooms, okra, potatoes, spinach, and yellow squash.


Storing Veggies at Room Temperature
-
1Keep veggies at room temperature if you’re using them within 1-3 days. Almost every kind of vegetable can be kept on the counter, at room temperature, for a short amount of time. If you’re going to be using your veggies within 1-3 days, you don’t need to store them in the fridge. Just keep them on the counter, out of the sunlight.[6]
- When keeping your veggies on the counter, be careful not to crowd them or pile them together. Veggies prefer ventilation and air circulation.
-
2Store asparagus, celery, and leeks in a glass with water. Vegetables like asparagus, celery, fennel, kale, collard greens, chard, and leeks can all be stored in a glass of water on the counter. Arrange the veggies in a glass similar to the way you would a bunch of flowers in a vase. Asparagus, fennel, kale, collard greens, and chard will store for a week on the counter before they should be moved to the fridge.[7]
- When and if moved to the fridge, you can keep the veggies standing up in a glass of water.
- Leeks should only have enough water in the glass to cover the bottom of their stems. All other veggies can have the glass at least half full of water.
-
3Place tomatoes, cabbage, and zucchini in a cool place. If cabbage, sweet peppers, or zucchini are going to be used within a few days, you can keep them on the counter in a cool spot. Eggplant can be stored on a counter as well, but can also be put in the crisper. Summer squash and tomatoes should always be stored on the counter in a cool spot. If you don’t use cabbage, sweet peppers, or zucchini within a few days, move them to the fridge.[8]
- You can store summer squash and zucchini on the counter even if it’s been cut or sliced open.
-
4Keep garlic, onions, and potatoes in a pantry or cellar. Garlic, green tomatoes, onions, potatoes, sweet potatoes, winter squash, beets, carrots, parsnips, turnips, and rutabagas can all be stored in a cool, dark location. A cool, dark location includes a cupboard, pantry, cellar, or basement. Don’t stack or pile the onions on top of each other. Store potatoes inside a box, basket, or paper bag.[9]
- The cool, dark location should be dry for every vegetable except rutabagas. If the location isn’t humid, store your rutabagas in the fridge.


Keeping Veggies in the Fridge
-
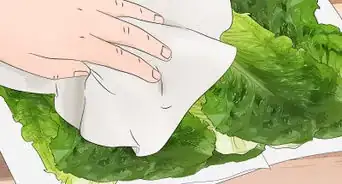
1Wash and dry greens before storing them in the fridge. If you need to store any type of salad greens, especially those that are cut or ripped up, rinse and wash them first. Salad greens include any type of lettuce, arugula, and spinach. Wash them by dunking them in a bowl of cold water. If possible, use a salad spinner to wring out as much moisture as possible, then lay them on a towel to finish drying.[10]
- In order to properly wash and dry heads of lettuce, you will need to peel the leaves off.
-
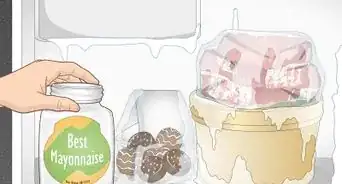
2Use a glass or metal airtight container with a damp cloth for salad greens. Artichokes, fennel, and salad greens can all be put inside an airtight glass or metal container along with a damp cloth and stored in the fridge. If you’ve cut the greens off any other veggies (carrots, beets), you can also store them using this method.[11]
- Basil can also be stored in an airtight container with a damp cloth but should be kept on the counter instead.
- Arugula, on the other hand, should be stored in an open container with a dry cloth. Do not allow arugula to get damp while in the fridge.
-
3Place beans, broccoli, and snap peas in an open container. Beans, broccoli, broccoli rabe, corn, snap peas, and spinach can all be stored in an open container left in the fridge. However, beans, broccoli rabe, and corn should all be used fairly quickly as they do not last very long, even in the fridge.[12]
- Remember to leave your corn-on-the-cob in its husk until you’re ready to cook it.
- Spinach loves the cold. Never put spinach anywhere warm.
-
4Put beets and leeks in a damp towel and an open container. Beets (without their greens), brussel sprouts (without their stalks), leeks, rhubarb, green beans, radicchio, radishes (without their greens), and turnips (without their greens) can all be stored in an open container in the fridge. Cover the open container with a damp cloth or towel to keep the veggies moist.[13]
- Check the cloth or towel regularly to make sure it stays damp.
-
5Wrap broccoli and cucumbers in a damp towel. Broccoli, carrots, celery root, cucumbers, parsnips, and zucchini can all be stored in the fridge wrapped in a damp towel or cloth. For carrots only, place the wrapped carrots inside an airtight container. The other veggies can be left in the fridge with just the towel or cloth.[14]
- Make sure you check the cloth or towel regularly and do not let it dry out.
- You can also store these veggies inside a cloth produce bag in the fridge. The cloth bag should keep some moisture inside to keep the veggies fresh.
-
6Store cauliflower and herbs in an airtight container in the fridge. Cauliflower, fava beans, herbs, okra, and rutabagas can all be put inside an airtight container and stored in the fridge. These items do not need to be kept damp while inside the container.[15]
- Cauliflower and okra should be used as soon as possible, they won’t store for a long time.
- Wrap the okra inside a dry towel or cloth before putting it into the container.
-
7Put sweet peppers and spring onions in the fridge. When storing sweet peppers for more than 1-3 days, put them in your fridge. Spring onions should also be stored in the fridge. Both veggies can be left loose, they do not need to be wrapped or put inside a container.[16]
- It’s very important not to wash sweet peppers before you’re ready to use them. Peppers don’t like water and washing them will reduce how long they’ll stay fresh.


Freezing Veggies
-
1Purchase and freeze vegetables instead of buying them frozen. Unfortunately, most frozen fruits and vegetables found at the grocery store are packaged inside plastic bags. In order to reduce your use of plastic, buy and freeze vegetables yourself. You can freeze almost any veggies, except artichokes, Belgian endive, eggplant, lettuce, non-mashed potatoes, radishes, sprouts, and sweet potatoes.[17]
- The one downside to freezing your own veggies is that you’ll only be able to purchase veggies that are currently in season.
- When looking for veggies to freeze, look for those that are young and tender.
-
2Wash all your vegetables before preparing them for freezing. Make sure all the veggies are completely washed and dried before you proceed to prepare them for long-term storage. Place broccoli, brussel sprouts, and cauliflower into a bowl of water with 1 tsp (4.9 mL) of salt for 15 minute to remove any insects that may be hiding inside.[18]
- Depending on how you’re going to prepare the veggies, you may not need to completely dry them before moving to the next step.
-
3Trim or cut the vegetables as needed before freezing. Remove or trim the ends of veggies, remove green tops, remove inedible stems or leaves, remove husks, and remove outer skins. Also, chop your veggies into smaller pieces.[19]
- You can find more specific instructions on what is required for each specific vegetable here: https://www.halfyourplate.ca/wp-content/uploads/2014/12/CPMA.Freezing_Guide_Fresh_Vegetables_EN.pdf.
-
4Dip your vegetables in boiling water to blanch them. Boil a large pot of water on the stove. Place your veggies into the boiling water and stir them with a wooden spoon. Cover the pot with its lid and allow the veggies to cook for the required amount of time (found here: https://www.halfyourplate.ca/wp-content/uploads/2014/12/CPMA.Freezing_Guide_Fresh_Vegetables_EN.pdf).[20]
- For the best results, blanch the veggies for the required amount of time which is between 1 and 11 minutes.
- Do not blanch the following veggies; there are other cooking methods that should be used before freezing them: beets, garlic, herbs, mushrooms, onions, sweet peppers, spaghetti squash, tomatoes.
-
5Place the vegetables into an ice bath after blanching them. Use a wooden or slotted spoon to remove the veggies from the boiling water and put them into a large bowl of ice water. The ice water will instantly stop the veggies from cooking.[21]
- There is no required amount of time the veggies need to stay in the ice water.
- The veggies can stay in the ice water until you’re ready to move onto the next step.
-
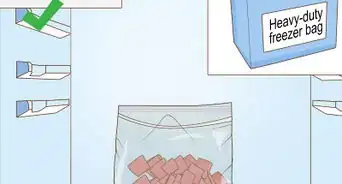
6Drain the blanched vegetables and put them resealable containers. Use a colander to remove the veggies from the ice-cold water. Lay them on a towel to dry further or put them in a salad spinner. Put the veggies into a resealable, reusable container or bag. Then place the container or bag in the freezer and leave for up to a year.[22]
- You can use glass or metal containers in the freezer or silicone bags. Although, some glass and metal containers have plastic lids.

Things You'll Need
- Cotton or mesh produce bags
- Knife
- Cutting board
- Glass or vase
- Paper bag
- Box or basket
- Dishtowels or cloths
- Airtight glass or metal containers
- Large bowl
- Salad spinner
- Large pot with lid
- Wooden spoon
- Colander
- Reuseable/resealable silicone bags (optional)


-Step-11.webp)
References
- ↑ https://www.thegoodtrade.com/features/keeping-leafy-greens-fresh-without-plastic
- ↑ https://myplasticfreelife.com/wp-content/uploads/images/Berkeley%20Farmers%20Market%20Tips%20for%20Storing%20Produce.pdf
- ↑ https://myplasticfreelife.com/wp-content/uploads/images/Berkeley%20Farmers%20Market%20Tips%20for%20Storing%20Produce.pdf
- ↑ https://www.washingtonpost.com/graphics/2018/voraciously/ten-fruits-and-vegetables-youre-storing-wrong/
- ↑ https://zerowastechef.com/2017/01/20/store-produce-without-plastic/
- ↑ https://zerowastechef.com/2017/01/20/store-produce-without-plastic/
- ↑ https://myplasticfreelife.com/wp-content/uploads/images/Berkeley%20Farmers%20Market%20Tips%20for%20Storing%20Produce.pdf
- ↑ https://myplasticfreelife.com/wp-content/uploads/images/Berkeley%20Farmers%20Market%20Tips%20for%20Storing%20Produce.pdf
- ↑ https://myplasticfreelife.com/wp-content/uploads/images/Berkeley%20Farmers%20Market%20Tips%20for%20Storing%20Produce.pdf
- ↑ https://www.greenmatters.com/home/2019/01/22/EFuhh5lJG/store-produce-without-plastic
- ↑ https://ecologycenter.org/wp-content/uploads/2013/06/Veggie.Storage.pdf
- ↑ https://www.greenmatters.com/home/2019/01/22/EFuhh5lJG/store-produce-without-plastic
- ↑ https://ecologycenter.org/wp-content/uploads/2013/06/Veggie.Storage.pdf
- ↑ https://www.greenmatters.com/home/2019/01/22/EFuhh5lJG/store-produce-without-plastic
- ↑ https://ecologycenter.org/wp-content/uploads/2013/06/Veggie.Storage.pdf
- ↑ https://www.greenmatters.com/home/2019/01/22/EFuhh5lJG/store-produce-without-plastic
- ↑ https://www.halfyourplate.ca/wp-content/uploads/2014/12/CPMA.Freezing_Guide_Fresh_Vegetables_EN.pdf
- ↑ https://www.halfyourplate.ca/wp-content/uploads/2014/12/CPMA.Freezing_Guide_Fresh_Vegetables_EN.pdf
- ↑ https://www.halfyourplate.ca/wp-content/uploads/2014/12/CPMA.Freezing_Guide_Fresh_Vegetables_EN.pdf
- ↑ https://www.halfyourplate.ca/wp-content/uploads/2014/12/CPMA.Freezing_Guide_Fresh_Vegetables_EN.pdf
- ↑ https://www.halfyourplate.ca/wp-content/uploads/2014/12/CPMA.Freezing_Guide_Fresh_Vegetables_EN.pdf
- ↑ https://www.halfyourplate.ca/wp-content/uploads/2014/12/CPMA.Freezing_Guide_Fresh_Vegetables_EN.pdf
About This Article

The best way to store vegetables without plastic depends on what kind of veggies you're working with and how soon you'll be eating them. If you'll be using your vegetables within 1-3 days, you can store them at room temperature. Keep tomatoes, cabbage, and zucchini in a bowl on your counter, and store garlic, onions, and potatoes somewhere dark, like your pantry or basement. For longer storage, put your veggies in the fridge. Wash and dry greens, cauliflower, and herbs, then transfer them to an airtight glass or metal container. Beans, broccoli, and snap peas can all go in an open container in your fridge. You can also wrap broccoli, cucumbers, carrots, and zucchini in a damp paper towel and store them in the fridge. To learn how to store different vegetables in your freezer, scroll down!