This article was co-authored by Jon Depoian. Jon Depoian is a Skateboarding Instructor and the Owner of Intro2Skateboarding, an organization based in Orange County, California that provides professional private, home-school, after-school, birthday party, and summer camp skateboard lessons for beginners and experienced skateboarders alike. Jon has over 21 years of skateboarding experience and over 10 years of skateboard instruction experience. He also has extensive experience producing street skateboarding videos and skating competitions.
There are 9 references cited in this article, which can be found at the bottom of the page.
wikiHow marks an article as reader-approved once it receives enough positive feedback. In this case, 90% of readers who voted found the article helpful, earning it our reader-approved status.
This article has been viewed 171,982 times.
We’ve all seen people flying down the street on longboards. You may have tried it yourself at some point – and why wouldn’t you? Gathering speed and pumping adrenaline – combined with the wind flowing through your hair – can be quite an amazing experience for all ages. The trick, however, is knowing how to stop. Stopping can be a learning experience, but with the right amount of practice, you’ll be dominating hills and reaching top speeds.
Steps
Foot Braking
-
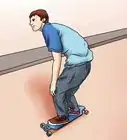
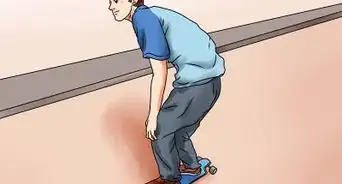
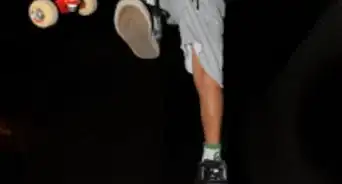
1Know when to foot brake. The foot brake should only be used at slow speeds. If you’re flying down a steep hill and about to carve into a turn, the last thing you want to do is hang your foot off your board. Reserve the technique for casual riding at the level ground and slower speeds.[1]
- Make sure you’re sporting proper footwear when using the foot brake. While using the foot brake is technically possible in thin-soled shoes and flip-flops, it’s not recommended. Using the foot brake involves sliding your shoe along the ground to come to a stop. Don’t use it as an opportunity to ruin shoes and gain friction burns!
-
2Shift your weight to your front foot.[2] To begin utilizing the foot brake, shift the majority of your weight (60 to 70 percent) to your front foot. It doesn’t matter whether you have your left or right foot forward. Use whichever foot you normally have out front.
- While it is possible to foot brake by leaning onto your back foot, it’s not recommended. Since longboarding involves going down hills, leaning back can unevenly distribute the weight in regards to the angle you’re traveling at. This means your back foot is much more likely to be unstable than your front.
Advertisement -
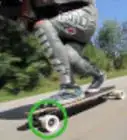
3Lift up your back foot and drag it along the ground next to the board. Begin dragging your back foot along the ground. Do not lean onto your back foot, as that would be stepping off the board (potentially at high speeds). Use a minimal amount of weight to merely drag the foot across the top of the ground.[3]
- Make sure the shoes you’re wearing have large enough soles to drag along the ground. You want to avoid any and all sort of foot injuries or wardrobe malfunctions. This technique could easily result in burned or scraped skin or ruined footwear.
-
4Apply pressure on the ground until you come to a stop. As you drag your foot, slowly apply pressure toward the ground and begin shifting your weight slowly from the front to the back.[4] Remember, the more pressure you apply, the faster you’ll come to a stop. Use your own judgment, taking into account factors like speed, distance and the angle at which you’re traveling.[5]
- Be mindful of the type of ground you’re skating on. Friction changes depending on the type of ground you’re traveling on, be it asphalt or concrete. For example, asphalt has a higher skid resistance than concrete, but concrete roads are more durable.[6]


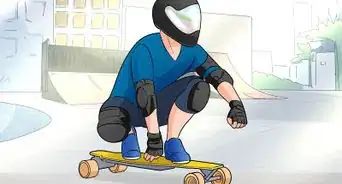
Powersliding
-
1Set up the slide. You’re going to begin a powerslide by turning or “carving” out to one side of the road. The turn is an integral part of the powerslide, as it involves drastically turning the board until it’s perpendicular to the road, causing you to skid or “slide” to a stop. The side you carve out to depends completely on how you situate yourself on your longboard. Carve out to the side your toes are pointing ("toeside") to complete one of the most basic standing powerslides.[7]
- Be mindful of traffic coming from both behind and ahead of you. You will not want to attempt to slide and stop with cars coming in either direction, as the powerslide is a tricky maneuver to perform until fully mastered.
-
2Shift your weight to your heels and the front of the board. After carving out and setting up your powerslide, shift your weight to your heels. This will mean you’re leaning more backward than forward, allowing your bodyweight to dictate the board’s slide. In addition, put the majority of your weight (60 to 70 percent) on your front foot. This will help when fully turning and fully sliding.
- The more weight on your back foot, the harder it will be to slide. While it’s a perfectly normal tendency to have some weight on the back of your board for stability, it’ll actually prevent you from completing a slide in the proper fashion.[8]
-
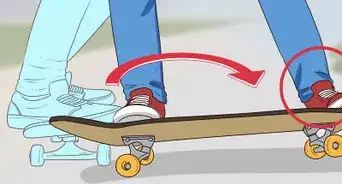
3Turn your hips and shoulders in the direction you’re sliding. After you’ve shifted your weight appropriately, swivel your hips and shoulders in the direction of the slide. If you’ve leaned back on your heels and toward the front of your board, use your front foot as a pivot. This will begin your perpendicular slide.
- Exercise caution in regards to anything that may be on the ground before performing this step. The tiniest piece of gravel, stone, wood, or glass can easily sabotage your slide and make for some gnarly road rash.
- Determine the speed in which you want to turn based on your speed. If you turn too fast, you’re just gong to turn 180 degrees without detracting any sort of speed. Ease into the turn slowly to attain a fuller stop.
-
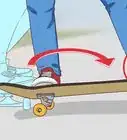
4Kick out with your back foot.[9] As you pivot with your front foot, kick out in the direction of your slide with your back foot. This will turn you 180 degrees and complete the slide. If performed correctly, you will have slid your board “sideways” along the road or path. Be prepared to skid and slide a short distance.
- It’s important to remember to continue leaning back throughout the slide. If you lean forward, you run the risk of bringing your board to a complete stop. At higher speeds, this can be very problematic and runs you the risk of injury.
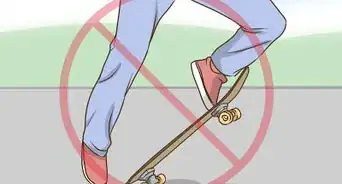
- Continue rotating throughout the entire slide. If you slide completely sideways (perpendicular to the road) for too long, you’ll warp the shape of your wheels to the point of having flat spots. Continuing your rotation will help your wheels evenly wear when power sliding.
-
5Lean forward as you complete your slide. After you’ve turned 180 degrees and continue moving, lean forward and even out your weight. This will prevent you from falling backward after the slide and allow for a smooth transition and a significantly shorter speed. If performed correctly, the powerslide will slow you down to the point you can utilize a foot brake.


Performing Advanced Techniques
-
1Perform a toeside pendulum slide. A "pendulum" slide involves sliding a gloved hand along the ground as you perform a powerslide. This involves becoming lower to the ground. Carve out to the side, crouch down, and put all your weight on the front foot. Put a gloved hand on the side you’re sliding away from and perform a powerslide. Use your back foot to kick out and slide and reduce speed. Bring your foot back to continue rolling on your board while also retracting your gloved hand.
- Do not put your gloved hand either too far away from your body or too close to your body, as you’ll run the risk of not being able to perform the pendulum or completely falling off your board by being bucked forward.
- Performing this maneuver will require a lot of practice and messing up, so don’t worry if you don’t immediately catch on. Keep at it until you perform the maneuver with ease, adding your own style and flare in the process.
- Try not to become overly reliant on your hand. Your hand his there to help maintain balance and ensure you can maneuver your legs properly to get the best slide you can.
-
2Perform a heelside pendulum slide.[10] Begin by setting your feet up square on the board. Carve out to one side of the road. With a gloved hand, crouch down and begin running your hand along the ground. Kick your feet out in a powerslide maneuver while leaning back on your heels. Weight should be evenly distributed from the front to back. Slide 180 degrees and continue on your way. If performed correctly, you’ll lose a lot of speed but continue forward.
- Your free hand can grab your board to help maintain balance. Do not, however, grab the board in between your legs. Grab the board near your back foot instead to avoid interference with the maneuver.
-
3Perform a 360 slide. You can slow your speed drastically by performing two slides at once. This involves performing two successive powerslides.[11] To begin, carve out to one side of the road. Lean back while also placing your weight on your front foot as a pivot before turning your hips and shoulders. Kick out your back foot to perform a power slide before transferring your weight back by leaning forward. Perform the same maneuver again by switching your weight back to the front and rotating your hips the same way as before.
- It’s not necessary to use your hands in this maneuver along the ground, as you’ll be typically using them for balance in the air.


Expert Q&A
Did you know you can get expert answers for this article?
Unlock expert answers by supporting wikiHow
-
QuestionShould I get a longboard or penny board if I'm new to skateboarding?
 Jon DepoianJon Depoian is a Skateboarding Instructor and the Owner of Intro2Skateboarding, an organization based in Orange County, California that provides professional private, home-school, after-school, birthday party, and summer camp skateboard lessons for beginners and experienced skateboarders alike. Jon has over 21 years of skateboarding experience and over 10 years of skateboard instruction experience. He also has extensive experience producing street skateboarding videos and skating competitions.
Skateboarding InstructorPenny boards are neat, but they're really small which can make it rather difficult to balance and turn. The bigger the board is, the easier it will be to control the board. If you've never skateboarded before, a longboard is likely going to be safer and easier to ride than a penny board.
Support wikiHow by unlocking this expert answer.
Warnings
- Pads are always helpful and good to use, but helmets are non-negotiable. Even the most experienced riders can experience serious injuries, most of which can be prevented by simply wearing a helmet. Don't think you're too cool for one either.[12]⧼thumbs_response⧽
Things You'll Need
- Longboard.
- Helmet.
- Slide Gloves.
- Skate friendly footwear.
- Elbow Pads (Optional)
- Knee Pads (Optional)
- Confidence


References
- ↑ https://www.ridingboards.com/how-to-stop-on-a-longboard/
- ↑ https://youtu.be/5LloIFi4Qb8?t=41
- ↑ Jon Depoian. Skateboarding Instructor. Expert Interview. 5 June 2020.
- ↑ https://youtu.be/l3EyJPm2E6s?t=95
- ↑ Jon Depoian. Skateboarding Instructor. Expert Interview. 5 June 2020.
- ↑ http://www.differencebetween.net/object/difference-between-concrete-and-asphalt-roads/
- ↑ https://www.ridingboards.com/how-to-powerslide-on-a-longboard/
- ↑ https://www.youtube.com/watch?v=tNIZS3S7kx0
- ↑ https://youtu.be/41bjF2Eu4EY?t=81
- ↑ https://youtu.be/HmO8gr_tdT0?t=175
- ↑ https://www.ridingboards.com/how-to-powerslide-on-a-longboard/
- ↑ Jon Depoian. Skateboarding Instructor. Expert Interview. 5 June 2020.
About This Article

To stop on a longboard using a power slide, start by steering your board out to the side of the road in the direction your toes are pointing. Then, shift your body weight onto your heels and swivel your hips in the direction you’re sliding in. As your front foot pivots, kick out your back foot in the direction of the slide so that your board swings out sideways. Finally, lean forward as you slow down so you don’t fall backwards, then use your foot to stop yourself completely. To learn how to stop quickly on a longboard using a 360 slide, read on!