This article was co-authored by Michael Metz. Michael Metz is a Golf Instructor and the Director of Instruction at Simi Hills Golf Course. With more than 15 years of experience, Michael is adept at coaching all facets of Golf. Mike uses technology, such as Flightscope, V1 Swing Suite, Blast Motion, and BodiTrak pressure mapping, to provide advanced golf training with quick results.
There are 11 references cited in this article, which can be found at the bottom of the page.
This article has been viewed 13,840 times.
When you’re working on perfecting your golf stroke, the downswing is one of the most crucial parts to get right. A solid downswing provides a great deal of explosive power that you can transfer directly to the ball, and can help you hit the ball dead-on. It’s important that you wind up for the downswing with an effective backswing, and that you channel momentum from your shoulders, torso, and hips into your club on the downswing.
Steps
Performing the Backswing
-
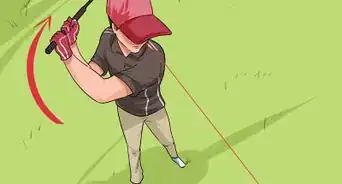
1Wind up your backswing so the club’s head is over your rear shoulder. Face the tee and, from a neutral stance (feet shoulder-width apart), swing your club backwards, away from the ball. Keep your elbows mostly straight while you do this. Instead of bending your elbows, bend your wrists so the club curves up over your body.[1]
- For example, if you’re right handed, you’ll be golfing with your left foot forward. Wind up your backswing by turning slightly to the right and curving your club back up behind you until the head is above your left shoulder.
-
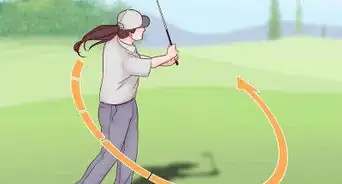
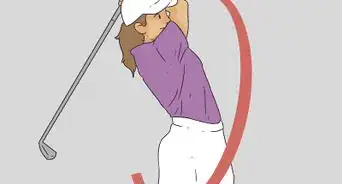
2Swing your hips back and rotate your torso in the same direction.[2] At the same time as you’re bringing your golf club up behind you, wind up the rest of your torso. Turn your shoulders by about 90°, so that your front shoulder points in roughly the same direction as your feet. Keep your body still from the waist downward, though, and don’t move your feet.[3]
- You can think of winding up for a backswing as if your torso is a large spring that you’re coiling up in order to hit the ball.
- It’s okay if you wind up slowly. Compared with the fast, explosive downswing, the backswing can be relatively deliberate, even slow.[4]
Advertisement -
3Stand in an “L” position with your front forearm parallel to the ground. Your rear forearm should be roughly parallel to the ground too, but slightly bend. Keep your golf club elevated vertically, so it’s directly perpendicular to the ground. This will maximize your ability to perform a successful downswing and transfer your hips’ and shoulders’ momentum to the ball.[5]
- This position is often referred to as an “L” pose because your forearms (parallel to the ground) and your golf club (perpendicular to the ground) form an “L” shape.
- If you wind up too far, you’ll end up over-swinging on the downswing.


Beginning the Downswing
-
1Plant your front foot in 1 location and keep your rear foot mobile. If it helps, you can physically stamp down with your front foot when you’re standing in front of the tee. When you’re preparing for your golf swing, your 2 feet should be about shoulder width apart. While your rear foot will slide up (towards your front) as you initiate the swing, your front foot shouldn’t leave its position until after you’ve followed through on the swing.[6]
- This placement lets you transition out of the backswing and into the downswing by transferring your weight forward onto your front foot.
-
2Fire your front hip forward to initiate the downswing. Once you’ve wound up your backswing, initiate the downswing by leaning your front hip forward, in the direction of the ball. From the wound-up position, this maneuver should feel as if your front hip is rotating aggressively towards your front foot. Turn the hip and lean at the same time until your hip is over your front heel.[7]
- Starting your downswing this way is great for golfers with bad backs, as it allows you to channel more momentum from your hips and less from your back.
-
3Narrow your swing by bringing your hands in towards your body. As you start the downswing, bend your elbows by about 15° to bring the club in closer to your body. At the same time, bend your wrists slightly inward (towards your torso) to bring your club closer to your shoulders. Bringing in the club will help increase the accuracy and consistency of your strokes.[8]
- Narrowing your swing allows you to transfer momentum from your shoulders and torso into the club.
-
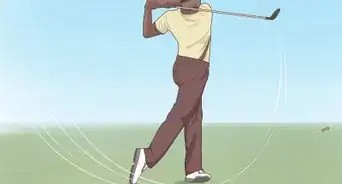
4Turn your shoulders and torso towards the ball to transfer momentum. While you’re swinging the golf club downwards towards the ball, rotate your shoulders to help follow through on the swing.[9] It’ll take some practice to figure out the exact speed at which you should unwind your shoulders. Broadly speaking, turn your shoulders so that, when the club’s head strikes the ball, your shoulders are aligned with your feet.[10]
- If you swing with your arms alone and don’t swing your torso and shoulders, your stroke will be weak and ineffective.
-
5Bend your rear knee and bring it inward towards your front knee. As you fire your hips forward and turn your shoulders towards the ball, it will feel natural for you to bend your rear knee as well. While you shouldn’t overdo this part of the downswing (you don’t want to fall down mid-swing!), bending your knee is a great way to line your torso up for a solid hit on the ball.[11]
- When your downswing is complete, your rear knee should be bent towards the ball at about a 20° angle.
- Keep your front leg straight throughout the downswing.


Striking the Ball
-
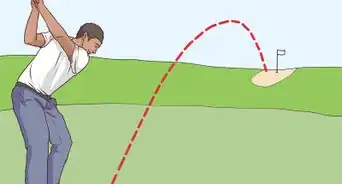
1Bring the club shaft past the ball before you swing the head downward. As you move through the downswing, lower the club’s head towards the ball. Don’t do this too quickly, though. Deliberately keep the head about 1–2 feet (0.30–0.61 m) above the ground until the shaft of the club is roughly 8 inches (20 cm) in front of the ball.[12]
- Using this technique on your downswing is especially useful for fairway shots, when you’re trying to hit the ball from the fairway onto the green.
- This step may seem counterintuitive but it will help you hit the ball with strength and precision.
-
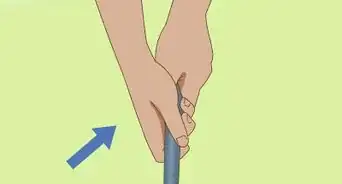
2Approach the ball with the palm of your back hand facing the ball. This will maximize your aim and control as you move the club into position to strike the ball. Keep the palm of your back hand (which will be clenched around the shaft of the club) facing the ball. Then, rotate the knuckles of your front hand towards the ball to bring the club’s head down. This will quickly drop the golf club’s head down into position to strike the ball.[13]
- To avoid over-swinging, visualize turning the knuckles of your front hand downwards towards the ground rather than pointing them upwards into the air.
-
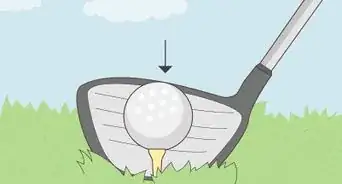
3Strike the ball with the head while the club is at a 20° angle to the ground. Once the club shaft is in front of the ball, drop the club’s head towards the ball. By the time the head of the golf club actually comes in contact with the ball, the shaft should be about 9–10 inches (23–25 cm) in front of the ball.[14]
- Striking the ball with the club at an aggressive angle will allow you to transfer a tremendous amount of power to the ball from your shoulders, torso, and hips.


References
- ↑ https://youtu.be/7PgM_8Ssfe4?t=80
- ↑ Michael Metz. Golf Instructor. Expert Interview. 24 March 2022.
- ↑ https://youtu.be/7PgM_8Ssfe4?t=67
- ↑ https://www.golfdigest.com/story/butch-harmon-start-downswing
- ↑ https://youtu.be/7PgM_8Ssfe4?t=118
- ↑ https://www.golfdigest.com/story/john-elliott-jr-4-ways-to-start-the-downswing
- ↑ https://golftips.golfweek.com/correct-downswing-sequence-20648.html
- ↑ https://youtu.be/8ZKZOLw_jaw?t=67
- ↑ Michael Metz. Golf Instructor. Expert Interview. 24 March 2022.
About This Article