This article was co-authored by Patrick Coye. Patrick Coye is the owner and operator of Patrick’s Painting & Home Improvement in Alexandria, Virginia. With over 15 years of experience in residential construction, Patrick specializes in painting, wallpaper removal/installation, drywall, staining decks and fences, and kitchen cabinetry painting. To date, Patrick and his team have painted over 2,000 houses and stained over 800 decks. Patrick's Company won a "Top Job" award from the American Painting contractor magazine in 2020.
This article has been viewed 84,068 times.
Stains are a great way to give flooring, furniture, and other objects added warmth. If you're applying stain to a previously painted object, you don't have to strip the paint first. Gel stains can adhere over painted objects without damaging the color or chipping off over time. After cleaning your object and applying the stain, it will have all the vibrancy of a painted object with the warmth of a stained one!
Steps
Cleaning and Sanding the Surface
-
1Clean the object with a mild solvent. Use dish soap or a mild cleaner to remove any dirt or grime from the object. Dip a washcloth in the solvent and wipe the object's entire surface, then dry it with another washcloth.
- The stain will adhere better to the object if it is free of dirt or grime.
-
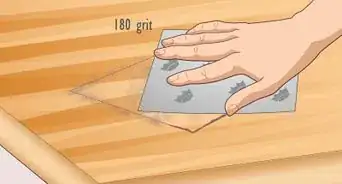
2Sand the object with wet, fine-grit sandpaper. Spray the object and the sanding block with water, then press the sanding block against the object. Rub the object lightly with the sandpaper in circular motions to remove bumps or minor imperfections.
- Try using fine-grit sandpaper, around 120-grit. This will create a slightly rough surface that the stain can adhere to.[1]
- Avoid applying firm pressure as you sand, as too much pressure may remove the paint.
Advertisement -
3Wipe off residual sandpaper dust and dry off the object. Dip a washcloth in water and wipe off any dust or grit left behind by the sandpaper. Use a dry cloth to absorb any excess water and, if the object is still damp, let it air dry before staining it.
- After drying the object, you can apply the stain over the paint.
-
4Put on a pair of gloves and a respirator. Most stains have a strong color and smell that can irritate your skin or respiratory system. To protect your skin and lungs, put on a sturdy pair of gloves and a respirator before you apply the stain.[2]
- Because most stains can dye fabric, wear clothes that you don't mind getting dirty in as well.
-
5Lay out a drop cloth in an open, well-ventilated area. Choose a place to stain your object with plenty of air circulation, preferably outside. Spread out a drop cloth to catch stain drops and avoid staining anything beside your object.
- If you can't stain the object outside, lay the cloth out near an open door or open windows if possible.


Applying the First Gel Stain Coat
-
1Use a gel stain for full coverage over the paint. Pick a gel stain in a color darker than the initial paint color. Avoid applying light stains over dark paint, as the stain will be less likely to show up on the surface.[3]
- Not every stain absorbs well over paint, so gel stain is your best option for a rich, even color.
-
2Add the gel stain using a foam brush. Dip a foam brush in the gel stain and paint a small section of the object's surface. Inspect the stain coating while you brush the first stroke to make sure you like the color before coating the entire object.[4]
- Avoid using polyurethane or wax-based stains over painted objects, as they're less likely to absorb over the paint.
-
3Coat the entire surface in the stain coating. Once you've finished the first brush stroke, continue painting the object from one end to the other, overlapping your strokes for even coverage. Apply the gel stain in thin, even strokes to prevent streaks or a bumpy surface after the object dries.
- Start in an inconspicuous area of the object so that if you don't like the stain's color, you can easily remove it and apply a new one.
-
4Inspect the gel stain coat and remove any excess. After applying the first coat, the stain coverage should be thin and even. Check the gel stain for any thick areas and use staining pads to wipe off any residual gel stain.
- For a brighter color that preserves the paint's natural hue, apply thinner coats of the gel stain.


Adding Additional Coats and Finishes
-
1Apply 2-3 additional coats of gel stain. Let the first coat dry for an hour, then apply an additional coat using the same technique. Depending on the desired color, apply 2-3 coats over the first layer, waiting an hour for the coat to dry in-between applications.[5]
- The more coats that you apply, the stronger and richer the stain will be.
-
2Let the gel stain cure for 24-48 hours. After you've applied several coats, place it on a flat surface. Leave the object to dry for at least 1-2 days before touching or moving it.[6]
- Curing times may vary between different stains. Check the stain's directions for specific instructions.
-
3Add a clear finish over the dried gel stain. Dip a foam brush in a clear paint finish and spread it over your object's surface in small sections. Once you've coated the entire object, let it dry for another 30-60 minutes to seal the finish before touching it.[7]
- Clear finishes protect your gel stain from flaking off or fading over time.
- For a smooth, brighter sheen, choose a semi-gloss paint finish.


Expert Q&A
Did you know you can get expert answers for this article?
Unlock expert answers by supporting wikiHow
-
QuestionWhat primer should I use?
 Patrick CoyePatrick Coye is the owner and operator of Patrick’s Painting & Home Improvement in Alexandria, Virginia. With over 15 years of experience in residential construction, Patrick specializes in painting, wallpaper removal/installation, drywall, staining decks and fences, and kitchen cabinetry painting. To date, Patrick and his team have painted over 2,000 houses and stained over 800 decks. Patrick's Company won a "Top Job" award from the American Painting contractor magazine in 2020.
Painting SpecialistChoose a stain-blocking primer that's high in titanium dioxide. It will cost a little more, but you'll get much better coverage.
Support wikiHow by unlocking this expert answer.
Things You'll Need
- Gel stain
- Gloves
- Respirator
- Dish soap or mild cleaner
- Washcloth
- 320-grit wet sandpaper
- Foam brush
- Paint finish


-Step-14.webp)
References
- ↑ Patrick Coye. Painting Specialist. Expert Interview. 22 July 2020.
- ↑ https://www.theweathereddoor.com/2014/10/how-to-stain-with-gel-stain-over.html
- ↑ https://www.theweathereddoor.com/2014/10/how-to-stain-with-gel-stain-over.html
- ↑ https://www.theweathereddoor.com/2014/10/how-to-stain-with-gel-stain-over.html
- ↑ https://www.familyhandyman.com/woodworking/staining-wood/how-to-stain-wood-evenly-without-getting-blotches-and-dark-spots/view-all/
- ↑ https://www.theweathereddoor.com/2014/10/how-to-stain-with-gel-stain-over.html
- ↑ https://www.familyhandyman.com/woodworking/staining-wood/how-to-stain-wood-evenly-without-getting-blotches-and-dark-spots/view-all/
About This Article

To stain over paint, you can use gel stain, which is able to stick to painted surfaces. Use a gel stain that's darker than the paint color or else it might not show up very well. Before you apply the gel stain, you'll need to lightly sand the surface to get rid of any bumps. Then, you can apply several coats of gel stain until you get your desired color. Just make sure you let the gel dry for an hour between coats. For more tips, including how to choose a stain for your surfaces, read on!