This article was co-authored by wikiHow staff writer, Christopher M. Osborne, PhD. Christopher Osborne has been a wikiHow Content Creator since 2015. He is also a historian who holds a PhD from The University of Notre Dame and has taught at universities in and around Pittsburgh, PA. His scholarly publications and presentations focus on his research interests in early American history, but Chris also enjoys the challenges and rewards of writing wikiHow articles on a wide range of subjects.
This article has been viewed 58,828 times.
Learn more...
The Gear Ball is a spherical, more complex variation on the classic Rubik’s Cube. When solved, the sphere’s six “faces” will each be their own color—that is, you’ll have a red side, orange side, blue side, yellow side, green side, and purple side.[1] You can try solving the Gear Ball randomly, but a defined strategy works better. Try matching the corners and centers of each face, then use several repeated sets of turns (also called algorithms) to bring all the colors into alignment.
Steps
Matching the Corners and Centers for Each Face
-
1Spin the ball to get a feel for how it rotates. Because of the gear rings that span adjacent faces, you can spin the right or left thirds of the sphere either up or down, or the top or bottom thirds either left or right. When you do so, the center third will follow in the same direction but cover half the distance.[2]
- In other words, if you spin the right side all the way around (360 degrees), the center will spin halfway around (180 degrees).
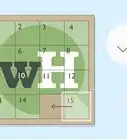
- Each of the Gear Ball’s 6 faces has 13 colored components: 4 plus sign shaped corners; 4 side pieces that are each half of a gear ring; 4 interior pieces that look like block letter “C”s; and 1 square center.
- References to “sides” or “thirds” (left, right, up, down, center) of the Gear Ball are based on you holding the ball with a single face pointed towards you.
-
2Identify a “favorite color” corner and its two adjacent corner colors. Each corner of each side of a Gear Ball is next to corners from two other sides. So, once you pick out, for instance, a red corner to start with, you’ll see that it is next to two corners with different colors—for example, yellow and green.[3]
- There’s nothing special about red—you can start with any of the six colors you prefer. It may make the process easier if you start with the same “favorite” color each time, though.
Advertisement -
3Create 2 matching pairs from 4 adjacent corners. The goal here is to have 2 corners (separated only by 1 side piece) of a face both be a single color (for example, red), and the 2 adjacent corners of an adjacent face both be another single color (for example, yellow).[4]
- If, for example, you’re holding the Gear Ball so that there’s a red corner on top of a yellow corner to the left, you may be able to rotate the right side of the ball up or down until you have a red corner on top of a yellow corner to the right as well.
- With practice, you’ll be able to quickly decipher which pairs will be easiest to match. If you always start with red, for instance, you might sometimes find matching red and yellow corners to be easier, while other times matching red and green corners will be simpler.
-
4Find the other 2 “favorite color” corners and move them into place. Now that you’ve established 2 starting corners, (for example, the 2 red corners that are next to 2 yellow corners), look for the 2 other “favorite color” (red, for example) corners on the Gear Ball. They will always be separated from each other only by a side piece, and you’ll be able to rotate them together into place. Move them around until they are the other 2 corners in the same face as your starting 2 corners (for instance, all 4 corners in the face will be red).[5]
- If your 2 starting (red) corners are to your left and facing you, for instance, the other 2 red corners may be to your right and facing away from you. In this case, you’ll need to rotate the right side of the ball either upward or downward 180 degrees in order to bring all 4 red corners into alignment in the same face.
-
5Relocate the center square that matches the color of your corners. For example, you might now have 4 red corners in a single face but have an orange center square. If the red square you seek is directly opposite the orange square (that is, facing away from you), rotate the right side of the ball around once (360 degrees) and the red square will move into place with the 4 red corners.[6]
- Remember that, whether you’re rotating up and down or side to side, the center section of the ball rotates half the amount of the side section. So, if you rotate the right side of the ball up and all the way around (360 degrees), the center section will rotate up and halfway around (180 degrees).
- In this example, then, the 2 red corners on the right will rotate all the way around and meet up with the red center square that has traveled halfway around.
-
6Bring the corners and centers of the other 5 faces into color alignment. The corners and center of the face directly opposite your “favorite color” face (red, for example) will also now match (they might all be orange, for instance). Hold the ball with these corner-center matched faces at the top and bottom, and rotate the top left or right. Keep rotating until the other corners and centers match up.[7]
- Eventually, you'll be able to match the colors of the corners and centers in each of the other 4 faces.
- At this point, the corners and centers will be the same color in each of the 6 faces.


Aligning Interior Pieces with “R2-U-R2-U”
-
1Find a group of 4 interior pieces that need to switch locations. For instance, say the blue face is facing you, with the yellow face above and the purple face below it. However, say there’s a yellow interior piece below the blue center and a purple one above it, as well as blue interior pieces at the bottom of the yellow face and the top of the purple face. In this case, you need all 4 of these interior pieces to switch locations.[8]
- Once you’ve solved all the centers and corners, you’ll always find the above scenario somewhere on the ball—but the grouping of colors may vary.
-
2Rotate the entire ball up 90 degrees (¼ turn). That is, the face that was pointing downward (for instance, purple) should now be pointed towards you. Likewise, according to the yellow-blue-purple example, the blue face will be pointed upward and the yellow face will be on the opposite side of the ball.[9]
-
3Go through the “R2-U-R2-U” algorithm once. Rotate the right side of the ball upward 180 degrees (½ turn) twice (“R2”), then rotate the upper side to the left 180 degrees (½ turn) once (“U”). Then, repeat the process again—so it’s right-twice-up, right-twice-up or R2-U-R2-U.[10]
- The interior pieces will now be in the correct vicinity, but still in the wrong faces. That is, according to the example, the purple interior piece will be at the bottom of the blue face, and the blue interior piece will be at the top of the purple face.
- Remember, each time you rotate the top, bottom, or side 180 degrees, the center rotates 90 degrees in the same direction.
-
4Find other sets of interiors to switch with R2-U-R2-U. For instance, you may find the same scenario you had with the yellow-blue-purple faces, this time by reorienting the ball so you have the red face above and the orange face below the blue face. Turn the ball up 90 degrees (¼ turn) so the orange face is towards you, then repeat the R2-U-R2-U algorithm to put the interior pieces in the proper vicinity.[11]
- In some cases, using R2-U-R2-U will not only put the interior pieces in the proper vicinity, but also place them in the correct face as well (for example, yellow into yellow).
- Keep repeating this process until all the interior pieces are either in the proper face or are next to the proper face (that is, in the correct vicinity).


Reorienting Interior Pieces with “R-U-R-U-R-U”
-
1Locate the 8 sets of interior pieces that need reoriented. At this point, there are only 2 scenarios: either all the interior pieces will already be in their proper faces (this is rare), or exactly 8 pairs of interior pieces will need to be flipped. Look over the ball to find the 8 pairs that need to be reoriented, then choose a pair to start with.[12]
- For example, with the green face above the purple face, you might find that the bottom interior piece of the green face is purple, and the top interior piece of the purple face is green. This could be the first of your 8 mismatched pairs to fix.
- If all the interior pieces are already oriented (that is, none of them need switched because they’re already in their proper faces), skip this entire section and move on to the “R4” algorithm section.
-
2Line up the 4 correct pairs in the “standing slice” position. If 8 interior pairs are incorrectly oriented, that means 4 are correctly oriented. And, you’ll be able to turn the ball so that these 4 pairs create a “belt” that goes around the entire center section of the sphere. Position the ball so this “belt” is facing up, down, left, and right, but not directly towards you.[13]
- If the Gear Ball was a globe, and you were looking straight at the Prime Meridian, the belt would cross over the North and South Poles and follow the 90 deg East and 90 deg West longitudinal lines.
- This orientation is called a “standing slice.”
-
3Turn the ball via the “R-U-R-U-R-U” algorithm once. With the 4 correct interior pairs in the “standing slice” position, turn the right side of the ball up 180 degrees (½ turn). Then, turn the upper side to the left 180 degrees (½ turn). Repeat these turns 2 more times apiece.[14]
- Once you’ve completed the R-U-R-U-R-U algorithm, all the centers, corners, and interior pieces will be match in color within each face. Now, you just need to rotate some of the gear pieces into the correct orientation, and you’ll be all finished!


Using “R4” to Orient the Gear Rings
-
1Point an incorrectly-oriented gear ring towards you. For instance, the red half of the gear ring might be in the blue face, and the blue half in the red face. Hold the ball so that this mismatched gear ring is looking you straight in the eye.[15]
- It’s possible, but very unlikely, that all your gear rings will be in the proper orientation after you finish R-U-R-U-R-U. Look closely to make sure you don’t miss any wayward gear rings!
-
2Use the gear ring’s orientation to determine your “R4” turn. The 2 colors in the gear ring are separated by a thin black line. This line will either divide the gear ring from top right to bottom left (“/”), or from top left to bottom right (“\”). Take note of this orientation to figure out which direction you should turn the Gear Ball next.[16]
- If you have this line (“/”) you’ll turn R4 upward.
- If you have this line (“\”) you’ll turn R4 downward.
-
3Rotate the right side of the ball upward or downward 4 times. This is the very simple “R4” algorithm. Rotate the right side 180 degrees (½ turn) each time, upward if you have (“/”) and downward if you have (“\”). The gear ring will be in the proper alignment after you complete the fourth turn.[17]
- For example, the red side of the gear ring will be in the red face, and the blue side in the blue face.
- As a bonus, all the other gear rings in the same vertical slice—the “belt” that this time faces both towards and away from you—will also be properly oriented!
-
4Rotate any other misaligned gear rings into position with R4. Look over the ball to see if there are any gear rings still out of alignment. If so:[18]
- Point the gear ring toward you.
- Turn R4 upward if the gear ring divider looks like (“/”).
- Turn R4 downward if the gear ring looks like (“\”).
- Keep repeating this until all the gear rings are properly aligned. Congratulations—you’ve solved the Gear Ball!


Community Q&A
-
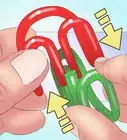
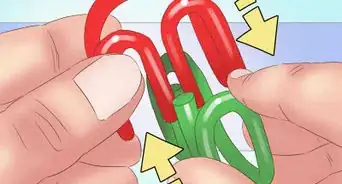
QuestionSometimes only two of the gears are misaligned, how do I fix this?
 Community AnswerThis is not normally possible. If only two gears are misaligned, that means that they skipped a track at some point. Just manually fix them by pulling apart the two adjacent corners and rotating the gear.


References
- ↑ https://www.rubiks.com/store/puzzles/mefferts-gear-ball
- ↑ https://www.rubiks.com/store/puzzles/mefferts-gear-ball
- ↑ https://youtu.be/qwFwQbkD0qw?t=36s
- ↑ https://youtu.be/qwFwQbkD0qw?t=36s
- ↑ https://youtu.be/qwFwQbkD0qw?t=36s
- ↑ https://youtu.be/qwFwQbkD0qw?t=36s
- ↑ https://youtu.be/qwFwQbkD0qw?t=36s
- ↑ https://youtu.be/qwFwQbkD0qw?t=2m41s
- ↑ https://youtu.be/qwFwQbkD0qw?t=2m41s
- ↑ https://youtu.be/qwFwQbkD0qw?t=2m41s
- ↑ https://youtu.be/qwFwQbkD0qw?t=2m41s
- ↑ https://youtu.be/qwFwQbkD0qw?t=4m27s
- ↑ https://youtu.be/qwFwQbkD0qw?t=4m27s
- ↑ https://youtu.be/qwFwQbkD0qw?t=4m27s
- ↑ https://youtu.be/qwFwQbkD0qw?t=5m53s
- ↑ https://youtu.be/qwFwQbkD0qw?t=5m53s
- ↑ https://youtu.be/qwFwQbkD0qw?t=5m53s
- ↑ https://youtu.be/qwFwQbkD0qw?t=5m53s
About This Article