This article was co-authored by wikiHow Staff. Our trained team of editors and researchers validate articles for accuracy and comprehensiveness. wikiHow's Content Management Team carefully monitors the work from our editorial staff to ensure that each article is backed by trusted research and meets our high quality standards.
There are 9 references cited in this article, which can be found at the bottom of the page.
The wikiHow Video Team also followed the article's instructions and verified that they work.
This article has been viewed 20,322 times.
Learn more...
An invisible zipper is a common feature of formal dresses and other items where a visible zipper might be unsightly. The process of sewing an invisible zipper is similar to a regular zipper, but with a few differences in how you line up the zipper and sew it into place. You will need a sewing machine and a zipper foot to complete an invisible zipper. Make sure to follow any additional instructions provided with your sewing pattern (if you are using one) to ensure that you get the best results possible.
Steps
Selecting Your Materials
-
1Choose a zipper 2 inches (5.1 cm) longer than the zipper opening. Your zipper needs to be longer than the opening for an invisible zipper. It is also a good idea to find a zipper that is in the same color as your fabric, or as close as you can get.[1]
- For example, if the zipper opening is 8 inches (20 cm), then choose a zipper that is 10 inches (25 cm) long.
- If you cannot find an exact color match for your zipper, choose a zipper that is in a similar shade, such as a black zipper for a dark purple dress, or a white zipper for a light blue garment.
-
2Cut 2 fusible interfacing strips 1.5 in (3.8 cm) longer than the zipper opening. Measure and then cut your fusible interfacing so that it is 1.5 inches (3.8 cm) longer than the zipper opening. The interfacing should be the same width as the zipper plus your seam allowance.[2]
- For example, if the zipper opening is 8 inches (20 cm), then the interfacing should be 9.5 inches (24 cm) long. If the zipper is 1.5 inches (3.8 cm) wide and the seam allowance is 0.5 inches (1.3 cm), then you will need to cut the interfacing to 2 inches (5.1 cm) wide.
Advertisement -
3Install a zipper foot on your sewing machine. An invisible or concealed zipper foot is ideal, but if you don’t have this type of presser foot, then a regular zipper presser foot will also work. Follow your sewing machine’s instructions for installing the zipper foot. You will need to remove the regular presser foot to do this.[3]
- Your machine should have a screw (or 2) holding the presser foot into place. With the machine switched off, lift the lever on your machine to raise the presser foot and undo the screw(s). Then, remove the presser foot attachment and install the zipper foot. Reattach the presser foot and secure it with the screw(s) you removed.
Applying Interfacing to Stabilize the Zipper
-
1Place a fusible interfacing strip where you will be sewing the zipper. Place the fabric on a flat surface with the wrong (non-print) side facing up. Then, lay 1 of the fusible interfacing strips on the edge of the fabric where you want to place the zipper. The adhesive side should be facing down towards the wrong side of the fabric.[4]
- The adhesive side of fusible interfacing is usually glossy or smooth to the touch.
-
2Press the interfacing with an iron for 3 to 5 seconds. With your iron on the lowest setting, smooth it across the interfacing. Do this for 3 to 5 seconds to bond the interfacing with your fabric.[5]
- Make sure the fabric and interfacing are flat before you iron over them. Otherwise, you may end up with bumps in the interfacing.
-
3Repeat on the opposite side. Next, go through the exact same process for the other side of the fabric and the other piece of interfacing. After the other piece of interfacing is bonded with the fabric, turn your fabric over and start pinning and sewing your invisible zipper into place.
Pinning and Sewing the Zipper
-
1Iron the zipper fabric. To ensure that your zipper will lay flat, iron the fabric that is attached to the zipper. Set your iron to the lowest setting, and run it over the zipper fabric a couple of times to flatten it out.[6]
- Be extra careful with plastic zippers, which may melt if you iron over them.
-
2Pin the zipper to the right (print) side of the fabric’s edges. Place the closed zipper over the right side of the fabric with the zipper pull facing downwards. Line up the raw edge of the fabric with the edge of the zipper fabric. Then, insert a pin through the top part of the zipper fabric and zipper opening fabric. Open the zipper, and then continue pinning down the length of the zipper opening.[7]
- Some of your zipper will extend down past the zipper opening in your fabric. Don’t worry about pinning this area.
- Repeat this for the other side to secure the other half of the zipper.
-
3Position the fabric and zipper under the zipper foot on your machine. Raise the presser foot on your sewing machine, and then place the zipper and fabric under the presser foot so that the top edge of the zipper fabric is directly under the needle. Bring the presser foot down and line up the zipper foot with the edge of the zipper.[8]
- If you are using an invisible presser foot, then the zipper teeth will fit into a groove in the center of the foot and this will help to ensure a very close stitch. With a regular zipper foot, you will also position the teeth under a groove in the foot, but the groove is positioned on the edge rather than on the center of the foot.
-
4Baste the zipper onto the fabric to check the positioning. To ensure that the zipper will be in the correct position, sew a baste stitch into the pinned areas of your zipper first. Set your machine to the baste stitch setting, or select a straight stitch with the longest possible stitch length. Sew along the pinned areas, and then check to see how the seam looks. If it does not look right, you can tug on the end of the thread to remove it and try again.[9]
- Keep in mind that baste stitching may damage certain fabrics, such as silk, satin, leather (and faux leather), and suede (and faux suede). This is because basting will create extra holes in the fabric which may be visible after sewing.
-
5Sew a straight stitch along the edge of the zipper. Set your machine to the straight stitch setting and begin sewing along the edge of the zipper. Keep the zipper teeth in the groove of the zipper foot foot to ensure that your zipper will be well hidden by the fabric.[10]
- Remove the pins that you inserted into the zipper and fabric as you sew. Do not sew over them or you may damage your machine.
- Make sure to keep a firm hold on the fabric and zipper while you sew. The presser foot will apply some pressure, but you will still need to hold and guide the fabric as you sew.
-
6Stop sewing and backstitch at the end of the zipper opening. Sew to the end of the zipper opening on your fabric, and then press down on the lever on the right of your machine to reverse the stitch direction. Sew 1 inch (2.5 cm) in this direction, then release the lever and sew to the end again.[11]
- Since your zipper is 2 inches (5.1 cm) longer than your zipper opening, stop sewing about 2 inches (5.1 cm) from the end of the zipper. If desired, you can make a mark on the edge of the fabric or on the zipper as a guide.
-
7Repeat for the opposite side. After you have secured 1 side of the zipper, repeat the exact same process to secure the other side of the zipper. Close the zipper to line up the first edge and then open it to secure the rest of the zipper into place just as you did the first time.
Finishing the Zipper
-
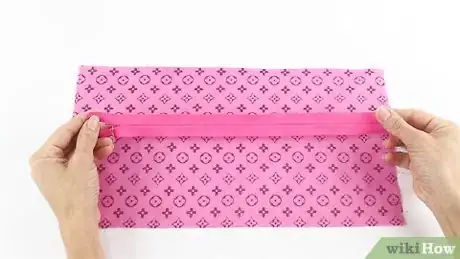
1Close the zipper and fold the fabric in half with the wrong sides visible. Zip up the zipper and then fold the fabric along the zipper. Fold the fabric so that the right sides are together and the wrong sides are exposed. The back of the zipper should also be visible.[12]
-
2Place a pin along the bottom edge of the zipper opening. Hold the zipper out to the side so it is out of the way. Then, insert 1 pin through the zipper opening fabric so that it is pointing towards the zipper stitch line. Place the pin slightly to the left of the stitch line so you can use the zipper stitch line as your guide when you sew.[13]
- You may also want to place a pin through the zipper and fabric to keep it out of your way, but this is optional. You can also just keep holding it out of the way until you sew past it.
-
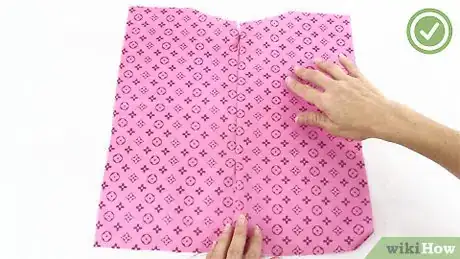
3Sew down from the zipper stitch line to the bottom of the fabric. Using the pin as your guide, sew downwards from the zipper stitch line and keep going until you reach the end of the fabric. Sew right off the edge of the fabric to secure the seam. This will create a seam that is flush with your invisible zipper seam.[14]
- Only sew through the zipper opening fabric, not the zipper.
- Do not sew through the pin you placed in the fabric or you may damage your machine. You can remove the pin after the first few stitches.
-
4Continue your project after the zipper is in place. You may sew an invisible zipper before hemming a garment or putting on other finishing touches, so make sure to finish these up after you have completed your invisible zipper. Consult your pattern (if you are using one) to finish sewing for your project.
Community Q&A
-
QuestionHow do I get books that teach me about sewing garments?
 T. ChinsenTop AnswererPBS hosts a sewing show presented by Nancy Zieman. The show was on for 35 years, and she was the author of several books that provide comprehensive information on sewing topics. It is a good starting point if you want to learn techniques on sewing.
 -
QuestionWhat type of stabilizers are there for this process on lightweight fabrics?
 T. ChinsenTop AnswererThere is light- and medium-weight interfacing that will work with lightweight fabrics. Keep in mind that the interfacing should be close to the density of the zipper fabric or the fabric will pucker when sewn.
Things You’ll Need
- 2 fusible interfacing strips 1.5 inches (3.8 cm) longer than your zipper opening
- Invisible zipper 2 inches (5.1 cm) longer than your zipper opening
- Pins
- Zipper presser foot
- Sewing machine
- Thread
References
- ↑ https://www.youtube.com/watch?v=4XTCQsSLBFw&feature=youtu.be&t=15s
- ↑ https://www.youtube.com/watch?v=4XTCQsSLBFw&feature=youtu.be&t=26s
- ↑ https://www.thesprucecrafts.com/sewing-an-invisible-zipper-step-by-step-2978506
- ↑ https://www.youtube.com/watch?v=4XTCQsSLBFw&feature=youtu.be&t=43s
- ↑ https://www.youtube.com/watch?v=4XTCQsSLBFw&feature=youtu.be&t=47s
- ↑ https://www.thesprucecrafts.com/sewing-an-invisible-zipper-step-by-step-2978506
- ↑ https://www.thesprucecrafts.com/sewing-an-invisible-zipper-step-by-step-2978506
- ↑ https://www.thesprucecrafts.com/sewing-an-invisible-zipper-step-by-step-2978506
- ↑ https://www.threadsmagazine.com/2017/11/14/smart-technique-imperceptible-zipper
- ↑ https://www.thesprucecrafts.com/sewing-an-invisible-zipper-step-by-step-2978506
- ↑ https://www.youtube.com/watch?v=4XTCQsSLBFw&feature=youtu.be&t=2m16s
- ↑ https://www.youtube.com/watch?v=4XTCQsSLBFw&feature=youtu.be&t=3m36s
- ↑ https://www.youtube.com/watch?v=4XTCQsSLBFw&feature=youtu.be&t=3m36s
- ↑ https://www.youtube.com/watch?v=4XTCQsSLBFw&feature=youtu.be&t=4m1s
About This Article
If you want to sew an invisible zipper, make sure you have a zipper that is 2 inches longer than the opening. When you have a properly sized zipper and pieces of fabric, place a fusible interfacing strip where you’ll be sewing the zipper and iron it on for 3 to 5 seconds. Then, pin the zipper to the right side of the fabric’s edge with the pull facing downwards. Once the zipper is in position, sew a straight stitch along the edge with a zipper foot installed on your sewing machine. After the first side of the zipper is secured, sew the other side. From there, close the zipper and fold the fabric in half with the wrong sides visible. Sew down from the zipper stitch line to the bottom of the fabric to create a seam flush with your invisible zipper seam. For more tips, like how to baste stitch your zipper to keep it in position, read on.
