This article was co-authored by wikiHow Staff. Our trained team of editors and researchers validate articles for accuracy and comprehensiveness. wikiHow's Content Management Team carefully monitors the work from our editorial staff to ensure that each article is backed by trusted research and meets our high quality standards.
There are 7 references cited in this article, which can be found at the bottom of the page.
This article has been viewed 136,646 times.
Learn more...
SkyScan makes over 40 models of atomic clocks, and they all transmit the time from the National Institute of Standards and Technology. It is estimated that they deviate by less than one second within 3,000 years. Choose the correct setting procedure according to whether your clock is a digital clock, weather station, or standard clock face.
Steps
Setting a SkyScan Digital Clock
-
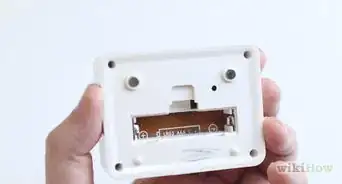
1Insert two AA, LR6 1.5 volt alkaline batteries in the battery compartment of the clock. Align them in the compartments based on the polarity marked on the clock’s compartment case. The clock will search for a signal once the batteries are installed. Wait at least 15 minutes for the temperature to display on the clock before setting it.[1]
-
2Slide the time zone switch on the back of the clock or press the time zone button.[2] The time zone will flash and at that point, you can input the desired time zone by pressing and releasing the “+” key. PST is Pacific Standard Time, MST is Mountain Standard Time, CST is Central Standard Time, and EST is Eastern Standard Time.Advertisement
-
3Begin to manually set the time on your clock. Slide the Daylight Saving Time switch to “On” if you are in Daylight Savings Time. Switch it to “Off” if it is not Daylight Savings Time.[3] This option may not be available on all clocks.
-
4Set the time on your clock with your desired hours. After adjusting the time zone and daylight savings (as described in the previous step), the hour digit on the clock will start to flash automatically. Press and release the “+” key until it’s the at the desired hour. Press “SET” to secure the time.[4]
- The minute digits will begin to flash once the hour digit has been set in place. Press and release the “+” key until it’s at the right minute.
- Press and release the “SET” key to move to setting the “year”. Repeat this action to set the month, date, weekday, 12/24H time format, and temperature setting.
- Remember that if set properly, SkyScan clocks are able to set themselves. So although you can manually set the time, understand that the time may change accurately on its own and void your manual efforts.
-
5Place your atomic clock near a window, away from metal and concrete structures. Leave it for at least four minutes so that it can find the signal. It will automatically search for a signal at 2 AM for eight minutes each night.[5]


Setting a SkyScan Clock with a Weather Station Transmitter
-
1Set one to three of the transmitters on the clock/weather station. Transmitters display the current humidity and temperature indoors and outside that the remote unit monitors. Remove the transmitter from the stand and unscrew the battery door of the transmitter. Place two AAA batteries in each battery compartment.[6]
-
2Assign a channel to each transmitter you plan to use. Receivers can receive temperature and humidity data from up to three transmitters at a time, as reflected by assigned channels. Once channels have been assigned to a transmitter, they can only be changed by removing the batteries and resetting the transmitter over again.[7]
- Slide the switch inside of the battery compartment for each transmitter you’re using. There will be a switch for Channel 1, 2, and Channel 3 respectively.
-
3Confirm the channel setting by pressing the “Reset” button. The “Reset” button is inside the battery compartment using a small pin. Slide the C/F switch inside of the compartment for centigrade or Fahrenheit. Replace and screw in the battery cover.
-
4Avoid placing the transmitter in rain, snow or direct sunlight. The clock on the transmitters and weather station will be controlled via radio signal. You can also press “Reset” to recalibrate the unit.
-
5Remove the battery cover on the back of your weather station monitor.[8] The weather station monitor is the part of the clock that displays time, time zone, and weather, as received by the transmitter set up in previous steps. Insert the three AA batteries into the back. Make sure to use the plus and minus symbols to ensure the correct polarity of the batteries.
- Replace the battery cover onto the back of the weather station.
- Press the “Reset” button to restart the clock of the weather station. The channels of the transmitter will sync automatically.
-
6Select the time zone. The clock’s default time zone is Pacific, but if you are not in that time zone, select your real time zone. Press and hold the button labeled “Time” for two seconds. The hour will flash. Use the up and down keys to change the hour to the correct hour.[9]
- To change the time in the correct order of hour-minute-second-12/24 hour-year-month-date-day language, press the time key for two seconds followed by the up and down arrows to adjust the time. Repeat this action one at a time for each time component.
- Choose PA/P for Pacific, MO/M for Mountain, CE/C for Central, or EA/E for Eastern.
- Press the “Time” key again to exit the time setting mode.


Setting a SkyScan Clock with a Standard Clock Face
-
1Insert 1 fresh AA, LR6 1.5 volt battery into the analog clock battery holder. Insert a second AA, LR6 1.5 volt battery into the digital clock.[10] Ensure that you insert the battery according to the right polarity on the battery. This is indicated by the plus and minus signals on the case and on the battery.
-
2Close the battery cover. Mount the clock to stand in an upright position near a window so that it can search and receive a signal. The clock will either receive a WWVB signal to set itself to the exact time within five minutes of exposure or it will determine that a signal cannot be received due to the location or time of day.[11]
-
3Press the time zone button. Select the time zone that you are in. The SkyScan atomic clock can only collect the correct signal from 2,000 miles (3,200 km) away, so it must be set to the correct zone to get an accurate reading.
- Press and hold one of the four time zone buttons MT-Mountain Time, CT-Central Time, ET-Eastern Time, and PT-Pacific Time.
- Clocks tend to automatically default to a Pacific area time zone. If you are in the Pacific area time zone, hang up your clock. If not, use one of the buttons to make the setting correct.
-
4Set the clock by the window. If you choose to manually set the hands, be aware that it will still gather a signal and adjust the time periodically, overriding manual set ups. Once the SkyScan clock picks up the signal from the NIST station, it will advance by eight seconds until it gets the right signal.


Community Q&A
-
QuestionWhy does the clock keep blinking?
 Community AnswerYou need to reset the time. If the time is incorrect, it will keep blinking until you fix it.
 -
QuestionHow can I change it to Fahrenheit without changing any other settings?
 Community AnswerTry pressing the clock’s “Set” button repeatedly until the “C” on the clock flashes, then click the “+” button to change it to “F.” Alternately, see if there is a button within the transmitter that enables you change the transmitter’s F/C setting.
 -
QuestionWhat do the letters LUN mean on an atomic wall clock?Community Answer“LUN” may mean "set the clock to display the lunar (moon) phase." If it says “LON,” it means the time zone is set to show time in London, England, which is on Universal Coordinated Time (UTC).
Things You'll Need
- Fully-charged alkaline batteries (AA or AAA)
- SkyScan Clock
- Screwdriver
- Window


References
- ↑ https://drive.google.com/file/d/0B4iJGdLyQwf7X2tsdDdSdVJsejA/view
- ↑ https://drive.google.com/file/d/0B4iJGdLyQwf7X2tsdDdSdVJsejA/view
- ↑ https://drive.google.com/file/d/0B4iJGdLyQwf7X2tsdDdSdVJsejA/view
- ↑ https://drive.google.com/file/d/0B4iJGdLyQwf7X2tsdDdSdVJsejA/view
- ↑ http://skyscanatomicclocks.com/site/owners-manuals/model-88909/
- ↑ https://drive.google.com/file/d/0B4iJGdLyQwf7eUlCNTJyOUMxRDg/view
- ↑ https://drive.google.com/file/d/0B4iJGdLyQwf7eUlCNTJyOUMxRDg/view
- ↑ https://drive.google.com/file/d/0B4iJGdLyQwf7eUlCNTJyOUMxRDg/view
- ↑ https://drive.google.com/file/d/0B4iJGdLyQwf7eUlCNTJyOUMxRDg/view
About This Article

To set an analog SkyScan atomic clock, first press and hold the correct time zone button on the back. You can then set the hands manually, but they will adjust by themselves when the clock receives a signal. To set a digital SkyScan clock, press the time zone button or slide the time zone switch on the back. Then, press the plus button to cycle through time zones. If your clock has a switch for Daylight Savings Time, make sure this is on or off. Once you’ve set the time zone, you can manually set the time with the plus and set keys, but it will adjust automatically when it receives a signal. Regardless of whether your clock is analog or digital, place it by a window away from any metal or concrete structures so it can pick up a signal from the station. Your clock should receive a signal once a day, usually at 2am. For more tips, including how to set a SkyScan clock with a weather station transmitter, read on!