This article was co-authored by Eric Shipe. Eric Shipe is a Kitchen and Bath Designer and the Owner of Bath + Kitchen based in Washington DC. Eric and his team specialize in cabinetry, design, and remodels. They serve homeowners, interior designers, architects, and contractors with a refined process, creative ideas, 4K photo-realistic renderings, and 360 Panoramic views. Bath + Kitchen was featured in Best of Houzz 2017-2020. Eric holds a BA in Economics and Business Administration from Ursinus College.
wikiHow marks an article as reader-approved once it receives enough positive feedback. In this case, 100% of readers who voted found the article helpful, earning it our reader-approved status.
This article has been viewed 271,389 times.
Learn how to seal a basin or bathtub using silicone or caulk. This process of silicone sealing stops water penetration into joints around wash basins, bathtubs or shower trays.
Steps
-
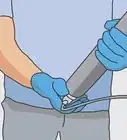
1Prepare the area. Remove any old silicone from the work area.[1]
- This can be done with a utility knife or a straight razor.
- Any contaminants like oil and grease could prevent the silicone from bonding so clean the area thoroughly with alcohol.
-
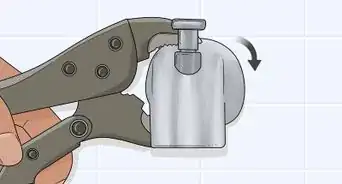
2Load the silicone gun. With a knife, cut the tip at 45 degrees, keeping the hole fairly small. This will give you better control over the amount of silicone released. The opening should not be so big that a bead cannot be formed, and it should not be so small that caulk tube seems highly pressurized.[2]
- Pop the silicone seal. Most tubes have a thin barrier inside the tube to prevent the caulk from curing. Many silicone guns have a tool to do this built on them. However, if yours does not, then a long nail or something similar will work.
- Load the tube of silicone into the gun.
Advertisement -
3Test the sealing. Silicone sealing can be tricky. Hold the caulk gun over trash and depress trigger to move caulk forward, filling the tip. Caulk should flow out, not squirt or drip. Release the trigger lock to relieve the light pressure inside the tube. You may want to first practice on a test piece if you have never done it before. Use the corner of a cardboard box. This will give you a feel for the gun and the rate of the silicone flow.[3]
- The tip should be slightly above the surface, nearly touching. As you begin to press the trigger, watch the flow of caulk. With one steady motion, move the caulk gun straight along seam, creating a uniform bead. Before flow stops, quickly release the trigger and begin to press again as you continue to create a uniform bead the entire length of seam. Do not stop until you reach the corner.
-
4Begin to gently apply seal around the desired area. For best results, hold the gun at a 45 degree angle. You want to apply the caulking in an even and steady manner. Be careful not to apply too much as it can be tricky to remove the excess. When you come to the end of the area you plan to seal then release the handle and give it a quick pull to eliminate any strings.[4]
-
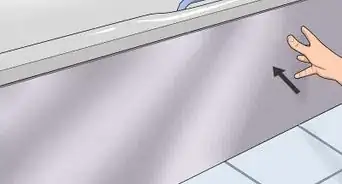
5Complete the seal with tooling. Tooling is the process of using your finger to create a seamless, clean bond between the sink and the silicone sealer. Gently pull your finger around the silicone to complete the seal. You may wish to use latex gloves. Now wipe away excess silicone from your finger, and allow to dry. When smoothing the caulk, start in a corner and go 1/2 to 3/4 across. Then start in the opposite corner and meet in the middle. When meeting the already smoothed section, lightly lift your smoothing device so there isn't a hump.[5]


Community Q&A
-
QuestionIs it possible to only partially reseal around the bath tub? I only need to replace a short length on the back wall.
 Community AnswerThe only way to seal both parts together properly would be with heat, which is likely to take more time than replacing the whole thing (as well as potential for burns). Unless you don't mind it looking botched, in which case you can just use some polyfill to seal the joining crease.
 -
QuestionHow long should I wait before it's dry?
 Community Answer24 hours will be ample time for the seal to fully cure to its entire depth.
 -
QuestionWhat can be applied to new GE silicone caulking to prevent future mold problems?Community AnswerAn exhaust fan that's properly piped to the outdoors. The reason for visible mold is lack of ventilation, not the caulk. Vent the area for twice the time the water was used to evacuate excess humidity.
Things You'll Need
- Silicone or caulk
- A silicone or caulking gun
- A knife
- A rag and a bottle of alcohol


References
- ↑ https://www.youtube.com/watch?v=HiujAReaNRk
- ↑ https://www.youtube.com/watch?v=jufcpLs-Hkk
- ↑ https://www.bhg.com/home-improvement/remodeling/how-to-use-a-caulking-gun/
- ↑ https://www.familyhandyman.com/bathroom/remodeling/how-to-re-caulk-a-shower-or-bathtub/
- ↑ https://www.youtube.com/watch?v=_DI4hfHM_Hg
About This Article