This article was co-authored by wikiHow staff writer, Danielle Blinka, MA, MPA. Danielle Blinka is a Writer, Editor, Podcaster, Improv Performer, and Artist currently living in Houston, TX. She also has experience teaching English and writing to others. Danielle holds a Bachelor of Arts in English, Bachelor of Arts in Political Science, Master of Arts in English with a concentration in writing, and Master of Public Administration from Lamar University.
There are 11 references cited in this article, which can be found at the bottom of the page.
The wikiHow Culinary Team also followed the article's instructions and verified that they work.
This article has been viewed 42,036 times.
Learn more...
Buon appetito! You don’t need a pasta machine to enjoy tasty homemade pasta. It’s fairly easy to roll out your own dough with a rolling pin, and you might get a good arm workout in the process. To prevent sticking, be sure to knead and roll out the dough on a floured surface!
Steps
Portioning
-
1Sprinkle flour on your work surface and rolling pin to prevent sticking. Use your hands to lightly dust anywhere your dough may touch. Pasta dough is super sticky, so keep a container of flour handy. You’ll need it throughout the entire roll out process.[1]
- Don’t worry about wiping the flour off your hands afterward—it will make it easier to handle the dough.
- Rolling out dough can be a bit messy! Choose a spacious work surface where you can make a mess.[2]
-
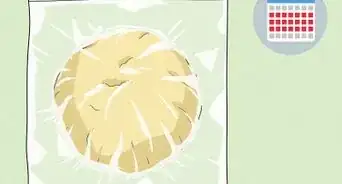
2Cut your dough into 4 portions so it’s easier to roll out. Use a long knife to slice through the dough. Try to make the portions relatively even, but don’t stress too much about it.[3]
- If you make dough a lot, consider buying a bench scraper. It makes portioning out dough super easy and quick.[4]
- Remember to keep the dough on the floured surface the entire time so it doesn't stick.
Advertisement -
3Roll each portion into a ball. Use your hands to ball up 1 portion, then place it on your countertop. Place your palm over the dough and gently roll it over the surface of the counter. Do this for each of the portions.[5]
- If the dough sticks to your hands, dust your hands with flour again.
-
4Place 1 ball on your work surface to roll it out. Set it in the center of your counter top so you have plenty of room to work. Only roll out 1 portion of dough at a time.[6]
- Place the extra balls of dough in a bowl that you’ve wiped down with olive oil. Cover the dough balls with plastic wrap or a towel until you’re ready to use them.


Stretching into Sheets
-
1Press your rolling pin into the dough and roll away from your body. Stretch the dough into an oval. Make 1 to 2 passes with your rolling pin before you turn the dough.[7]
- If you don't have a rolling pin, try improvising with a washed wine bottle or large drinking glass.
- You might encounter some resistance when you first start rolling out the dough. Keep at it—it gets easier.
-
2Turn the dough 90 degrees after each pass with the rolling pin. Pick your dough up off the counter top and rotate it in either direction. Keep rotating the dough so it thins out evenly.[8]
- Lift the dough after each pass with your rolling pin so it doesn’t stick to the work surface.[9]
- If the dough starts to stick, dust the counter top and your rolling pin with more flour. If you're working in a humid space, that may be causing the stickiness.[10]
- If your pasta does end up sticking to itself, that's okay! Just ball it back up and start over.[11]
-
3Flatten the dough until it’s about 1⁄16 in (0.16 cm) thick. Keep rolling out the dough until it reaches your desired thickness.[12] Check it by sliding your hand underneath the pasta. When it’s thin enough, you’ll be able to see your hand.[13]
- For thick pastas, like lasagna noodles, stop at 1⁄16 in (0.16 cm) thick.[14]
- If you're making linguine and fettuccine, aim for 1⁄32 in (0.079 cm) thick. For angel hair or stuffed pastas, go even thinner! These need to be as thin as possible.[15]
- It’s perfectly okay to eyeball it and estimate the thinness.
-
4Use a knife to trim the dough into a rectangle. Cut away any excess dough so that the rolled out dough looks like a clean rectangle. This makes your pasta pieces look more uniform.[16]
- It’s okay to skip this step if you don’t care if your finished pasta pieces are all the same length.
- Either discard the extra dough or incorporate it into another dough ball.
-
5Let your dough dry for 20 minutes. Set a timer and leave your dough to sit out on the counter top or a baking sheet covered in flour. It will start to dry out a bit but won’t get hard.[17]
- This firms up your pasta so it’ll hold its shape after you cut it.

Cutting the Pasta
-
1Sprinkle the dough with flour so it doesn’t stick to itself. Your dough is still sticky, so use your hands to lightly dust both sides of it with flour. Otherwise, the pasta may stick to itself when you fold it up, undoing all the hard work you did rolling it out.[18]
-
2Fold up the dough lengthwise before you cut it into pieces. Pick up the edge of the dough and make a fold about 2 to 3 in (5.1 to 7.6 cm) from the edge. Then, make another fold. Keep folding the dough until it’s all folded up.[19]
- Folding your dough makes it easier to cut it into uniform pieces of pasta.
-
3Slice the folded dough into pieces using a knife. Estimate the size of your noodles and make even cuts. Set aside your cut pieces so you can roll them out later. How big you slice the pieces depends on what type of pasta you’re making. Use these measurements as a guide:
Drying and Storage
-
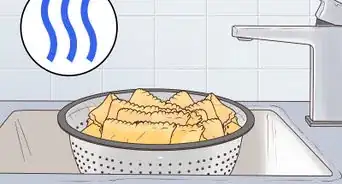
1Unroll the pasta, flour it, and let it dry for 15 minutes before cooking it. Shake out each piece of pasta and lay it on a clean baking sheet or foil-covered countertop. Then, sprinkle more flour over the pasta to help dry it out. Set a timer and leave the pasta to dry.[26]
- Drying your pasta for a few minutes improves the taste and texture of your pasta after you cook it.
- For shaped pasta, like tortellini, be sure to keep the tray and individual pasta pieces well-floured so they don't stick to each other.[27]
-
2Dry your pasta for 3 to 4 hours if you want to store it. You don’t have to cook your homemade pasta right away, but it needs to be very dry before you store it. Leave your pasta laying out to dry for at least 3 hours if you plan to use it later. Feel the pasta to make sure it feels stiff and brittle before you transfer it into a container.[28]
- Be very careful when handling your pasta after it dries, as it will be fragile.
-
3Store the pasta at room temperature in an airtight container for later use. Place your pasta in a tall, sealed container. If you don’t have a big enough container, use a plastic storage bag that has a zipper. Keep your pasta in your pantry until you’re ready to use it.[29]
- Pasta usually keeps for several months. If you notice any mold or a foul smell, don’t eat it.


Things You’ll Need
- Mixing bowl
- Clean hand towel or plastic wrap
- Olive oil
- Flour
- Flat work surface
- Rolling pin
- Knife
- Airtight storage container (optional)
References
- ↑ https://www.recipetips.com/kitchen-tips/t--793/cutting-and-shaping-pasta-by-hand.asp
- ↑ https://www.seriouseats.com/2015/01/best-easy-all-purpose-fresh-pasta-dough-recipe-instructions.html
- ↑ https://www.thekitchn.com/how-to-make-fresh-pasta-from-scratch-cooking-lessons-from-the-kitchn-73435
- ↑ https://www.thekitchn.com/handy-kitchen-tool-the-bench-s-45469
- ↑ https://www.splendidtable.org/story/2011/10/07/hand-rolled-egg-pasta
- ↑ https://www.splendidtable.org/story/2011/10/07/hand-rolled-egg-pasta
- ↑ https://www.splendidtable.org/story/2011/10/07/hand-rolled-egg-pasta
- ↑ https://www.splendidtable.org/story/2011/10/07/hand-rolled-egg-pasta
- ↑ https://www.thekitchn.com/how-to-make-fresh-pasta-from-scratch-cooking-lessons-from-the-kitchn-73435
- ↑ https://www.seriouseats.com/2015/01/best-easy-all-purpose-fresh-pasta-dough-recipe-instructions.html
- ↑ https://www.seriouseats.com/2015/01/best-easy-all-purpose-fresh-pasta-dough-recipe-instructions.html
- ↑ https://mangiabenepasta.com/rollncut.html
- ↑ https://www.splendidtable.org/story/2011/10/07/hand-rolled-egg-pasta
- ↑ https://cooking.nytimes.com/recipes/1021028-handmade-lasagna-sheets
- ↑ https://www.thekitchn.com/how-to-make-fresh-pasta-from-scratch-cooking-lessons-from-the-kitchn-73435
- ↑ https://www.youtube.com/watch?v=SXdl4fuF9zg&feature=youtu.be&t=69
- ↑ https://www.splendidtable.org/story/2011/10/07/hand-rolled-egg-pasta
- ↑ https://www.thekitchn.com/how-to-make-fresh-pasta-from-scratch-cooking-lessons-from-the-kitchn-73435
- ↑ https://www.recipetips.com/kitchen-tips/t--793/cutting-and-shaping-pasta-by-hand.asp
- ↑ https://www.recipetips.com/kitchen-tips/t--793/cutting-and-shaping-pasta-by-hand.asp
- ↑ https://www.recipetips.com/kitchen-tips/t--793/cutting-and-shaping-pasta-by-hand.asp
- ↑ https://www.youtube.com/watch?v=SXdl4fuF9zg&feature=youtu.be&t=103
- ↑ https://www.youtube.com/watch?v=SXdl4fuF9zg&feature=youtu.be&t=91
- ↑ https://www.splendidtable.org/story/2011/10/07/hand-rolled-egg-pasta
- ↑ https://www.seriouseats.com/2015/01/best-easy-all-purpose-fresh-pasta-dough-recipe-instructions.html
- ↑ https://www.recipetips.com/kitchen-tips/t--793/cutting-and-shaping-pasta-by-hand.asp
- ↑ https://www.thekitchn.com/how-to-make-homemade-tortellini-from-scratch-cooking-lessons-from-the-kitchn-188288
- ↑ https://mangiabenepasta.com/rollncut.html
- ↑ https://mangiabenepasta.com/rollncut.html
- ↑ https://www.splendidtable.org/story/2011/10/07/hand-rolled-egg-pasta
About This Article

To roll out pasta dough without a machine, you’ll need a flat surface, a rolling pin, and a sharp knife. Sprinkle flour on your work surface before you start, then divide the dough into 4 smaller pieces so it’s easier to work with. Form each portion into a ball, then roll a ball out with a rolling pin, using firm pressure and rolling away from your body. Turn the ball 90 degrees after each pass with the rolling pin. Once the dough is about one sixteenth of an inch thick, trim it into a rectangle with a sharp knife. Repeat this process with the other sections. Let the sheets of dough dry for about 20 minutes, then sprinkle on a little more flour to prevent sticking. Fold each rectangle over lengthwise and cut it into strips with a sharp knife. Keep reading to learn how to dry and store your fresh pasta!