This article was co-authored by Anthony Stark, EMR. Anthony Stark is a certified EMR (Emergency Medical Responder) in British Columbia, Canada. With over 11 years of experience, he has worked as an industrial medic and provided urban and rural paramedic services. He currently works for Mountain View Safety Services and previously worked for the British Columbia Ambulance Service. Anthony has a Bachelor of Engineering in Electrical, Electronics, and Communications Engineering from the Georgia Institute of Technology. He has completed the EMP Canada EMT Course and Swiftwater Awareness Training associated with the British Columbia Ambulance Service.
wikiHow marks an article as reader-approved once it receives enough positive feedback. In this case, 93% of readers who voted found the article helpful, earning it our reader-approved status.
This article has been viewed 209,201 times.
Steri-Strips, also called butterfly stitches, may fall off naturally when enough time passes, but there are also instances in which manual removal is necessary. The adhesive used in Steri-Strips is quite strong, but is designed to weaken over time. Most Steri-Strips are intended for removal in 12 – 14 days. Removing Steri-Strips should be done carefully, with clean hands in a well-lit area.
Steps
Removing the Steri-Strip
-
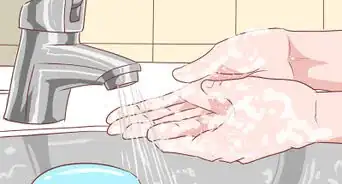
1Wet the strips with water. Apply a wet washcloth over the area covered by Steri-Strips. Hold it there for 30 to 60 seconds, or until the strips feel thoroughly soaked.[1] Do not soak the injury in water, as that gets water in the healing wound.
- If water alone does not loosen the adhesive on the Steri-Strips, try using a solution made of equal parts water and peroxide.[2] Combine the two in a plastic cup, soak the washcloth in the new solution.
- Gently lay the solution-soaked washcloth over the Steri-Strips for 60 seconds.
-
2Press down on your skin. Stabilize your skin by gently pressing down on either side of each strip with two fingers. Switch the placement of your fingers as needed so that you are directly supporting the skin around each strip as you remove it.
- If you cannot use two fingers, one finger may suffice. Place the finger on one side of the strip you plan to remove, pressing down with just enough force to make the skin slightly taut.
Advertisement -
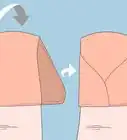
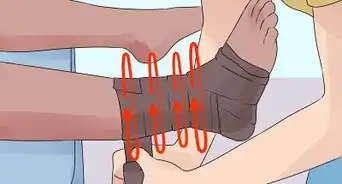
3Remove cross stays. If any strips were applied over the ends of your primary Steri-Strips, remove those first. Simply lift one end of each strip and gently pull across the length of the strip until you reach the opposite end.
- These cross stays run parallel to the wound and are usually placed 1/2 inch (1.25 cm) away from the ends of the primary strips.
- The main function of the cross stays is to support the primary strips, reducing the risk of premature peeling and skin tension blisters.
-
4Pull one end of each strip at a time. For each primary strip, begin by lifting one end and peeling it back in the direction of the incision. Stop just before reaching the incision itself.
- Grab the strip so that the fingers used to pull it away are continually positioned just above the skin.
- Pull this end away slowly, passing the strip back over itself. Pull the strip back on top of itself, doubling back, rather than lifting up.
- As you peel the strip away, shift your supporting fingers so that they move closer to the newly exposed skin.
-
5Lift the opposite end of the strip. Peel each strip in the direction of the wound. As before, stop peeling the strip away before you reach the wound.
- Note that you will be pulling in the opposite direction used for the first end. In other words, if you pulled the first end to the left, the second end should be pulled to the right.
- By pulling each strip towards the wound, you should avoid pulling the Steri-Strip directly off the wound itself. Avoid pulling a Steri-Strip off as you would a Band-Aid.
-
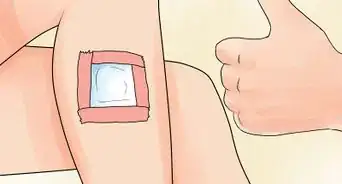
6Gently lift the strip off the incision. Start at the top of the wound and gently lift the center of the Steri-Strip off, pulling it down toward the bottom of the incision. Pull slowly and gently.
- Make sure that you are still supporting the newly exposed skin with one or two fingers.
- Continue at an even, slow pace. If you feel any resistance from the strip, try wetting it again to loosen the adhesive more or peeling it from a different direction.
-
7Repeat as needed. Remove each primary Steri-Strip from the wound in the same manner, working slowly and gently to reduce the risk of reopening the wound. Avoid tugging the strip or your skin.
- Do not be alarmed if you see dead skin peeling away with the strips.
- It is also fairly normal for brown or green patches to form on the adhesive side of the strip. Brown discoloration can be caused by dried blood. Green discoloration can be caused when the oils of your skin get trapped beneath the strip and dry.


Caring for the Affected Area
-
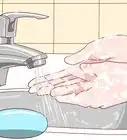
1Wash the area with antibacterial soap. Gently washed the newly exposed skin with warm water and antibacterial soap. Pat dry with a clean, soft towel when done.[3]
- Gently lather the area with antibacterial soap and warm water for 30 to 40 seconds.
- Rinse the soap away, then clean the area again for another 30 to 40 seconds in the same manner.
- Patting the area dry, rather than scrubbing it, prevents the wound from reopening.
-
2Talk to your doctor about proper wound care. The physician, nurse, or other healthcare professional in charge of your treatment may have specific instructions regarding the proper care of your wound once the Steri-Strips are off. It is recommended that you check with your healthcare provider for any necessary continuation of care.[4]
- If there are no special requirements, you should care for the wound simply by washing it gently and letting it dry completely before covering it with anything (bandages, clothing, etc.).
- Avoid exposing the wound to sunlight since excess sun can irritate the area and cause the scar to turn red.
- Depending on your circumstances and the speed at which your wound is healing, your physician or nurse may recommend that you apply more Steri-Strips or another type of bandage over the area for a few more days.
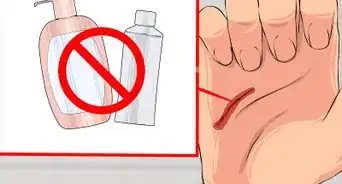
- Wounds that have been closed with strips and then left open can often become dry. Ask your doctor about a viable cream to apply to keep the area moist and reduce scarring. Creams with silica in them or Vitamin K have been shown to help reduce scarring.


Warnings
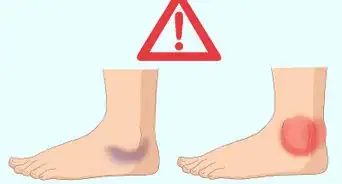
- Removing Steri-Strips prematurely can damage the new skin and may cause the wound to reopen. A wound that has reopened can become infected and increase the risk of scarring.⧼thumbs_response⧽
- Do not remove Steri-Strips unless you are specifically told to do so by your physician.⧼thumbs_response⧽
References
About This Article

To remove Steri-Strips, start by holding a wet washcloth over them for 30-60 seconds to loosen the strips. Next, stabilize your skin by pressing down on it until it’s taut. Then, begin at one end of the strip and slowly peel it back in the direction of the incision, doubling it back as opposed to lifting it up. Make sure to stop just before the incision, then gently lift off the strip and repeat the process with all the remaining strips. For more tips from our Medical co-author, like how to care for your newly exposed skin, read on!