This article was co-authored by wikiHow staff writer, Darlene Antonelli, MA. Darlene Antonelli is a Technology Writer and Editor for wikiHow. Darlene has experience teaching college courses, writing technology-related articles, and working hands-on in the technology field. She earned an MA in Writing from Rowan University in 2012 and wrote her thesis on online communities and the personalities curated in such communities.
This article has been viewed 20,105 times.
Learn more...
When you apply for a passport, you have to include a 2x2 passport photo. If you have a high-quality printer, you can actually print your own passport photo at home! We'll walk you through the simple steps to print the perfect photo so you can start traveling.
Steps
-
1Add glossy or matte photo paper into your printer. Most passports and identity cards use a paper that's at least 200gsm. Plain paper and other non-photo papers will not be accepted.[1]
-
2Open the picture in a photo editor. You can use the free Paint program in Windows or Preview in Macs to perform basic editing.
- You need the picture to be 2in x 2in (51 x 51mm). In Paint, you'll find "Page Setup" in the File tab. In Preview, you'll see the "Adjust Size" button in the Markup toolbar (make sure you enable "scale proportionally" before you change the size of your photo).[2]
Advertisement -
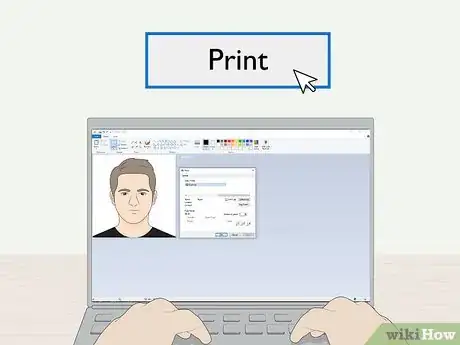
3Print the photo. You will need to click the File tab and select Print.
- A print preview should pop-up.
-
4Review the print preview. You'll need to make sure your printer is selected here as well as how many copies you want to print.
- If you print one copy and mess up, you can always print another copy. You must use a copy that is not damaged with holes, creases, or smudges.[3]
-
5Click Print. After you've approved the print preview and changed any selections necessary, you can print the photo.
References
About This Article
1. Add glossy or matte photo paper into your printer.
2. Open the picture in a photo editor.
3. Print the photo.
4. Review the print preview.
5. Click Print.









-Step-17-Version-2.webp)
