X
This article was co-authored by wikiHow Staff. Our trained team of editors and researchers validate articles for accuracy and comprehensiveness. wikiHow's Content Management Team carefully monitors the work from our editorial staff to ensure that each article is backed by trusted research and meets our high quality standards.
This article has been viewed 9,290 times.
Learn more...
Thanks to advances in 3D printing, you can design and create almost anything. But, 3D printed nylon can be rough and have a few small holes or seams when it’s finished. Fortunately, there’s plenty you can do to smooth 3D nylon prints to improve their look and feel. Check out the tips below to learn how to easily smooth nylon 3D prints.
Steps
Method 1
Method 1 of 2:
Sanding the Model
-
1Put on a pair of safety glasses and a face mask. Sanding 3D print models can cause small filaments and particles to be released in the air, which can irritate your eyes and throat. Wear a pair of safety glasses to protect your eyes from the dust and a face mask to keep from breathing in any particles.[1]
- You could also wrap a bandana or a t-shirt over your mouth and nose to keep from breathing in the particles.
-
2Remove any support material if your print has it. If your model has material that was used to help keep it supported during the print, such as a brim or skirt, use your hands to pull off large pieces first. If there are smaller support pieces, take a pair of needle-nose pliers and pull them off.[2]
- Be careful not to break or scratch your model when you remove the support material.
Advertisement -
3Clean the edges with a chisel so they’re smooth. Take a small hand chisel and use the end to gently scrape off rough edges and filaments. Smooth out all of the edges of the model so it’s easier to sand.[3]
- If you plan to glue your print to another piece, don’t smooth out the edges you’re going to connect so they bond more effectively.
-
4Rub the model in circular motions with 100-grit sandpaper. Take a coarse sheet of sandpaper and begin rubbing the surface of your model. Use circular motions while you sand so the finish is consistent. Continue sanding until the entire surface is smooth and there aren’t any rough patches.[4]
- Don’t apply too much pressure or you could break or damage the model. Apply gentle, consistent pressure as you rub in circular motions.
-
5Change to 300 and 600-grit sandpaper to polish the model. Continue sanding the model with finer and finer grit sandpaper. Use circular motions and work the sandpaper over the entire surface of the model. After you sand the model with 300-grit sandpaper, switch to 600-grit to finish polishing it.[5]
- Be careful not to over-polish the model. If an area you’re sanding starts to look sunken or lower than the surrounding surface, or if you start to see small holes in the material, stop polishing there.
- Don’t remove too many of the layers or the model could break or crack.


Advertisement
Method 2
Method 2 of 2:
Filling Holes and Seams
-
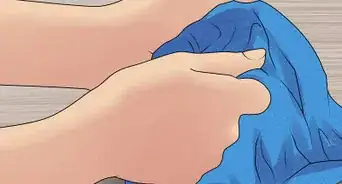
1Wash the model with soap and water and dry it off. Fill a bowl with warm water and add a few drops of a gentle dish soap. Dip a clean cloth in the soapy water and wipe the surface of the model to remove any dust and debris. Once it’s clean, take a dry cloth and wipe the model to remove moisture from the surface.[6]
- It’s super important that the model is completely dry before you fill any holes or seams on it so dust and debris don’t get mixed in with the epoxy and stick to the surface.
-
2Put on a pair of rubber gloves and work in a well-ventilated area. The epoxy you'll be using can put off noxious fumes, so open up a window or turn on a fan to increase the circulation in the room. Because it’s a strong adhesive, it can be difficult and painful to remove from your skin, so put on a pair of rubber gloves to keep your hands protected.[7]
- Try not to breathe in the epoxy fumes directly.
-
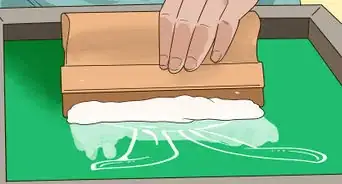
3Apply a thin layer of sandable epoxy over the hole or seam. Use your finger to apply a small amount of epoxy over any holes or seams on your model. Rub the surface to smooth and thin out the epoxy.[8]
- Epoxy is a resin that hardens and cures and is great for filling in holes and seams. Choose an epoxy that you can sand when it’s dry so you can polish the surface.
- You can buy sandable epoxy at your local hardware store or by ordering it online.
- Use as little epoxy as you can to avoid a heavy buildup.
-
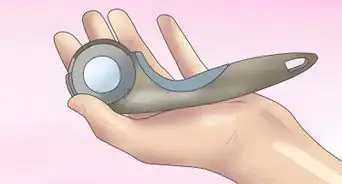
4Scrape off the excess epoxy with a razor blade. Run the edge of a razor blade over the holes and seams you filled so the surface is even. Wipe the razor blade clean after you scrape the surface so you don’t spread the epoxy to other areas of your model.[9]
- Be careful not to scratch the model with the sharp edge of the razor blade. Keep the blade held at an angle while you scrape the surface of the model.
-
5Wait 2 hours to allow the epoxy to dry and harden. Epoxy drying times can vary, but it generally needs about 2 hours of drying time to fully harden. Check the packaging of your epoxy for specific drying times and leave the model alone so it can fully harden and cure.[10]
- Turn on a fan to increase circulation in the room to help the epoxy dry.
-
6Sand the epoxy smooth with increasingly finer grit sandpaper. Start with 100-grit sandpaper and rub over the surface of the epoxy using circular motions. Once the epoxy is smooth and there aren’t any rough patches, switch to 300-grit sandpaper and sand it until it’s even smoother. Then, finish the polishing with 600-grit sandpaper so the epoxy is super smooth and consistent.[11]


Advertisement
Warnings
- Work in a well-ventilated area to avoid breathing in the noxious fumes of the epoxy.⧼thumbs_response⧽
Advertisement
Things You’ll Need
Sanding the Model
- 100, 300, and 600-grit sandpaper
- Safety glasses
- Small chisel
- Needle-nose pliers (for small pieces of support material)
Filling Holes and Seams
- Sandable epoxy
- Rubber gloves
- Razor blade
- 100, 300, and 600-grit sandpaper


References
- ↑ https://youtu.be/NLoB52nPuao?t=115
- ↑ https://youtu.be/NLoB52nPuao?t=69
- ↑ https://youtu.be/NLoB52nPuao?t=98
- ↑ https://www.fictiv.com/hwg/fabricate/ultimate-guide-to-finishing-3d-printed-parts
- ↑ https://www.fictiv.com/hwg/fabricate/ultimate-guide-to-finishing-3d-printed-parts
- ↑ https://www.fictiv.com/hwg/fabricate/ultimate-guide-to-finishing-3d-printed-parts
- ↑ https://youtu.be/YBps-j3dHW0?t=170
- ↑ https://youtu.be/YBps-j3dHW0?t=325
- ↑ https://www.fictiv.com/hwg/fabricate/ultimate-guide-to-finishing-3d-printed-parts
About This Article

wikiHow Staff
wikiHow Staff Writer
This article was co-authored by wikiHow Staff. Our trained team of editors and researchers validate articles for accuracy and comprehensiveness. wikiHow's Content Management Team carefully monitors the work from our editorial staff to ensure that each article is backed by trusted research and meets our high quality standards. This article has been viewed 9,290 times.
Co-authors: 5
Updated: September 12, 2022
Views: 9,290
Categories: Fabric Printing
Advertisement