This article was co-authored by Jeanine Hattas Wilson. Jeanine Hattas Wilson is a Professional Painter and the President of Hattas Public Murals, Inc. With nearly 20 years of experience, Jeanine specializes in creating, overseeing, designing, and painting murals. Jeanine holds a BA in Advertising from Marquette University and a Studio Painting Minor from The Milwaukee Institute of Art & Design. She has studied at The Atelier Artien in Paris, France, Los Angeles Academy of Figurative Art, and under renowned artists such as Robert Liberace, Michael Siegel, and William Cochran. To date, Hattas Public Murals has painted nearly 5,000 commissioned works of art in homes and commercial and public spaces.
There are 9 references cited in this article, which can be found at the bottom of the page.
This article has been viewed 15,152 times.
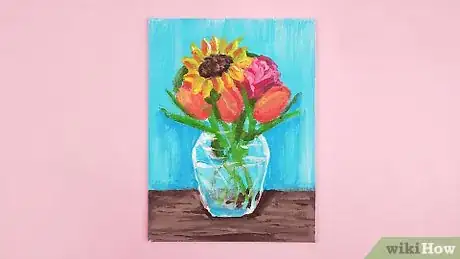
A vase full of flowers is a fantastic subject if you're new to painting. You can practice mixing colors when you paint vibrant blooms, dimensions when you paint shadows from the vase, and composition when you decide the flower arrangement. Above all, it's a chance to have fun and work on your skills.
Steps
Paint the background with vertical strokes.
-
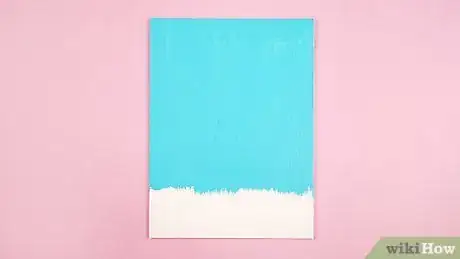
Dip a flat 1 in (2.5 cm) paintbrush in blue and white acrylic paint. You don't have to blend the colors together on your palette—just start brushing the paint onto your canvas using vertical strokes. The colors will blend together as you work. Leave about 3 inches (7.6 cm) of space from the bottom of the canvas which will be your table.[1] X Research source
- Feel free to use any colors you like for the background! For a darker, more dramatic painting, use rich brown and gold. Want a minimalist painting? It's totally fine to leave your background white.
- There's no need to wait for the background paint to dry before you paint the table.
Brush the bottom 3 in (7.6 cm) with brown to make the table.
-
Rinse your flat brush and dip it into brown paint with a touch of white. To help you make a straight tabletop, lay a T-square ruler at the bottom of your canvas so the horizontal edge is exactly 3 inches (7.6 cm) from the bottom. Then, paint horizontal strokes with your brown color to fill in this table space. Let the background and table dry for 30 minutes before you work on the flowers.[2] X Research source
- If you want a different table color, go for it. Try using gray with a touch of black to make your table look metallic, for instance.
Sketch the outline of the vase.
-
Use a piece of white chalk or a pencil to lightly draw the vase on your canvas. For a classic vase shape, draw a circle that extends about 3 inches (7.6 cm) below the line of the table. Then, sketch 2 vertical lines coming up from the top of the circle. Leave 3 to 4 inches (7.6 to 10.2 cm) of space between the lines. Draw a slightly curved line at the top to connect them and form the rim of the vase.[3] X Research source
- Play around with the shape of your vase. You might make your vase wider near the top or cylindrical, for instance.
- It's totally up to you where you place the vase in your painting. Position it in the center for a bold look or place it off to one side for a dramatic effect.
Draw the outlines of your flowers above the vase.
-
Decide what kinds of flowers you'll have in your vase before you begin. This way, you know what shapes to make. Need some inspiration? We'll walk you through painting roses, tulips, and sunflowers, but feel free to choose whatever flowers you like![4] X Research source
- For example, sketch your roses so they're rough circles, make ovals where you want to put tulips, or make 2 concentric circles for sunflowers.
- If you'd rather paint the flowers freehand, you can skip this step.
- You can paint a vase that's full of a single type of flower or go for a mix.
Fill in the roses with a few shades of the same color.
-
Dip a #8 round brush in a base color and paint the entire rose shape. Squeeze white paint on your palette along with a few colors you want your roses to be. Get your brush into the lightest color and fill in a rose. Then, dip your brush in a darker shade and make C-shaped strokes coming from the middle of the flower. These make the petals. To make a lighter-colored rose, mix a color with some of the white paint.[5] X Research source
- For example, fill in a rose with light pink paint. Then, mix in a little dark purple to make the petals.
- If you want more of an impressionist style, keep your brush strokes short and choppy instead of blending them together.
- Use more shades of paint to add highlights and shadows.
Make oval shapes to form your tulips.
-
Tulips are a great flower for beginners to paint. Load your #8 round brush with color and paint an oval shape over the outline for a tulip. Then, dip your brush in another color—lighter or darker, either is fine—and press the brush firmly at the base of the oval. Bring the brush up along the side of the oval to create a side petal. Do this for the other side and your tulip is done![6] X Research source
- For a little variation, give your tulips pointed or frilly tips.
- Don't outline the edges—they should be thin.
Paint brightly colored sunflowers.
-
Create bold yellow sunflowers with dark orange centers. Take a round paintbrush and dip it into bright yellow acrylic paint. Paint a large yellow circle where you want the sunflower to be. Then, paint a smaller circle in the center with a darker orange color. Use this same color to paint lines radiating from the center out to the edge of the sunflower. This makes the petals.[7] X Research source
- Some sunflowers have darker centers, especially if they have black seeds. To make a darker center, dip your brush in a little black paint and blend it with the orange. Avoid using pure black, because it looks unnatural.
Use green paint to create stems.
-
Switch to a thinner paintbrush and dip it in green paint. Press your brush at the base of a flower or at the bottom edge of its petals. Drag it down in a single, slightly curved stroke until you reach the vase. At this point, you can stop at the rim of the vase if you want to paint the vase a color or keep dragging the brush down if you're going to make the vase clear.[8] X Research source
- If your vase is going to be clear, make the stems cross each other as though the flowers have been pushed down into the glass.
Add leaves around a few of the flowers.
-
Fill in gaps between the flowers with several green leaves. Dip a round paintbrush in green paint and press it near the flowers at the rim of the vase. Release the pressure as you drag the brush away from the flower to make a tapered end for the leaf. Make more leaves to fill in gaps around the flowers—make some of them a little darker or lighter so they look realistic.[9] X Research source
- The type of brush you use is totally up to you! A flat brush might be useful for stiff tulip leaves while a round brush may be better for rose leaves, for instance.
Fill in the vase or use a white outline to create a clear vase.
-
Dip a round brush in paint and go over the chalk outline of your vase. If you're painting a colorful vase, choose any color acrylic you like and fill in the vase, too. Going for a clear glass vase? Even easier—just use white to outline the vase. Then, take a dry fan brush and brush white faintly around any curves in the vase so they look three-dimensional.[10] X Research source
- To make a colorful vase look realistic, decide where light would be hitting the vase. Then, mix a little white into the color you used for the vase and brush it onto that area.
Add shadows and texture to the table.
-
Mix black into the paint you used for the table and paint a shadow from the vase. Look at where you added the highlights to the vase and paint your shadow on the opposite side. Then, use the same darker table color and add details to the wood—make curly whorls and streaks that represent boards.[11] X Research source
- If you painted the table a metallic color instead, you can skip the detail, but do paint the shadow from the vase.
Let your masterpiece dry.
-
Acrylic dries quickly, but plan on waiting a few hours before you handle it. This gives the painting time to set up. Then, display your beautiful artwork. You could frame it or hang it directly on the wall, for instance.
- Want to place it on a table? Set the canvas on a tabletop easel or display stand. You can find beautiful easels or stands that match the decor of your room.
You Might Also Like



 How to Make a Homemade Windmill
References
- ↑ https://youtu.be/iEOHQp5ragk?t=115
- ↑ https://youtu.be/iEOHQp5ragk?t=309
- ↑ https://youtu.be/TUZe50iZRIo?t=58
- ↑ https://stepbysteppainting.net/2021/03/17/spring-flower-vase-painting/
- ↑ https://youtu.be/iEOHQp5ragk?t=798
- ↑ https://stepbysteppainting.net/2021/03/17/spring-flower-vase-painting/
- ↑ https://youtu.be/TUZe50iZRIo?t=370
- ↑ https://youtu.be/iEOHQp5ragk?t=1892
- ↑ https://stepbysteppainting.net/2021/03/17/spring-flower-vase-painting/
About This Article

