This article was co-authored by Carlotta Butler, RN, MPH. Carlotta Butler is a Registered Nurse in Arizona. Carlotta is a member of the American Medical Writers Association. She received her Masters of Public Health from the Northern Illinois University in 2004 and her Masters in Nursing from the University of St. Francis in 2017.
There are 11 references cited in this article, which can be found at the bottom of the page.
This article has been viewed 23,426 times.
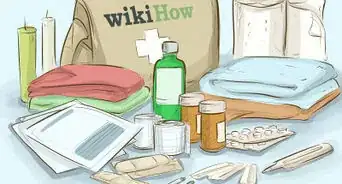
When packing gear for a hike, you want to keep your pack as light as possible. However, a solid first aid kit is a necessity. Whether you will be in the woods for a few hours or several days, a kit can make your hike more enjoyable and safer. To pack a kit you will need to choose the medications that you need to bring along. You will also want to include wound care and prevention materials. When you’ve gathered everything, make sure to pack the kit carefully.
Steps
Choosing Medications for Your First Aid Kit
-
1Pack all prescription medications. Any medications that you require on a regular basis should go with you on your hike. These items will not be available in the wilderness, or usually even in a general store, so it is better to be safe than sorry. This even applies if you anticipate being back from your hike in time.
- Prescription pill packaging can often be bulky. To save space and weight, take out the dosage that you will need (and maybe one extra) and place it in a pill bag. Label the outside of the bag with the medication name, dosage, and expiration date. If you have multiple medications, make sure to put them into separate bags to avoid confusion.
-
2Include over-the-counter medications in pill or powder form. You may suffer from a variety of health complaints or injuries when hiking, so you want to pack medications that cover a wide spectrum of potential ills. Buy travel sized versions of medications or place the pills in separate, labeled pill bags.
- Pack a pain relief and anti-inflammatory medication, such as ibuprofen or acetaminophen. Use whatever brand has worked well for you in the past, like Advil or Motrin. These will help to dull the pain and minimize inflammation in the case of injury.
- Pack an anti-diarrheal medication, such as Loperamide (sold under the brand name of Immodium, etc.). Choose the pill version of all medications when possible. Diarrhea can lead to dehydration, which can be life-threatening.[1]
- Pack a couple antacid tablets, such as Pepcid. These will help with any indigestion that you may experience. This is especially important if you will be eating food mid-hike.
- Pack an antihistamine, such as Benadryl. This can minimize the effects of allergies and other breathing conditions. It can also lessen the severity of a skin rash.
Advertisement -
3Include a small tube of sunscreen and bug repellant. Choose a high SPF sunscreen (50+) that is also water and sweat resistant. You will want to include this even if you are hiking in a shady locale. A sunburn can present a serious health hazard.[2] Bug repellant lotion or wipes will keep you from getting bitten, reducing the risk of bug-borne diseases.
-
4Pack a source of electrolytes. These come in a variety of forms: tablets, gels, powders. Choose one that you prefer and include it in your pack. You will most likely sweat when you hike and electrolytes can help to replace that moisture in your system. It is also a good hydration option if you get sick and cannot tolerate standard food.[3]


Including Items for Wound Care
-
1Make a space for topical medications. Include packets of antibiotic cream, such as Neosporin, in your kit. You can use this ointment for sanitary wound care. It also doubles as a petroleum-based lubricant if you need to apply it to areas being chafed by backpack straps.[4] Zinc oxide cream is another option to treat spots being rubbed raw.
- If you start to feel a burning in your feet, lightly applying antibiotic cream can help to fight off a possible fungal infection. This can be a particular problem when hiking in humid locations.
- Packing a small tube or packet of hydrocortisone cream is also a good idea. It will help to treat skin irritations.
-
2Include a small vial of iodine. A 1 oz. bottle is sufficient for a single hike. Read the instructions carefully to see if you need to dilute the iodine with water in order to treat wounds. Iodine’s antiseptic qualities help prevent infection.[5]
- Iodine can also be used to purify water. The rule is generally ten drops per quart of cloudy water. Let it sit for 30 minutes and it should be safe to drink.[6]
- Be aware that not all people react well to iodine. Days before you leave, you might want to test it on a small patch of skin. Iodine is also not generally recommended for use by pregnant women or those with compromised immune systems.
-
3Pack a type of protective lubricant. Chapstick or a lip lotion is great for any type of hike. If your lips crack open, they can be prone to infection. Vaseline is also helpful. You can use it to moisten wounds. You can also apply it to your skin to prevent chafing.
-
4Choose a type of adhesive or tape. You need a tape that can serve many purposes. It needs to be durable and it should maintain its stickiness in varying conditions. You can always go with standard medical tape, but it is not very versatile. Duct tape is a good choice. Fold it over on itself until you’ve created a small tape packet that can be unfolded for use.[7]
- If you don’t want to mess with scissors, paper tape is good as you can tear it by hand. However, it doesn’t always stand up well to wet conditions.[8]
-
5Include a form of liquid bandage. Some wounds are so superficial that a bandage is simply a hassle. Other wounds are so deep that you need extra adhesive help prior to receiving stitches. Many different types of liquid bandages are sold over-the-counter at your local pharmacy or grocery store.
-
6Pack gauze pads, bandages, and Band-Aids. Tightly roll the gauze and it will take up minimal space. Triangular, roll, and ace bandages should all be included. Include an assortment of sizes so that you can respond properly to all medical situations. Two-inch and four-inch pads are the best and can always be cut down if needed.[9]
- It is best to pack a mix of adhesive and non-adherent bandage options.[10]
- Butterfly closure strips, the 4-inch variety, are good to pack for small wounds and cuts.[11]
- Moleskin is a very popular choice amongst hikers. It is particularly useful in shielding blistered skin. Moleskin comes in synthetic skin sheets that can be cut as needed. They adhere to your skin, providing a barrier.[12] Pack 2-3 whole sheets in your kit.[13]
-
7Add alcohol prep swabs or wipes to your kit. These wipes often come in individual sealed packages made for quick and easy use. Rub one of these wipes on your hands before treating yourself or someone else. Use them to clean a wound area as well.[14]
-
8Include scissors and tweezers. Trauma scissors are a good option due to their blunt end. You can cut near a person’s body without injuring the skin. Foldable scissors are preferred by some people as they take up less space. When choosing your tweezers, look for metal ones with a good sturdy tip.[15]
-
9Consider adding an irrigation syringe. This is an unusual item to pack but it can be very helpful when cleaning out a wound. It’s small and can make a significant difference in infection prevention.[16]
-
10Include a pair of medical gloves. Barrier gloves are an essential if you need to render assistance or if you require care. Surgical rubber or non-latex gloves are the best option. Try on the gloves to make sure that they fit well before you include them in your kit.[17]


Packing Items for Unique Situations
-
1Consider any prior medical conditions. Bring medical items to assist you in the event that your medical condition worsens. For example, if you are diabetic, it is a good idea to pack extra insulin.[18] Or, if you’ve suffered from ankle injuries in the past you may want to pack extra gauze in case of a sprain.[19]
-
2Be prepared for allergic reactions. An EpiPen is useful to bring even if you do not have any known allergies. You may be able to save someone else. You also may discover that you are allergic to a bite or plant.[20]
-
3Bring medical items for your dog. If you are hiking with a dog, you may want to pack a few animal-specific treatment items. Check with your vet for specific instructions as to dosage, etc. For example, dogs can use certain types of aspirin.[21] It is also a good idea to pack activated charcoal. It will be helpful in the event that your dog ingests toxic plants or materials.[22]
- Due to their anatomy, dogs are particularly prone to eye injuries. Pack a small bottle of saline to flush out your dog’s eyes if needed.[23]
-
4Include a weather blanket. If an emergency occurs, you may be stuck outdoors far longer than intended. An emergency blanket, often made of a mylar material, can help you maintain a healthy body temperature and avoid hypothermia. This is especially important if you are hiking in an area that experiences cold temperatures.[24]
-
5Heed location-specific medical warnings. If you are hiking in a foreign country or a location that you are unfamiliar with, browse online to see if there are any medical or wildlife warnings available. The World Health Organization (WHO) website posts many of these warnings. In some situations an antibiotic, such as Ciprofloxacin, is a good addition to your first aid kit.[25]
-
6Add a primary care instruction booklet. Some people feel better knowing that they have a booklet to reference in case of an emergency. However, the best option is to familiarize yourself with field medicine beforehand via an in-person or online class offered by many nature agencies and outdoors stores.[26]


Putting Your Kit Together
-
1Choose a container for your kit. Use a container that is large enough for your items, yet small enough to not present a weight burden. It needs to be self-contained and waterproof. A travel micro-organizer works well and contains zip pockets to make organizing easier. Or, you can use a generic plastic container with a sealable lid.
- A money deposit bag is another option. It has a zip opening and is sturdy. You can purchase one at your local office supply store. Other people prefer using a coffee can that can double as a water boiler.[27]
- A one or two-gallon plastic freezer bag is another option. You can use quart baggies or pill baggies for smaller items, such as medications. However, be careful as this system can get disorganized quickly and the bags can puncture.
-
2Purchase travel sized or sample-sized medications. Go to the travel aisle in your local drugstore or grocery store. Look for small container versions of the medications that you need. If a package is larger, but smaller pieces can be taken out, like with Band-Aid boxes, that is okay too. Weight is always a consideration when hiking so, when in doubt, go with the miniature version of items.
- If a small version of a particular medication is not available, don’t worry. You can get the standard size and then remove the pills that you want and place them in a pill baggy in your kit.
-
3Place similar items together when packing. Group items according to usage. Medications should all go together. Topical creams should be near to one another. Bandages should be stacked and stored together. This will make it easier to pull out exactly what you need in the event of an emergency.
-
4Personalize your pre-packaged kit. There are many great pre-packaged kits available online and in stores. After you receive your kit, take an inventory of what is inside. Discard any items that you feel are not useful for you. Add other items to fit your unique hiking needs and medical situation.[28]
- For example, if you react badly to Advil, you may want to toss it out and consider another anti-inflammatory medication.
-
5Add locks, if needed. If you will be hiking with children you want to take care that they do not have access to your kit and the medications contained therein. You may want to purchase a kit bag that will allow you to lock it through the zipper area, or another access hole.


Warnings
- Check all medication expiration dates in your kit before leaving on your hike. Never use an expired medication because it can be dangerous and the medication may not work properly.[29]⧼thumbs_response⧽
- Don’t underestimate or under-utilize nature. A stick can make an excellent splint.[30]⧼thumbs_response⧽


References
- ↑ http://appalachiantrials.com/anatomy-thru-hikers-first-aid-kit/
- ↑ http://appalachiantrials.com/anatomy-thru-hikers-first-aid-kit/
- ↑ http://www.firstaidanywhere.com/hiking-first-aid-kit.html
- ↑ http://appalachiantrials.com/anatomy-thru-hikers-first-aid-kit/
- ↑ http://www.wta.org/hiking-info/basics/like-your-life-depends-on-it-building-your-first-aid-kit
- ↑ http://www.princeton.edu/~oa/manual/water.shtml
- ↑ https://www.outsideonline.com/1785691/what-belongs-my-backpacking-first-aid-kit
- ↑ http://www.firstaidanywhere.com/hiking-first-aid-kit.html
- ↑ http://www.hikinginthesmokys.com/checklist.htm
- ↑ http://www.wta.org/hiking-info/basics/like-your-life-depends-on-it-building-your-first-aid-kit
- ↑ http://www.thehikinglife.com/health-safety/first-aid/
- ↑ http://www.firstaidanywhere.com/hiking-first-aid-kit.html
- ↑ http://blog.outdoorherbivore.com/wilderness/first-aid-kit-for-backpacking/
- ↑ http://www.hikinginthesmokys.com/checklist.htm
- ↑ http://www.wta.org/hiking-info/basics/like-your-life-depends-on-it-building-your-first-aid-kit
- ↑ https://www.outsideonline.com/1785691/what-belongs-my-backpacking-first-aid-kit
- ↑ https://www.outsideonline.com/1785691/what-belongs-my-backpacking-first-aid-kit
- ↑ http://mthikes.com/how-to-build-a-backpacking-first-aid-kit/
- ↑ https://www.outsideonline.com/1785691/what-belongs-my-backpacking-first-aid-kit
- ↑ https://www.outsideonline.com/1785691/what-belongs-my-backpacking-first-aid-kit
- ↑ http://blog.outdoorherbivore.com/wilderness/first-aid-kit-for-backpacking/
- ↑ http://blog.outdoorherbivore.com/wilderness/first-aid-kit-for-backpacking/
- ↑ http://blog.theclymb.com/out-there/8-items-include-hiking-first-aid-kit-dog/
- ↑ http://blog.outdoorherbivore.com/wilderness/first-aid-kit-for-backpacking/
- ↑ http://www.thehikinglife.com/health-safety/first-aid/
- ↑ http://www.wta.org/hiking-info/basics/like-your-life-depends-on-it-building-your-first-aid-kit
- ↑ http://blog.outdoorherbivore.com/wilderness/first-aid-kit-for-backpacking/
- ↑ http://mthikes.com/how-to-build-a-backpacking-first-aid-kit/
- ↑ http://www.fda.gov/Drugs/ResourcesForYou/SpecialFeatures/ucm481139.htm
- ↑ http://www.firstaidanywhere.com/hiking-first-aid-kit.html


Medical Disclaimer
The content of this article is not intended to be a substitute for professional medical advice, examination, diagnosis, or treatment. You should always contact your doctor or other qualified healthcare professional before starting, changing, or stopping any kind of health treatment.
Read More...