This article was co-authored by wikiHow staff writer, Christopher M. Osborne, PhD. Christopher Osborne has been a wikiHow Content Creator since 2015. He is also a historian who holds a PhD from The University of Notre Dame and has taught at universities in and around Pittsburgh, PA. His scholarly publications and presentations focus on his research interests in early American history, but Chris also enjoys the challenges and rewards of writing wikiHow articles on a wide range of subjects.
This article has been viewed 159,357 times.
Learn more...
Invented in 1934 by O.G. Schmidt, electric trolling motors allow fishermen to maneuver their boats at slower speeds than trolling speed with an outboard motor and with greater control than with a paddle or oars. They are also an option for propelling boats across lakes where "no-wake" rules are in effect or in most lakes where gasoline-powered outboard motors are not allowed. Trolling motors are available for both freshwater and saltwater fishing and can be mounted in 1 of 3 places: on the transom (stern), on the engine itself, or on the bow. Following are instructions on how to mount a trolling motor in each of these places.
Steps
Mounting a Trolling Motor on the Transom
-
1Open the mounting bracket clamps. Transom-mounted trolling motors have 1 or 2 clamps built into the mounting bracket to hold the motor in place. Turning the clamps counterclockwise (to the left) will open them.
-
2Slip the motor over the transom. The trolling motor should be placed as close to the center of the stern as possible without interfering with the operation of the main motor, if there is one. The top of the mounting bracket should be flush with the top of the stern.Advertisement
-
3Tighten the clamps. Turn the clamps clockwise (to the right) as far as they will go, so that the motor won't vibrate loose while in operation.
- Transom-mounted trolling motors should be positioned so that the center of the motor section is at least 9 inches (22.5 cm) under water while the motor is running to keep the propeller from breaking the water's surface. This produces noise that can spook fish.


Mounting a Trolling Motor on the Engine
-
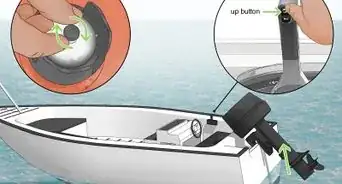
1Place the mounting bracket on top of the engine's anti-cavitation plate, with the motor up. The anti-cavitation is a horizontal plate above the propeller on either an outboard motor or the outboard unit of an inboard-outboard motor that keeps the propeller from breaking the water's surface as it pushes the boat forward. The mounting bracket is designed so that when the boat is "on plane" (the bow lifts out of the water as the boat skims across its surface), the trolling motor does break the water's surface.
- Your anti-cavitation plate must run at a depth of at least 13 inches (32.5 cm) below the waterline, so that the trolling motor will run at least 6 inches (15 cm) below the waterline while in operation.
-
2Mark holes to be drilled through the anti-cavitation plate. Use the mount itself as a template for this.
-
3Drill the holes for the mounting bolts. Use a drill bit sharp enough and tough enough to drill through the metal of the anti-cavitation plate.
-
4Place the mounting bracket on top of the anti-cavitation plate again.
-
5Insert the mounting bolts and tighten them. This will secure the trolling motor.
- Engine-mounted trolling motors are designed only for V-hull or tri-hull boats that go "on plane." They are not designed for use with pontoon boats or with sailboats.


Mounting a Trolling Motor on the Bow
-
1Separate the trolling motor assembly from the mount base. Bow-mounted electric trolling motors are designed to be used on boats with flat, raised forward decks. These types of decks are most commonly found on bass boats, which are designed for fishing for largemouth bass in shallow water around weeds and stumps where precise boat control is necessary.
-
2Choose the place on the deck where the base should be attached. You should place the mount base somewhere where it can accommodate the motor both when it is pulling the boat and when it is stowed on deck while the boat's main motor pushes it through the water. The base should also be placed where it provides enough clearance for the motor to break away from the base if the motor uses a breakaway mount and where the mounting screws can penetrate the deck but not the hull.
-
3Mark the holes to be drilled into the deck. Use the mount base as a template for this.
-
4Drill the holes for the mounting bolts. Use a sharp bit to drill to a depth of 1/4 inch (6.5 mm) and clear out any debris after drilling. If the boat is made of fiberglass, you'll have to countersink the holes.
-
5Thread a bolt through each hole in the mount base.
-
6Slip a rubber washer onto each bolt, underneath the mount base. You'll want to hold the washers in position with your fingers as you move the mount base over the holes you drilled in the deck. If this is too difficult, place the washers over the drilled holes.
-
7Place the base over the drilled holes, slipping the bolts through each hole.
-
8Check to see that the base rests level against the deck surface. If it doesn't, you'll need to add more rubber washers under those bolts where the base wobbles to level it.
- The base needs to rest evenly so that the motor can be raised onto the deck and locked down for transport without binding.
-
9Thread a steel washer and retaining nut onto each bolt. Tighten the nuts to secure the base.
-
10Secure the motor assembly to the base.
- Bow-mounted trolling motors should run at least 5 inches (12.5 cm) below the water level to allow for rough water. If you fish from a standing position while running the motor, a depth of 12 inches (30 cm) is recommended.


Community Q&A
-
QuestionI cannot get under the bow to put nuts on.
 Community AnswerUse stainless steel toggle bolts. Drill 1/2 inch holes to match mounting plate. Make two slits in each hole to slip a washer (1/2 inch inside diameter to get toggle bolt through) underneath, held with a wire T, Hold in place with a couple of dabs of epoxy 90 second glue. Then put in a 1/4/20 stainless toggle bolt. Add some thread lock to your 1/4 inch bolt and bolt the mounting plate down (a quick release bracket is great).
 -
QuestionCan a trolling motor be mounted off-center of the bow and pull okay if I already have an anchor system right on the point?
 Community AnswerYes, it will. Preferred position is in the middle as this article states, but many boats do not have that option. Mine is slanted and I compensate with foot control. Remember that a boat is never still in the water and neither is the direction of the trolling motor as long as it is pulls the boat nicely.
Things You'll Need
- Drill (for bow or engine mounted trolling motors)
- Drill bits (for bow or engine mounted trolling motors)
- Bolts or screws (usually supplied in mounting kit)
- Retaining nuts (usually supplied in mounting kit)
- Metal washers (usually supplied in mounting kit)
- Rubber washers (for bow or engine mounted trolling motors)
- Wrench or screwdriver (for bow or engine mounted trolling motors)


References
About This Article

A trolling motor allows you to maneuver a boat at slower speeds than a regular outboard motor. To mount one to the primary motor mount on your boat, you’ll need a mounting bracket, mounting bolts, a drill, and a ratchet. When you have your supplies, you’ll need to place the mounting bracket on top of the anti-cavitation plate, which is the opening located just above the propeller on the main motor. Once it’s in place, you can drill holes for the mounting bolts, put in the mounting bolts, and tighten them with your ratchet. Depending on the model you have, you may also need to connect the trolling wires to the main motor. To learn how to attach a trolling motor with a Transom mount, read on!