This article was co-authored by Lois Wade and by wikiHow staff writer, Hannah Madden. Lois Wade has 45 years of experience in crafts including sewing, crochet, needlepoint, cross-stitch, drawing, and paper crafts. She has been contributing to craft articles on wikiHow since 2007.
There are 20 references cited in this article, which can be found at the bottom of the page.
This article has been viewed 88,813 times.
Want a Star Wars themed decoration and a chance to flex your crafting skills at the same time? Making an origami Yoda is the perfect activity for you! You can choose from classic Yoda from the old Star Wars, or go for baby Yoda (Grogu) from the new ones. Either way, you’re bound to have a ton of fun making this recognizable and loveable character.
Steps
Original Origami Yoda
-
1Fold the top of a 7 by 5 in (18 by 13 cm) piece of paper downward. Start with a 7 by 5 in (18 by 13 cm) piece of paper in green. Lay the paper down so that the 7 inch (17.8 cm) side is vertical and the 5 inch (12.7 cm) side is horizontal. Fold the paper down 4.5 inches (11 cm) from the bottom.[1]
- If your paper has 2 colors (one on the front one on the back), start with the robe color (brown) facing up.
- Since 7 by 5 in (18 by 13 cm) isn’t a standard size for origami paper, buy a larger size and cut it yourself using a ruler.
-
2Create a double pleat on the folded part of your paper. This double pleat will become Yoda's eyes. To make it, draw a small line about .25 inches (0.6 cm) down from the top of the fold. Make another fold along that line to create a pleat in the paper. Then, flip the paper over again and do it once more to create a zig zag line.[2]
- A pleat is made by making two folds close together, kind of in a zig zag pattern.
Advertisement -
3Make another double pleat on the bottom of the paper. Begin the pleat about 1 inch (2.5 cm) up from the bottom of the paper (not just the folded part). Fold the paper up about 1 in (2.5 cm), then flip the paper over. Make a second fold directly on top of that fold to create a double pleat on the bottom of the paper.[3]
-
4Fold down the top two corners and tuck them in. Grab the top 2 corners of your paper and fold them over to create a triangle that has a straight edge on the inside. Then, unfold them and tuck them back into the folds you made already. These folds will become Yoda’s ears![4]
-
5Flip the paper and fold both sides in toward the middle. Flip your paper over so the colored part faces upward. Fold the bottom half of the right and left side inward so they meet in the middle to create Yoda’s body.[5]
-
6Unfold the corners to make his ears. Find the corners that you tucked inside those pleats you made earlier. Unfold them so that they're sticking out, like Yoda’s ears do.[6]
-
7Fold down the top of the paper to make Yoda’s head. Find the crease that separates the top fold from the rest of the paper. Gently fold the paper so that the double crease you made earlier is on top of the creases you made on the lower part of the paper.[7]
-
8Pull at the pleats to create Yoda’s face. If you want, you can sculpt Yoda's expression by pulling at the eye and mouth pleats. You can even make Yoda's ears pointier and more wrinkled by pulling at them and crinkling the paper.[8] Enjoy your origami Yoda!
- To create a lightsaber for your Yoda to hold, grab a second sheet of origami paper and make a zig zag fold over the entire thing. Crease your folds well so the lightsaber holds its shape, then tuck it into Yoda’s arms.
Origami Baby Yoda
-
1Start with a 6 by 6 in (15 by 15 cm) paper, white side up. Baby Yoda is a little bit smaller than original Yoda, so pick a paper that’s only 6 in (15 cm) on all sides. Go for green-colored origami paper, and flip it over so the non-colored side faces up.[9]
-
2Fold the paper in half horizontally and crease it. Grab the bottom of the paper and fold upwards, meeting the top half of the paper. Press down on the fold to make a sharp crease, then unfold the paper.[10]
-
3Fold the paper in half again vertically. Keeping the white side of the paper up, fold the paper in half the other way (not the way you folded it before). Press down on the fold to make a sharp crease in the paper.[11]
-
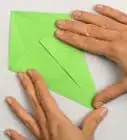
4Fold and crease the paper in a triangle shape. Unfold your paper and spread it flat on a table. Grab 1 corner and fold it over to its opposite corner, making a triangle shape. Press down on the fold to make a sharp crease. Unfold the paper again and make a second triangle fold, this time using the opposite corners. Press down on the fold to make a sharp crease and unfold your paper one last time.[12]
-
5Pinch the sides of your paper and push them together to create a triangle. Now that you have all of your creases, pick up your piece of paper, green side up. Hold your fingers in a pinching motion, then slowly push the paper in toward itself. Fold the front and back pieces of your paper to create 1 triangle shape.[13]
-
6Bend the right and left corners inward. Set your triangle shape down on a table, then grab the bottom right corner. Fold the corner inward so it touches the middle of the triangle, then do the same with the left corner.[14]
- Only make these folds on one side of the paper, not the other. Your paper will look like 1 folded triangle on top of an unfolded triangle at this point.
-
7Fold the other 2 triangle points upwards to make the ears. Flip your paper over and grab 1 of the triangle points, then fold it upwards to create a triangle with a straight line on the outside. Do the same thing to the other side to give baby Yoda his signature large ears.[15]
-
8Bend the top point downward to finish baby Yoda’s head. Grab the very top of your paper that’s still in a sharp point. Fold it downward about 1 in (2.5 cm) to give baby Yoda a flat head.[16] Now you’ve finished his head!
- If you’d like to, you can draw on eyes and a mouth using a permanent marker.
Finger Puppet Yoda
-
1Fold the paper down about 1 in (2.5 cm). Use a 7 by 5 in (18 by 13 cm) piece of green origami paper. Start with the “robe” side, or the non-colored side, facing up.[17]
- It's best to use origami paper that is green on one side and brown on the other. You can get this at any craft store.
-
2Fold both the top corners down, then unfold them. You want to fold them so that their edges line up with the edge of the green line. Make a crease, then unfold them.[18]
-
3Tuck in the corners into the folds you just made. Using the creases you made in previously as guidelines, tuck the corners in between the two sides of the paper. This will create two flaps, which will later become the ears.[19]
-
4Turn the paper over and fold the bottom up 1 in (2.5 cm). When your fold is done, there will be about 1 in (2.5 cm) of brown showing on top of the green.[20]
-
5Fold the flap back down and make a crease. You're undoing the step where you folded the bottom up 1 in (2.5 cm). Fold it back down to make a new crease that is different from that fold. This will make a zig zag shape on the paper.[21]
-
6Turn the paper back over and fold the bottom edge. Fold the paper up so that the bottom edge almost touches the top edge. Crease it well with your fingers.[22]
-
7Make a zig zag crease on top of the new fold. Fold the paper down just above the crease left over from the previous step. This will make another zig zag crease in the paper.[23]
-
8Turn the paper back over and fold each side into the center. Grab the left side of your paper and fold it over, leaving a triangle slice behind. Crease it so it stays, then do the same thing with the right side.[24]
-
9Fold out the ears so they stick out. Find the triangle flaps of paper in the center. Fold them so that they stick out. Turn the paper back over and then you’re done! Feel free to draw on a face or round out his head to make him more realistic.[25]
Things You’ll Need
Original Origami Yoda
- 7 by 5 in (18 by 13 cm) piece of green origami paper
Origami Baby Yoda
- 6 in (15 cm) piece of green origami paper
Finger Puppet Yoda
- 7 by 5 in (18 by 13 cm) piece of green origami paper
References
- ↑ https://origamiyoda.wordpress.com/2010/05/18/finally-instructions-for-folding-an-origami-yoda-like-the-one-on-the-cover-starwars/
- ↑ https://origamiyoda.wordpress.com/2010/05/18/finally-instructions-for-folding-an-origami-yoda-like-the-one-on-the-cover-starwars/
- ↑ http://origamiyoda.wordpress.com/2010/05/18/finally-instructions-for-folding-an-origami-yoda-like-the-one-on-the-cover-starwars/
- ↑ https://starwars.fandom.com/f/p/4400000000003614250
- ↑ https://starwars.fandom.com/f/p/4400000000003614250
- ↑ https://starwars.fandom.com/f/p/4400000000003614250
- ↑ https://starwars.fandom.com/f/p/4400000000003614250
- ↑ http://origamiyoda.wordpress.com/2010/05/18/finally-instructions-for-folding-an-origami-yoda-like-the-one-on-the-cover-starwars/
- ↑ https://www.youtube.com/watch?v=0sJ2_nti6y4&t=26s
- ↑ https://www.youtube.com/watch?v=0sJ2_nti6y4&t=40s
- ↑ https://www.youtube.com/watch?v=0sJ2_nti6y4&t=56s
- ↑ https://www.youtube.com/watch?t=30&v=GVow7U2HS-w&feature=youtu.be
- ↑ https://www.youtube.com/watch?t=113&v=hJ6-8wXhbjw&feature=youtu.be
- ↑ https://www.youtube.com/watch?v=hJ6-8wXhbjw&t=129s
- ↑ https://www.youtube.com/watch?v=hJ6-8wXhbjw&t=180s
- ↑ https://www.youtube.com/watch?v=hJ6-8wXhbjw&t=243s
- ↑ https://www.youtube.com/watch?v=TA4VJbqFQuw&t=47s
- ↑ https://www.youtube.com/watch?v=TA4VJbqFQuw&t=53s
- ↑ https://www.youtube.com/watch?v=TA4VJbqFQuw&t=66s
- ↑ https://www.youtube.com/watch?v=TA4VJbqFQuw&t=95s
- ↑ https://www.youtube.com/watch?v=TA4VJbqFQuw&t=108s
- ↑ https://www.youtube.com/watch?v=TA4VJbqFQuw&t=126s
- ↑ https://www.youtube.com/watch?v=TA4VJbqFQuw&t=139s
- ↑ https://www.youtube.com/watch?v=TA4VJbqFQuw&t=162s
- ↑ https://www.youtube.com/watch?v=TA4VJbqFQuw&t=180s
About This Article

To make an origami Yoda, start by making a double pleat at the top and bottom of a green, rectangular piece of paper. Then, fold down the top corners, unfold them, and tuck them into the folds you made. Next, flip the paper over, and fold both sides in and down from the top corners. Finally, fold the ears out so they're peeking out from the sides, and fold the top of the paper down toward the bottom to make the head. To learn how to make a paper Yoda finger puppet, scroll down!