X
wikiHow is a “wiki,” similar to Wikipedia, which means that many of our articles are co-written by multiple authors. To create this article, volunteer authors worked to edit and improve it over time.
This article has been viewed 11,936 times.
Learn more...
Many people are aware of the traditional origami ninja star and while it may be a classic in the world of origami, there exist much more interesting and complex versions of the “Ninja Star”. This set of instructions will teach you how to make an 8-Sided Transforming Ninja Star!

Part 1
Part 1 of 3:
Making The Basic Modules
-
1Grab one of the 8 square pieces to focus on to make the first module.
- If using sticky notes, having the adhesive side on the back will make folding easier and the added grip can be helpful in making more precise folds.
-
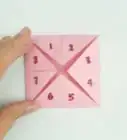
2Fold the paper diagonally from one end to the other to form a right triangle. Repeat with the other side to form an X in the middle of the paper. Fold the paper in half on one side and open it back up. You should have an X with one horizontal line through it made from the creases.
- If using sticky notes, make sure the vertical line goes through the adhesive.
-
3Position the paper so the middle straight line is vertical. Fold the corners to the middle of the cross along the vertical line.
- If using sticky notes, make sure you fold in on the side with the adhesive so the sticky portion is no longer showing.
-
4Fold the whole paper in half along the vertical line.
-
5Push the square end into itself to form a rhombus shape with 2 back flaps. This is the finished base module.
-
6Following the same steps from 3-7, make 7 more of the base modules using the other pieces of paper.


.jpg)


Advertisement
Part 2
Part 2 of 3:
Assembling the Transforming Ninja Star
-
1Grab 2 modules and put one end into the other as pictured above. The closed front of one piece should be positioned in between the back flaps of the first piece. This forms the beginning of the chain.
-
2Fold the pointed edges that hang over the crevice of the second module (but not over the other edge) and unfold the paper to form a crease. Do the same thing with the other side's pointed edge.
-
3Push both edges into the crevice of the second module to interlock the pieces and allow for a sliding motion between them.
-
4Follow the above steps with the first 6 module pieces.
- The 7th and 8th modules are a little trickier because the pieces begin to overlap, but still follow the same concept. When adding the 7th piece, make sure the front of the first piece is in-between the back flaps of the 7th piece. Slide the 8th piece into place, following the same pattern as the rest of the pieces with the front of the piece fitting in-between the 2 folded-in edges of the 7th piece and back flaps on either side of the first piece.
- When folding the flaps back edges in, you will notice that there is already another piece in the way. Fold the flaps in on either side of the piece already in the crevice, by holding the middle piece to the side while folding the edges in on either side.
- Do this with both the edges of the 7th piece as well as the edges of the 8th piece. You should now have a fully interlocked octagonal shape. This is the untransformed version of the ninja star.


Advertisement
Part 3
Part 3 of 3:
Transforming the Ninja Star
-
1Grabbing opposite sides of the octagon, push inward toward the center of the octagon, allowing the pieces to slide against each other and reveal the “blades” of the ninja star. Do this until the hole in the center is closed and all 8 edges of the ninja star are revealed. This is the transformed state of the ninja star.
-
2Pull outward on two opposite pieces until it is reverted to its original untransformed state. Repeat the above step to transform the Ninja Star again, and repeat.


Advertisement
Things You'll Need
- Sheets of paper or sticky notes (see Part 1)


About This Article
Advertisement


-Step-19-Version-4.webp)