This article was co-authored by wikiHow Staff. Our trained team of editors and researchers validate articles for accuracy and comprehensiveness. wikiHow's Content Management Team carefully monitors the work from our editorial staff to ensure that each article is backed by trusted research and meets our high quality standards.
The wikiHow Video Team also followed the article's instructions and verified that they work.
This article has been viewed 26,054 times.
Learn more...
If you have a pair of jeans that no longer fit you or that are too faded, then you might consider re-purposing them into a denim vest. Making a vest from a pair of old jeans is easy. You just need some basic sewing skills and a few special tools and materials. Try transforming a pair of your old jeans into a vest to get some more use out of them, and add a fashionable new item to your wardrobe!
Steps
Cutting Your Material
-
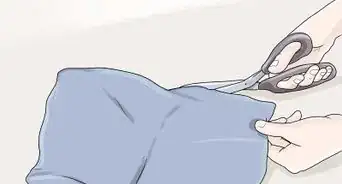
1Remove the leg material from the rest of the jeans. To make a vest out of a pair of old jeans, you will need to use the largest area of the jean material, which is available on the legs. Cut the leg material off from the jeans by cutting straight across the tops of the legs about an inch or two below the crotch.[1]
- Make sure that you remove enough fabric to cover the entire length of your vest. You can check this by placing your old vest or t-shirt over the jean leg material.
-
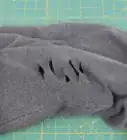
2Use a seam ripper to open up the inseam of the jeans. To make the jean leg material usable for your vest, you will need to open it up. Use a seam ripper to do this. Carefully run the seam ripper blade along the inseam of the jeans to cut the threads. Pull the seam apart as you do this and discard the cut threads.[2]
- Use a sharp seam ripper to do this. If you do not have a seam ripper, then you can also use scissors to cut through the threads, but it may take a bit longer.
Advertisement -
3Trace the shape of an old vest over the leg material. Open up the jean material and lay it flat. Then, use a piece of chalk to trace the shape of your vest onto the jean material. Make sure that you trace about 1” (2.5 cm) outside of the edges of your vest. This will ensure that you will have enough extra material for seam allowances.
- Line up the outer seam of your jean material so that it is positioned right in the center of your pieces.
- If you do not have an old vest, then you can also use a t-shirt with the sleeves folded inwards.
-
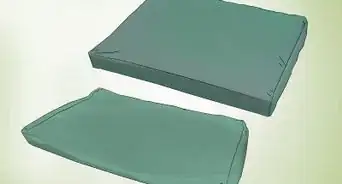
4Cut along the lines. After you have finished tracing your vest pieces onto the jean material pieces, cut along the lines. Make sure to cut carefully and avoid leaving any jagged edges. When you are done, you will have two identical pieces of jean material.
- Make sure that your scissors are sharp. Denim can be difficult to cut through.[3]
-
5Cut out the neckline for the front vest piece. Leave one of your vest pieces intact for the back of your vest. Then, take the other piece and cut an upside down triangle extending from the top (shoulder part) of the piece. Start the base of the triangle a few inches from the edge of the shoulder and end it in the same position on the opposite side.This opening will be the neckline and chest area of your piece.
- Make the cut as deep or shallow as you like. A deeper triangle cut will show more of your chest when you wear the vest and a shallow triangle cut will show less of your chest.
-
6Divide one of the front vest piece into two halves. After you have made the opening for the neckline, cut down the middle of the rest of the piece to separate the piece into two halves. Start cutting from the tip of the triangle you made and cut all the way to the bottom of the piece.
- If desired, you can also cut out the outer seam that is positioned in the middle of your vest piece.
- When you finish cutting down the center, you should have two identical pieces for the front of your vest.


Sewing the Pieces Together
-
1Pin your back vest piece to the front vest pieces. Lay your back vest piece so that the right side of the material is facing up. Then, lay the front vest pieces so that the right sides of those pieces are facing down. Line up the edges and then pin along the sides (from below the armpit to the bottom of the vest) and the shoulder areas (just the top of the shoulders) to keep everything in place.[4]
-
2Sew along the pinned edges. After you have lined everything up, you can begin sewing along the pinned edges. Sew about ½” (1.3 cm) from the edges of the jean material. Go over each seam twice to ensure that it is secured.[5]
- Use a new heavy duty needle and heavy duty (denim) thread to sew your vest. Denim can be hard to work with, so using a fine or dull needle may result in damage to your material or a bent or broken needle. Heavy duty thread will help to ensure a secure hold.
- Make sure that you only sew the pinned edges. Do not sew over the armholes, bottom of the vest, or any other areas that are not pinned.
- Remove the pins as you sew.
-
3Trim the excess thread. After you have finished sewing your pieces together, use a pair of scissors to trim away any excess threads that are left. You will likely have several hanging threads when you are done sewing.
-
4Try on the vest. At this point, you can turn the vest right-side out and try it on! Your vest is ready to wear, unless you want to add some details to it.

Adding Details
-
1Hem the edges or leave edges raw to get a frayed look. Depending on the kind of look you want, you may either leave your edges raw or hem them. Hemming the edges will result in smooth, unfrayed edges. Leaving the edges raw will result in a frayed look after you wash the vest for the first time.[6] Consider how you want your vest to look and then either hem the edges or leave the edges raw.
- If you decide to hem the edges, then fold over about ½” (1.3 cm) all the way around the edges of your vest (shoulders, bottom, neckline, and front). Pin the edges in place, and then sew a zigzag stitch along the pinned areas to secure the hem. Using the zigzag stitch will help to prevent fraying on the inner part of your seam as well.[7]
- If you want to leave the edges raw, then don’t do anything.
-
2Attach your jeans waistband around the vest opening. To add a neckline to your vest, you can attach the waistband from your jeans. Cut the waist band off from the top part of your jeans being careful to preserve the button and button hole. Then, pin the waistband to the neckline of your vest so that the right sides of the material are facing and the raw edges are lined up. Make sure to center the waistband so that the button and buttonhole will be even. Then, sew along the pinned areas to connect the two pieces, removing the pins as you sew.[8]
- Keep in mind that the waistband will probably not cover the entire opening of your vest. However, it will provide some interesting detail and a button closure for your vest.
-
3Add pockets. If desired, you can preserve the back pockets of your jeans and sew these onto the vest wherever you like. To do this, use a seam ripper to remove the pocket panels from the back of your jeans. Then, pin the pockets onto your vest where you would like them to go. Sew along the sides and bottom edges of the pockets to secure them in place. Your seam should be about ¼” (0.6 cm) from the edges of the pockets.[9]
- Remove the pins as you sew.
- Cut away any excess thread when you are done.


Things You’ll Need
- Jeans
- Old vest or t-shirt
- Chalk
- Scissors
- Seam ripper
- Pins
- Sewing machine
- Heavy duty sewing machine needle
- Heavy duty (denim) thread


References
- ↑ http://style-boulevard.blogspot.pt/2012/09/diy-turn-old-jeans-into-vest.html
- ↑ https://www.youtube.com/watch?v=XopfQRr3kj4
- ↑ https://www.craftsy.com/blog/tips-tricks-sewing-denim/
- ↑ http://style-boulevard.blogspot.pt/2012/09/diy-turn-old-jeans-into-vest.html
- ↑ http://style-boulevard.blogspot.pt/2012/09/diy-turn-old-jeans-into-vest.html
- ↑ https://www.youtube.com/watch?v=XopfQRr3kj4
- ↑ https://www.craftsy.com/blog/tips-tricks-sewing-denim/
- ↑ http://style-boulevard.blogspot.pt/2012/09/diy-turn-old-jeans-into-vest.html
- ↑ https://www.youtube.com/watch?v=XopfQRr3kj4
About This Article