wikiHow is a “wiki,” similar to Wikipedia, which means that many of our articles are co-written by multiple authors. To create this article, 16 people, some anonymous, worked to edit and improve it over time.
There are 13 references cited in this article, which can be found at the bottom of the page.
This article has been viewed 32,863 times.
Learn more...
Tomahawks were used as tools and weapons by many of the native tribes that inhabited North America prior to its colonization. These general purpose instruments have enjoyed recent popularity in the form of tomahawk throwing competitions and tournaments.[1] Whether you plan on using your tomahawk to learn a precision based skill or displaying it as a decorative piece of historical memorabilia, you can make your own 'hawk much like the Native Americans did so many years ago.
Steps
Making a Toy Tomahawk
-
1Gather the necessaries. To make your own tomahawk, or to make this as a craft with your kids, you should gather the supplies you'll need before you begin. For this project you will need:
- Feathers and beads (optional)
- Glue
- Paint (gray and brown suggested)
- Pencil (optional)
- Scissors
- Scrap paper (brown preferred)
- Cardboard
- Twine (optional)[2]
-
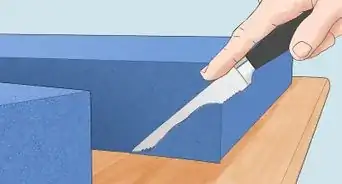
2Cut your cardboard in the shape of a tomahawk.[3] You should cut two pieces that are the full outline of a traditional tomahawk, including the ax-head and handle. You might want to consider adding support to the handle to make it more sturdy. You can do this easily by cutting 2 additional separate pieces of the tomahawk handle, which you will use later for support.
- To give a 3D appearance to the ax-head of your tomahawk, you can add a couple of pieces of cardboard cut only in the shape of the ax-head. You might want these to be slightly smaller than the full size ax-head. This will give contour and make it even more realistic.
Advertisement -
3Glue your pieces together. Your ax-head/handle combined pieces should be glued together first, with your supporting handle-only pieces glued on the outside. The same goes for your ax-head; the slightly smaller ax-head-only pieces should be glued on the outside of the ax-head on the ax-head/handle combined pieces.[4]
- You should allow your glued together pieces enough time to fully dry before you move on from this stage in the tomahawk making process.
-
4Apply some papier-mâché. To make the adhesive for your papier-mâché, you can dilute some normal all-purpose glue (sometimes called PVA glue) in a small amount of water.[5] [6] Use a paintbrush to apply your glue-water solution to your scrap paper and the surface of your cardboard tomahawk.
- For scrap paper, you might use thin brown paper, like the kind used for paper lunch bags or grocery bags. Cover the cardboard of your 'hawk so that it has a uniform appearance.
- To give a stone-like effect to your ax-head, you might want to crinkle the paper that you paste to it.
- To make the handle of your 'hawk appear wooden, you should try to glue your papier-mâché to the handle as smoothly as possible.
-
5Paint your toy tomahawk. If you are going for the classic appearance, you'll want gray and brown paint for the ax-head and the handle, respectively. Native Americans did not learn ironworking until after the arrival of colonists, so the more authentic 'hawks will have heads made of stone instead of metal.
-
6Add finishing touches. These will depend on your preference, but at this point, you might consider wrapping the head of your 'hawk in twine using a criss-cross pattern that goes around the handle, making it appear as though the head and handle are tied together.[7] You can also:
- Give the appearance of wood finish by taping the handle in clear tape.
- Glue or tie beads, ribbons, and/or feathers to create a more ceremonial looking 'hawk.[8]


Making a Metal Throwing Tomahawk
-
1Collect your tomahawk making supplies. To make your own throwing tomahawk will require some metalworking tools and raw material. Before you get started, you should gather:
- ¼" plate steel
- ¾" heavy gauge metal pipe
- Cutting goggles
- Fire extinguisher
- Hacksaw
- Heavy insulated gloves
- Plasma cutting torch/cutting laser (or other steel cutting tool)
- Pipe (for handle)
- Striker (for lighting torch)
- Welding Equipment
- File or grinding wheel
-
2Determine your method of cutting. To cut steel you will need an appropriate metal cutting torch or access to a mild steel cutting laser.[9] If you do not feel comfortable operating a high temperature steel-cutting torch, you should ask your local hardware store about places you might take mild-steel for fabrication.
-
3Prepare your work area, if necessary. You don't want any flammable materials around if you intend on using a plasma torch to cut your tomahawk head. Bare earth or concrete will reduce the possibilities of a spark from your torch causing a fire. Working on a steel table that's a comfortable height for you is recommended.
- Be wary if your table or anything else has a coating. These can sometimes be highly flammable, and the fumes can be toxic.
-
4Outline the shape of your head if cutting by plasma torch. Draw the desired shape of your tomahawk head on your steel plate. To do this, you can either use a soapstone or permanent marker.
-
5Set up your cutting implements, if necessary. You will need to hook up the appropriate tanks and gauges, turn off the necessary regulators, put on your gloves, and light your torch with your striker.[10] If you haven't performed this process in a while, you may want to revisit how to use a cutting torch, or instead of using a plasma torch, find a facility nearby that has a laser cutter you can use to fashion your tomahawk.
-
6Cut your plate steel. Make sure your plate is affixed to your table with clamps and be mindful of these while using your torch. Do not use clamps that are unable to withstand a considerable degree of heat, as these may melt. Arrange your plate at your workstation so that in cutting you will not damage the surface on which your plate rests.
-
7Sharpen your tomahawk head. Now that you've got the head of your tomahawk cut to size, you will need to sharpen it so that when you throw your 'hawk it sticks in your target. Both sides should be beveled, and the point sharp. You should use your file or grinding wheel to accomplish this task.
-
8Fashion your handle. Take your metal pipe and cut it down to size with an appropriate metal cutting saw, like a hack saw. The ideal length for your tomahawk will be between 16" and 21" depending on your preference and body type.
- You should start with a longer handle and give it a try before cutting it down to size. You can always remove more of your handle once you have discovered it is longer than is comfortable.
-
9Attach the ax-head and handle.[11] Prepare your welding equipment as you normally would, or seek the assistance of a skilled welder to guide you in the process. You will need proper safety gear, like a welding jacket, welding helmet, and a welding gloves. If you only require a welding refresher, check out how to weld.
- Once your equipment is prepared and your safety equipment put on, light your torch and weld your ax-head to your pipe handle.
-
10Grind or file away any remaining burrs. The metal cutting and welding process isn't always clean. You may have residual burrs or slag left over from making or attaching your ax-head. Using your file or grinding wheel, smooth any irregularities or deformities in the metal of your tomahawk.
-
11Add finishing touches. If may want to add an identifying feature to your tomahawk to make it more personalized, now is the time. You should also think about adding a wrap to your tomahawk handle to give it additional grip.[12]


Fashioning the Parts to a Stone Tomahawk
-
1Accumulate your tools and materials. With the use of modern technology, you can make yourself a tomahawk in a primitive style with much less effort and in a shorter period of time. For this endeavor, you will need:
- Alcohol (or epoxy solvent; optional)
- Cold water
- Epoxy
- Eye protection
- Grinder or stone cutting saw
- Head protection
- Pliers
- Pot (for boiling water)
- Respirator (for stone dust)
- Sandpaper (to polish stone ax-head)
- Scissors
- Sinew
- Stone (for ax-head)
- Wooden handle
-
2Evaluate your stone and handle ratio. A stone that is too large will be cumbersome and may put too much weight on the handle. While looking for a stone, you will want one that is slightly thicker than that of your handle and mostly flat, without any jagged edges or cracks.[13] The stone and handle will be notched later so that each fits together sturdily.
- A suitable, sturdy wooden handle can be bought at your local hardware store. Just about any kind of wood can be used in this process, so long as the thickness of the handle is slightly larger in diameter than that of your stone.
-
3Polish your stone. Depending on the kind of stone you are using, you may need to start polishing with a relatively coarse grade sandpaper. 60 grit is a good starting point.
- You can use finer grit sandpaper once the hard edges have been softened to give your tomahawk head a finished appearance.
-
4Slot your handle. Your stone tomahawk head will attach to your handle by fitting into its slotted end.[14] Using a hacksaw, cut one end of the handle of your tomahawk so that it is ¾ the diameter of your stone head of your ax.
-
5Prepare to fashion your ax-head. For the best possible fit for your tomahawk, you will want to make a corresponding notch to your handle in your stone. First you should make sure you are properly prepared to use your grinder, or other stone cutter, to notch your stone.
- Cutting stone can create a good amount of dust. You should wear a respirator or, at minimum, a mask to prevent from breathing in this dust.[15]
- Have a container of cool water nearby. Grinding or cutting stone will create a good amount of heat. You should dunk your stone regularly in your container of water to keep it from overheating.
- Eye protection is necessary in case a piece of rock or your fiber wheel breaks free during this process.[16]
- Head protection, like a thick wool hat, can also provide ideal protection if a chipped piece of stone or equipment flies of your grinding wheel.
-
6Notch your stone ax-head. It is advised that you work carefully and slowly while grinding or cutting your notch into your stone. Stone working tools are designed for this purpose and are exceptionally good at shaping stone, but careless use can result in severe injury. Depending on your grinder/cutter, there could be many configurations for use of this tool. Follow all directions as outlined in the manual, but, in principle:
- Place your stone securely in the cutting area.
- Make sure all safety catches are in place and guides are in place.
- Clear all debris from the cutting area that you might get in your way.
- Turn on your grinder/stone cutting tool.
- Lower the blade to cut a notch in your stone ¼" wide. The depth of your notch will have to be determined with regard to the slot you've made on your handle.
- The total thickness of the notched part of your stone should be slightly larger than the slot you've made on your handle. [17]


Assembling a Stone Tomahawk
-
1Soak the wood handle in boiling water. Take the slotted end of your handle and put it in boiling water to soften the wood. This will make it easier to attach the head of your tomahawk.
- Test the softness of your wooden handle with your pliers. If the wood bends with relative ease, you should be able to mold it around your ax-head.
-
2Prepare to attach your ax-head and handle. Take your length of sinew and cut a length about 10" to 12" using your scissors. Using your pliers, carefully bend the slotted end of your handle outward to make room for your ax-head. Be sure your wood does not crack when doing this.
- You should keep boiling water at the ready. Heat will go out of your wooden handle at a fairly quick rate. To maintain the flexibility of your wood, you will need to keep it hot.
-
3Test your fit. If the notch in your stone isn't deep enough or the slot in your handle is insufficient, you simply won't be able to fit your stone on your handle. Once the wood is soft, check to see if the head fits and make adjustments if you find it necessary.
- Your stone ax-head should fit firmly into its slot and should require some amount of pressure before it pushes into place.
-
4Apply your epoxy. This will help to hold your ax-head in place and make your tomahawk sturdier. Place some epoxy in the slot of your handle. You'll want to keep a rag close by soaked in a solvent, like alcohol, so that any excess or errant epoxy can be cleaned before it discolors your tomahawk.
-
5Affix your ax-head to your handle. Now you should be able to slide the notch of your stone into the slot of your handle. This might take some effort on your part.[18] Be firm, but don't exert so much pressure that you crack the handle.
- Once the stone is in place, bend the ends of your slotted wood back inward to snugly hold your stone ax-head in place.
- Wipe any epoxy on the visible parts of your stone or handle with your solvent soaked rag.
-
6Wrap your sinew around the head of your tomahawk.[19] In a figure-eight pattern, wind your sinew very firmly around either side of your tomahawk handle and the top and bottom of your ax-head. Your sinew should cross in an X shape on the flat sides of your stone.
-
7Tie off your sinew.[20] You may also want to apply a little bit of epoxy to your sinew to ensure it is firmly attached to your tomahawk. After you have wound the ax-head and handle sufficiently in a figure-eight patter, wind the remaining sinew around the base of the ax-head, and tie it off with a sturdy knot of your choice.
-
8Wait for your epoxy to dry. While waiting, you can begin cleaning up, but you should also take a moment to look over your tomahawk. If you notice any dripped epoxy, wipe it clean with your solvent soaked rag.
-
9Add finishing touches. Now that your tomahawk has finished drying, feel free to add any personal touches. You may want to add feathers or beads, or maybe even draw designs on the head of your tomahawk.


Community Q&A
-
QuestionCould I use rawhide strips instead of sinew if I soak the rawhide first so it will shrink when dried and make it tighter?
 Daniel CalentineCommunity AnswerNot all people I know use that method, but you can use pig skin. It shrinks when it dries out faster than leather, though it is not stronger.
 -
QuestionCan I make the ax-head out of bark or clay?
 Community AnswerAs long as it is for decorative purposes, you can make it out of just about anything. Many scout organizations make them out of wood or leather.
 -
QuestionAre these things safe?
 Community AnswerIf the blade is sharpened, no, it is not safe. Even if the blade is dull, you still want to be careful handling it.
Warnings
- Exercise caution when using metal cutting or welding equipment. You should always observe proper safety measures when using these kinds of tools.⧼thumbs_response⧽
- Be careful when using a grinder or stone cutting saw. These kinds of equipment can cause serious injury if not handled properly.⧼thumbs_response⧽
Things You'll Need
Making a Toy Tomahawk
- Feathers and beads (optional)
- Glue
- Paint (gray and brown suggested)
- Pencil (optional)
- Scissors
- Scrap paper (brown preferred)
- Cardboard
- Twine (optional)
Making a Throwing Tomahawk
- ¼" plate steel
- ¾" heavy gauge metal pipe
- Cutting goggles
- Fire extinguisher
- Hacksaw
- Heavy insulated gloves
- Plasma cutting torch/cutting laser (or other steel cutting tool)
- Pipe (for handle)
- Striker (for lighting torch)
- Welding Equipment
- File or grinding wheel
Making a Stone Tomahawk
- Alcohol (or epoxy solvent; optional)
- Cold water
- Epoxy
- Eye protection
- Grinder or stone cutting saw
- Head protection
- Pliers
- Pot (for boiling water)
- Respirator or mask (for stone dust)
- Sandpaper (to polish stone ax-head)
- Scissors
- Sinew
- Stone (for ax-head)
- Wooden handle


References
- ↑ http://www.americantomahawk.com/media/av/mountaineer.pdf
- ↑ http://timetravellerkids.co.uk/news/make-tomahawk/
- ↑ http://www.youthwork-practice.com/adventure-camps-events-programs/indian-camp-craft-ideas.html
- ↑ http://timetravellerkids.co.uk/news/make-tomahawk/
- ↑ http://timetravellerkids.co.uk/news/make-tomahawk/
- ↑ http://www.earmark-decorative-painting-studio.com/PVA-glue.html
- ↑ http://timetravellerkids.co.uk/news/make-tomahawk/
- ↑ http://www.native-languages.org/weapons.htm
- ↑ http://www.esabna.com/us/en/education/blog/what-is-the-best-way-to-cut-steel-plate.cfm
- ↑ http://www.thefabricator.com/article/plasmacutting/using-a-hand-held-plasma-cutter
- ↑ http://thetacticalguru.com/tactical-tomahawk/how-to-make/
- ↑ http://mandarinmansion.com/pdf/grip-wrapping.pdf
- ↑ http://thetacticalguru.com/tactical-tomahawk/how-to-make/
- ↑ http://www.knifenetwork.com/forum/showthread.php?t=58868
- ↑ http://www.hse.gov.uk/pubns/cis54.pdf
- ↑ http://www.concreteexchange.com/images/product-instructions/tools/polishers/aws125.pdf
- ↑ http://www.concreteexchange.com/images/product-instructions/tools/polishers/aws125.pdf
- ↑ http://www.knifenetwork.com/forum/showthread.php?t=58868
- ↑ http://thetacticalguru.com/tactical-tomahawk/how-to-make/
- ↑ http://www.knifenetwork.com/forum/showthread.php?t=58868