wikiHow is a “wiki,” similar to Wikipedia, which means that many of our articles are co-written by multiple authors. To create this article, 64 people, some anonymous, worked to edit and improve it over time.
This article has been viewed 923,017 times.
Learn more...
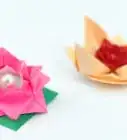
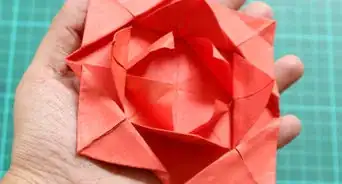
With a piece of paper and some clever folding, you can make a delicate origami lotus flower. This guide will help you get on your way by teaching you how to construct the "blintz fold:" the foundation for many popular origami projects, including the lotus flower. This guide will then teach how take that blintz base into full blossom! After a bit of practice, try experimenting with different shapes, sizes, and textures of paper to see what you can produce. With a little patience and a keen eye for detail, you will soon be impressing your friends.
Steps
Creating a "Blintz Fold"
-
1Create guidelines by folding a square piece of paper in half. Line-up the edges and corners and make a solid crease.[1]
-
2Unfold and repeat in the other direction. Be sure to line-up the edges and corners as cleanly as you possibly can.[2]Advertisement
-
3Unfold. You should now have a square piece of paper with creases/guidelines that intersect perpendicularly in the center.[3]
-
4Fold each corner inward toward the center. Begin with one corner, pulling it all the way toward the center point and lining it up with the guideline-creases you made earlier. Once everything is lined up, fold and crease.
- Try to get the tip as close to center without going past it.
- Do not unfold.
-
5Repeat the previous step for each corner. Once each corner is folded you should be left a smaller square. This is a "blintz fold."[4]
- The "blintz fold" is the foundation for many origami projects.
Creating a Lotus Blossom
-
1Fold each corner of the blintz base inward toward the center. Bring each corner all the way to the center point of the square, and line-up the corners, edges and guidelines just as you did when you first constructed the base.[5]
- Make sure the folds are on the top of the blintz base when you begin.
-
2Repeat for each corner. When you are finished, you should end-up with another square.
- You are essentially performing a series of blintz folds on a single piece of paper.
-
3Make another blintz fold. As you did with the previous step, fold each corner of the paper inward toward the center, lining up all edges and corners.
- Work each corner one at a time and be patient.
-
4Flip the square over and make another blintz fold. Once again, you will be folding the corners to the center point so that you are left with yet another, albeit smaller, square.[6]
- At this point, the paper may be very difficult to fold.
-
5Make the final folds. This time you will only be folding a portion of the corners inward. Make a fold that includes approximately 10-20 percent of the corner.
-
6Repeat for each corner. The object should know resemble an octagon with irregular sides.
-
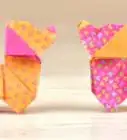
7Pull up your first petals. Keeping the object oriented so that you can see your most recent folds, feel around the bottom of the square for the top layer of flaps. Gently pull-up each flap one at a time, working around the smaller partial folds you made in steps five and six. Repeat for each flap/petal.[7]
- You will be "inverting" a fold with each petal. This is the hardest part of the process.
- Move slowly and gently, and try not to tear the paper.
- You may have to slightly "unfold" the lotus to get the petals to come up. When you're finished, the flap you grabbed from the bottom should be nearly vertical.
-
8Pull up the next round of petals. Again, grab the flaps on the bottom and gently lift them up, "inverting" the fold so that they petals open on the opposite side.
-
9Pull up the last round of petals. Grab the remaining flaps on the bottom and gently fold them upward. These petals will be closer to horizontal than vertical, and they might be the most difficult ones to fold without tearing.
Community Q&A
-
QuestionIf I need a bigger lotus, what size of paper will I use?
 Community AnswerIt really depends on how big the lotus needs to be. But, as long as it's in the shape of a square, it's okay to use any size paper.
 -
QuestionWhich way would I do one-sided colored paper?
 Community AnswerThe colored side should be facing down, so when you make the very first folds, the color side should be visible.
 -
QuestionWhy do the lotus flowers need to open?
 Community AnswerWhen the lotus flowers open, they will look more elegant and full.
References
- ↑ https://web.archive.org/web/20170929185832/http://www.origami-resource-center.com/blintz-fold.html
- ↑ https://web.archive.org/web/20170929185832/http://www.origami-resource-center.com/blintz-fold.html
- ↑ https://web.archive.org/web/20170929185832/http://www.origami-resource-center.com/blintz-fold.html
- ↑ https://web.archive.org/web/20170929185832/http://www.origami-resource-center.com/blintz-fold.html
- ↑ http://www.origami-fun.com/origami-lotus.html
- ↑ http://www.origami-fun.com/origami-lotus.html
- ↑ http://www.origami-fun.com/origami-lotus.html
About This Article
To make a simple origami lotus flower, you’ll just need one piece of square paper. First, construct the blintz fold, which is the foundation for many popular origami projects. To do the blintz fold, fold the piece of paper in half diagonally from both directions. Then, unfold the paper and fold each corner into the center. Once you’ve made the blintz base, fold each corner of the base inward to the center. Make another blintz fold next to construct an even smaller square. Then, turn the square over and make a third blintz fold on the other side. Gently fold each corner of the square inward so the shape looks like an irregular octagon. To finish the flower, pull up each layer of flaps to create the petals. For more tips on making a simple origami lotus flower, like how to pull up the last round of petals, read on!