X
This article was co-authored by wikiHow Staff. Our trained team of editors and researchers validate articles for accuracy and comprehensiveness. wikiHow's Content Management Team carefully monitors the work from our editorial staff to ensure that each article is backed by trusted research and meets our high quality standards.
This article has been viewed 45,922 times.
Learn more...
Assembling a Special Weapons and Tactics (SWAT) costume for an occasion such as Halloween or similar event can be an entertaining experience. Purchasing complete SWAT costumes can cost $30, $50, or more. But you can put together your own elements reasonably well.[1]
Steps
Part 1
Part 1 of 3:
Making the SWAT Head Gear
-
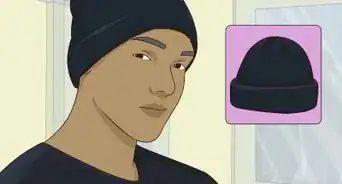
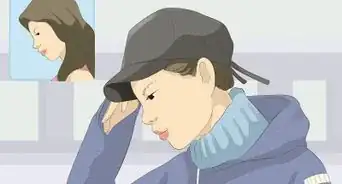
1Put on a hat. You have several options here including a cap or helmet.[2]
- You can take an ordinary ball cap or construction helmet for use in the costume.
-
2Paint the cap or helmet. If the chosen cap or helmet is not already black then paint it over.
- Get a can of black spray paint.
- Use a breathing protection mask while you apply it, and let it dry for a few hours before proceeding with further use.
Advertisement -
3Add a chin strap. If you use the helmet then you might want to think about adding a chin strap to the bottom.
- Cut off a piece of black cloth long enough to stretch from ear to ear along the bottom of the helmet and your chin.
- Tape to both ends of the strip to the bottom of the helmet from approximately the point just ahead of where your ears would go. Adjust the length if it’s too loose or too tight.
-
4Wear eye coverings from at home or from a shop. You can use sunglasses, goggles, or a visor for this part of the SWAT costume. See the later step for goggles and visor ideas if you prefer them instead.
- Get black frame-style sunglasses at home or from a shop rather than making them on your own.
- Avoid prescription or designer brands.
-
5Paint the sunglasses. If they’re not totally black you can paint or marker over the non-black areas with spray paint or black markers.
- Take care to avoid getting paint or marker on the lenses or you risk making them unusable. Try cover them with masking tape while you do the painting on the non-black surfaces.
-
6Set up goggles or a visor. Goggles and visors (such as those a welder or mechanic might use) might be available in your home or garage.
- If you don’t own goggles or a visor then you may be able to borrow them from someone handy with tools. You can ask something such as, “I’d like to borrow your welding visor for a Halloween costume, but I will return it the next day.”
- Make sure you return any borrowed equipment in the same condition you received it.
- Goggles and visors are also relatively inexpensive in local shops or online.
- Don’t paint these over especially if you intend to wear them at any point.
-
7Fasten the goggles or visor correctly. This part of the SWAT costume should be able to rest on top of your hat or helmet without falling, but also swing down with relative ease when you move them.
- If the glasses, goggles, or visor don’t already come with some kind of fastener you can tape some string to their ear pieces.
- Cut a piece of strong yarn or preferably nylon string long enough to stretch between the back of the earpieces of your chosen eye wear. It must be long enough to wrap around the back of your head and hat/helmet.
- Make sure there is enough excess string so you can tie both ends to the earpieces and leave enough slack to freely move the eye wear up and down. Ideally, you should be able to rest the eye wear on your hat/helmet and move your head freely without the eye wear slipping down.
- If the eye wear slips then you might need to use a shorter length of string on the eye wear. If it is too hard to move up and down then you need a longer piece of string.
-
8Plug your ears. You may want to add an ear piece to simulate a radio contact.
- A pair of thin-style headphones or earbuds that are black can work under your hat or helmet.
- Coil some black string or black wire from the ear piece to the back of your vest you’ll set up in a later step.
- Twist the string or wire around so it looks like a cork screw or spiral.
- Use black electrical tape to bind both ends of the wire between the back of the vest and the plastic backing of the ear piece respectively.
-
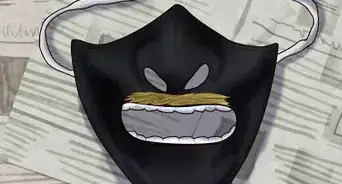
9Apply black glare eye color. This step is optional, but this can enhance the covert and field operative look.[3]
- This coloring can simulate glare protection.
- You can get the eye black at a sporting goods store.
- Apply it using your fingers in streaks just below both eyes.
-
10Apply camouflage face paint. This also can add to the covert and field operative look, but is also optional.[4]
- Mix green and black around your face for camouflage.
- You might look at a sporting goods store or department store for this paint.
- Ask the seller for suggestions if you are unsure how the paint will work with your skin complexion.
- Apply the paint generously around your cheeks, forehead, and chin using a makeup applicator or your hands.


Advertisement
Part 2
Part 2 of 3:
Assembling the SWAT Body Gear
-
1Put on an undershirt. This should be something comfortable.[5]
- This can be a short-sleeve or long-sleeve shirt.
- The shirt should be cotton or a cotton-polyester blend.
- Try to pick something you will be comfortable sweating into for a long period.
-
2Pick an undershirt colored in dark blue or black. You can sometimes get away with a white shirt for a contrast appearance instead of a blended look.[6]
- Wear this shirt under any other gear on your torso.
- You want a shirt color that will either blend with the vest or let the vest stand out.
- You don’t want the undershirt to be what draws attention.
- Do not pick a shirt with a logo.
-
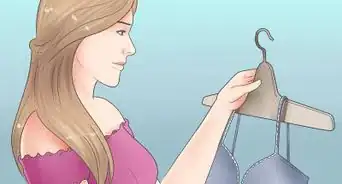
3Pick a vest. This can be a zip-up or pull-over variety of vest.[7]
- Select a vest made of polypropylene and polyester. This will ensure it’s sturdy and comfortable.
- Pick a vest with plenty of pockets for accessories.
-
4Fasten the vest properly. The vest may have an extra way to fasten with hooks around your back.[8]
- The vest hooks should snap or slide into place and loop around your back for a comfortably snug fit.
- This back strap should be adjustable. Maneuver the strap so the vest is not shifting around loosely, but is also not digging into your skin.
- This is when you should also see about taping the other end of the ear piece from the earlier section onto the top-back portion of the vest with black electrical tape. You can fasten it to an area on the shoulder or similar portion that will be out of sight—leaving only the ear bud and coiled black cord visible.
-
5Cover your elbows and knees. Depending on your sleeve situation and pants you have several options here.[9]
- None of these coverings are a must, but they do add to the image of the costume.
- For your elbows and knees you may want hardened plastic or rubber pads.
- You can improvise these out of black bicycle or skateboard pads as long as they are uniform in color. #* If they’re not all black pads then you can go over different colored areas in black marker or black electrical tape.
- Make sure the knee pads are easily adjustable for comfort by testing their straps.
-
6Wear wrist and ankle coverings. The coverings around your wrists and ankles should be cotton or a cotton/polyester mix.[10]
- These should be uniformly black as with the rest of your gear.
- Make sure you can flex your wrists and walk easily with these coverings on.
-
7Slip on gloves. These should be made of black polyester.[11]
- You can try standard or fingerless types of gloves.
- Biker gloves are an option if you can find them without logos and all black.
- You can cover any non-black areas in black electrical tape, but this may restrict movement too much in the case of gloves.
-
8Put on the right pants. You can go with long pants or shorts but either version needs to keep with the black motif.[12]
- Compare the pants color to the vest to be sure you are wearing the same shade of black top and bottom.
- Select a pair with a decent number of pockets. While your vest should already have many pockets you can benefit from additional ones.
- Pick pants with heavy duty stitching. Stronger stitching will be more comfortable and help your pants hold extra accessories.
-
9Put on a sturdy belt. Some of your accessories will hang off your belt in addition to the belt holding your pants.[13]
- Pick a leather belt with a color that fits the theme.
- Select a brown or black colored belt.
- Use a belt with a metal buckle, but without other logos.
- Plastic buckles may break, and you don’t want another logo to intrude on the theme.


Advertisement
Part 3
Part 3 of 3:
Adding Accessories
-
1Put on matching shoes. These should be black and handle long periods of use.[14]
- You can opt for combat-style boots instead of shoes, but these can be more costly and less comfortable.
- Standard black sneakers are a more inexpensive way to handle this part of the costume comfortably. #* Make sure whatever choice you make is entirely black with no logos on them.
- You can use black tape over logos temporarily if necessary.
-
2Wear a pair of black cotton dress socks. This will help to keep the color scheme going and stay comfortable.[15]
- You want socks that are well-cushioned for a lot of walking, but not so thick that your feet sweat excessively.
- Make sure the socks ride high enough to tuck into the legs of your pants.
-
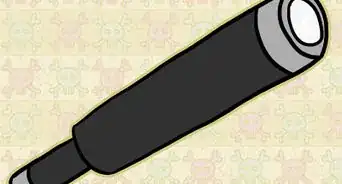
3Carry toy gear. This may include toy guns, handcuffs, SWAT shield, and baton for example.[16]
- If you don’t already have these toys around then a toy store, department store, or costume shop may have these individually sold for relatively low cost.
- Make sure you buy toy versions of all of these items and never bring the real thing to a costume party.
- Costume guns, like the toy AK-47 for example, are designated as such by the bright orange tip on the barrel.
-
4Write the correct logos. You can use a stencil and white marker or spray paint for this. Or buy the logos.[17]
- You can copy the SWAT logo onto a stencil such as construction paper or cardboard. Draw it on with a pen or black marker that makes it easy to see for cutting later.
- Cut out the marked logo from the paper or cardboard. Make sure only the letters are cut out.
- Use masking tape to tape the stencil onto the area you want to put the logo. This should be the front right pocket of the vest for a smaller stencil, and across the top-back of the vest for a larger one.
- Use white marker or spray paint to fill in the stencil and apply the logo to the target area.
- Some costume shops may sell decal logos you can stick on, or sell pre-made stencils.
-
5Set up your pockets. You should have at least half a dozen pockets between your vest and pants.
- You’ll need some pockets for your regular items like wallet, identification, keys, and so forth.
- You can use the other pockets for accessories like a flashlight, toy radio, notepad, pen, toy knife, and so on.
- Don’t overload any one pocket when you can make use of many others.


Advertisement
Community Q&A
-
QuestionWhat if I don't have a shirt with lots of pockets?
 Community AnswerJust use a button down shirt, or buy a shirt with lots of pockets.
 -
QuestionWhere do I buy this stuff?Community AnswerCostume stores are your best bet when looking for props, fake guns, handcuffs and the like.
-
QuestionCouldn't I get arrested for impersonating a police officer?
 Community AnswerAs long as your costume isn't too realistic and you're only wearing it for Halloween or something similar you should be fine.
Advertisement
Warnings
- Do not mix real weapons with toy weapons.⧼thumbs_response⧽
- Wear proper breathing and eye protection when using spray paint.⧼thumbs_response⧽
- Impersonating a police officer with intent to use their authority is illegal.⧼thumbs_response⧽
- Do not equip real weapons with your costume.⧼thumbs_response⧽
- Don’t remove the toy identifying items from your accessories.⧼thumbs_response⧽
Advertisement


References
- ↑ http://www.halloweencostumes.com/swat-costumes.html
- ↑ http://www.halloweencostumes.com/swat-helmet.html
- ↑ http://www.facepaint.com/
- ↑ http://www.facepaint.com/
- ↑ http://www.halloweencostumes.com/mens-swat-team-costume.html
- ↑ http://www.halloweencostumes.com/mens-swat-team-costume.html
- ↑ http://www.halloweencostumes.com/mens-swat-team-costume.html
- ↑ http://www.halloweencostumes.com/mens-swat-team-costume.html
- ↑ http://www.halloweencostumes.com/mens-swat-team-costume.html
- ↑ http://www.halloweencostumes.com/mens-swat-team-costume.html
- ↑ http://www.halloweencostumes.com/mens-swat-team-costume.html
- ↑ http://www.halloweencostumes.com/mens-swat-team-costume.html
- ↑ http://www.halloweencostumes.com/mens-swat-team-costume.html
- ↑ http://www.halloweencostumes.com/mens-swat-team-costume.html
- ↑ http://www.halloweencostumes.com/mens-swat-team-costume.html
- ↑ http://www.halloweencostumes.com/mens-swat-team-costume.html
- ↑ http://www.halloweencostumes.com/mens-swat-team-costume.html
About This Article

wikiHow Staff
wikiHow Staff Writer
This article was co-authored by wikiHow Staff. Our trained team of editors and researchers validate articles for accuracy and comprehensiveness. wikiHow's Content Management Team carefully monitors the work from our editorial staff to ensure that each article is backed by trusted research and meets our high quality standards. This article has been viewed 45,922 times.
Co-authors: 10
Updated: February 14, 2022
Views: 45,922
Categories: Costumes
Advertisement