This article was co-authored by wikiHow Staff. Our trained team of editors and researchers validate articles for accuracy and comprehensiveness. wikiHow's Content Management Team carefully monitors the work from our editorial staff to ensure that each article is backed by trusted research and meets our high quality standards.
The wikiHow Video Team also followed the article's instructions and verified that they work.
This article has been viewed 42,863 times.
Learn more...
Money is a common gift for occasions such as birthdays, graduation, New Years, and Eid. Instead of giving it by hand or in a plain envelope, why not make a custom money pouch instead? Making your own money pouch will allow you to customize the pouch to the occasion and the person's tastes. It will make the already special gift even more special!
Steps
Making a Simple Pouch
-
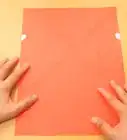
1Cut a sheet of paper down to 8¼ by 7 inches (20.96 by 17.78 centimeters).[1] You can use any type of paper you like, but if you wish to give this as a gift to someone, consider using cardstock. It will give you a more professional look.
-
2Orient the paper vertically, with one of the narrow edges facing you. If you are working on patterned paper, make sure that the blank side is facing up. This will be the inside of the pouch.Advertisement
-
3Measure down 3 inches (7.62 centimeters) from top edge, and draw a horizontal line across the page. Use a ruler and a pencil to lightly sketch the line. This will be your folding line. If you are using cardstock, you can score the line lightly instead to make it easier to fold.[2]
-
4Measure down another 3 inches (7.62 centimeters), and draw another horizontal line across the page. This will be your second folding line. Remember to use a ruler and a pencil.[3]
- The bottom of the paper will be inside your money pouch. If you'd like to make it more fancy, you can cut the edge at a slight angle.
-
5Fold up along bottom line, and secure both side edges. You can use a glue stick or double-sided tape to do this. Leave the top edge alone, or you won't be able to put any money inside. For a crisper finish, run your fingernail along the fold to sharpen the crease.
- If you don't have any glue or double-sided tape, you can use regular tape or even a stapler. This won't give you a very neat finish, however, but it will do if you just need something to hold your money.
-
6Fold down along the top line. Do not glue it down. Instead, run your fingernail along the edge to make the crease sharper. For a neater finish, unfold the flap, and erase the pencil marks you drew earlier. This way, they won't be visible when you open the pouch to take the money out.
-
7Insert some money into the envelope, and fold the top flap down again. If you'd like to give the pouch as a gift, you can write a "To:" and "From:" on the back, followed by the person's name and your name. You can also decorate the edges of the pouch with washi tape or glitter glue, and tie it off with a piece of baker's twine.

Making an Asian Money Pouch
-
1Choose your paper. You want something that is easy to fold and crease, such as scrapbook paper, wrapping paper, or origami paper. You can use other types of paper in a pinch, however, including construction paper or even old calendars.[4]
- If you want to make a traditional Chinese envelope, choose red.
- This pouch may also work for Eid.
-
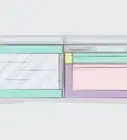
2Draw a vertical rectangle in the center of your page. If you are working on pattered paper, work on the blank side. The rectangle needs to be 2¼ inches wide and 3½ inches tall (5.72 centimeters wide and 8.89 centimeters tall). This will be the finished size of your pouch.
-
3Draw the bottom flap below the rectangle. The bottom flap needs to be ½-inch (1.27 centimeters) tall and 2¼ inches (5.72 centimeters) wide. The bottom flap will eventually be on the outside of your envelop, so you might want to give it rounded or slanted corners for a neater finish.
-
4Draw the top flap above the rectangle. It needs to be 1 inch (2.54 centimeters) tall and 2¼ inches (5.72 centimeters) wide. Give the flap either rounded or slanted corners, whichever matches your bottom flap.
-
5Draw a 1⅜-inch (3.5 centimeters) flap to the left of the rectangle. It needs to be the same height as your rectangle (3½ inches/8.89 centimeters), so don't include the heights of the top and bottom flaps! Make the bottom of the flap straight, but angle the top edge down towards the outer edge by a little. This way, when you finish folding your envelope, you'll have a wide V-shape in the center.
-
6Draw a 1¼-inch (3.18 centimeters) flap to the right of the rectangle. It needs to be the same height as your rectangle: 3½ inches (8.89 centimeters) tall. Don't include the height of your upper and lower flaps. Make the bottom straight, and the top angled down towards the outer edge.
-
7Cut your envelope out. Follow the outer lines of your flaps. Do not cut out the inside rectangle; you will use those lines as guides for folding.
-
8Fold the right flap over. Use the line you drew at the beginning as a guide. Run your fingernail across the crease to make it extra sharp. Do not glue this flap down.
-
9Fold the left flap over. Run your fingernail along the crease to sharpen it, then glue or tape the long, side edge down. Use a glue stick or double-sided tape for this.
-
10Fold the bottom flap up and glue it down. Run your fingernail across the crease, then secure the flap with a glue stick or double-sided tape.
-
11Fold the top flap down. Do not glue or tape it, or you won't be able to put anything inside of it.
-
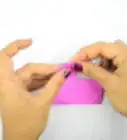
12Consider decorating the envelope to make it more unique. If you used plain paper, you can always decorate the envelope to make it more special. Turn the envelope over so that the plain, seam-less side is facing you, and decorate it with stamps or stickers. If you are artistic, you can also draw something or write a message.
- If this is for the Chinese New Year, consider drawing the current zodiac on the envelope. You can also draw bamboo or coins, both of which are common symbols of prosperity.[5]
- If this is for Eid, you could write "Happy Eid" or "Eid Mubarak" on the envelope.
-
13Insert money into the envelope, and give it away as a gift. This envelope is the ideal size to hold coins, but you can slip in some folded, paper money as well. You don't need to glue the top flap down, but you can tuck it into the envelope, if you wish.


Things You'll Need
- Paper
- Ruler
- Pencil
- Scissors
- Glue stick or double-sided tape
References
- ↑ https://stampwithamyk.com/2013/09/27/envelope-punch-board-money-holder-tutorial-new-everyday-occasions-cardmaking-kit/
- ↑ https://stampwithamyk.com/2013/09/27/envelope-punch-board-money-holder-tutorial-new-everyday-occasions-cardmaking-kit/
- ↑ https://stampwithamyk.com/2013/09/27/envelope-punch-board-money-holder-tutorial-new-everyday-occasions-cardmaking-kit/
- ↑ http://asianlifestyledesign.com/2010/12/how-to-make-a-red-envelope/
- ↑ http://asianlifestyledesign.com/2010/12/how-to-make-a-red-envelope/
About This Article