This article was co-authored by wikiHow Staff. Our trained team of editors and researchers validate articles for accuracy and comprehensiveness. wikiHow's Content Management Team carefully monitors the work from our editorial staff to ensure that each article is backed by trusted research and meets our high quality standards.
The wikiHow Video Team also followed the article's instructions and verified that they work.
This article has been viewed 268,228 times.
Learn more...
A paper dress can be a fun project for an afternoon. You can also wear a paper dress to a costume party. The process of making a paper dress can take a long time, so have patience. You'll make the bottom first, and then make a top piece to go with it. Once you're finished, you'll have a fun, flowing paper dress to show off.
Steps
Collecting Supplies and Taking Measurements
-
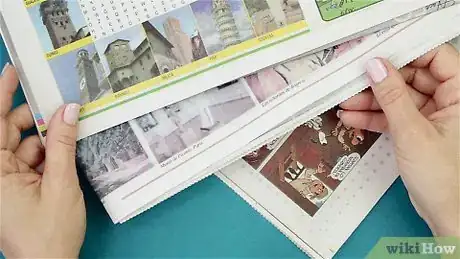
1Collect old newspapers. To start, you'll need to collect a variety of old newspapers. If you do not subscribe to a newspaper, this can get tricky. However, there are ways you can find newspapers for craft purposes.
- Old newspaper is commonly recycled. If you know a neighbor who's big into recycling, try asking him or her if they have any old newspaper to spare.
- You may also be able to find old newspaper at the recycling bin of a local dump, but make you ask worker if taking the paper is okay. Check at your local grocery store as well. If they have day old newspapers they intend to throw out, they may be willing to give these papers to you.[1]
-
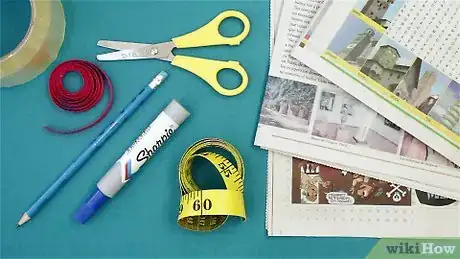
2Gather your supplies. Making a dress out of newspaper can be a fun project for an afternoon. It can also be great for a costume party. To make a newspaper dress, you'll need the following supplies:[2]
- You will need a pen or a pencil.
- Make sure to get a non-toxic brand of adhesive tape.
- You should get a tape measure, which you can purchase at a local drugstore if you do not have one on-hand.
- You'll need some string. You can use shoe string, or buy a thick bundle of string at a local craft store.
Advertisement -
3Tape together two pieces of newspaper. To start, take two pieces of newspaper. Open them up if necessary so they're spread out as much as possible. Lay the pieces side-by-side and tape them together, allowing a small amount of overlap between the pieces. This will comprise the skirt portion of your dress. Use a lot of tape to make sure the pieces are securely together, taping them down on both the front and the back.[3]
-
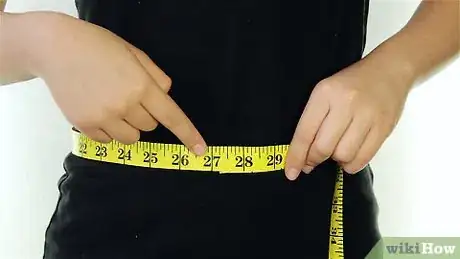
4Measure your waist and mark the newspaper. Take a tape measure and measure your waist. Measure just below your chest, slightly below your rib cage. Wrap the tape measure around your waist and see how big your waist is. Write down this number.[4]
- To measure your waist, grab your tape measure. Place the end of the tape measure directly on your skin, halfway between your lowest rib and the top of your hip bone. This should be more or less in line with your belly button.[5]
- Breath out and wrap the tape measure around your waist, making sure it's smooth without twists or wrinkles. Write down the size of your waist before removing the tape measure.
- Mark your waist size on top of the taped together newspaper. For example, say your waist is 22 inches. Start at the end of one piece of newspaper and stretch the tape measure out 22 inches. Use your pen to make a small vertical line on top of the newspaper marking the 22 inch mark.
-
5Wrap the two pieces around your waist, allowing them to cross near the line you marked. You will now want to wrap the newspaper around your waist. You want to allow the two ends of the newspapers to overlap at the line you marked. Allow them to point downward slightly when overlapping, as you want a long, flowing, triangular shape. The newspaper should look something like a lampshade. Hold the newspapers in place like this.[6]
- If you're having trouble holding the newspapers in place, ask a friend to help.
-
6Draw a line marking where the pieces overlap. Take a pen or pencil. Draw a line marking where the two ends of the newspapers overlap. You'll be taping the newspapers along this line to create the beginning of the bottom of your dress.[7]
-
7Tape this line down using several pieces of tape. Remove the newspaper from your waist. Carefully fold the two pieces of newspaper again, having them overlap at the line you drew. They should maintain the same basic shape they were in when wrapped around your waist. Remember, it should look something like a lampshade. Use several pieces of tape to tape the newspapers together along this line. You should now have a cone-like shape that you can stand up.[8]
Creating the Full Skirt
-
1Add several layers of newspaper to the skirt portion. You can set your existing skirt, that is the portion of newspapers taped in a lampshade shape, on a chair or stool. You can then add layers by taping more newspaper to the skirt. Take a piece of newspaper and place one end of it roughly in the middle of your skirt. Tape this newspaper to the skirt, using several pieces of tape to secure. Then, add more pieces of newspaper to the middle of the skirt, allowing some overlap between pieces, until all sides of the original skirt are covered with extra newspaper. The new newspapers should add length as they'll stretch down slightly below the two original newspapers.[9]
- How many newspaper you'll need to layer depends on the size of your skirt. If you have a bigger waist, you'll need more newspapers.
- Length is optional. You can stop with one extra layer of newspapers wrapping around the skirt. If you want a longer skirt, however, add another layer. This time, tape new newspapers over the overlapping portions of newspaper you added to the original skirt. The ends of these new newspapers should be taped down about halfway between the first layer of newspaper you added.[10]
-
2Cut a slit down the back of your skirt. Now, take your scissors. Make a cut at the back of your skirt. Cut through the middle of the first two newspapers you taped together. This will create a slit in the back of your skirt, that will eventually allow you to take the skirt on and off.[11]
-
3Create two small strips of newspaper. From here, create two small strips of newspaper. To do so, take a single piece of newspaper. Fold this newspaper in half length-wise and then cut down the line in the middle. Take one side of the newspaper and roll it into a tight cylinder shape. Press the cylinder down until it folds into a firm strip. Place several pieces of tape along the edge of this strip to secure it. Repeat with the other piece of newspaper.[12]
-
4Use these two small strips to create drawstrings for the back of your skirt. You will now apply these two strips to the back of your skirt. This can be a somewhat complicated process, so go slowly here to make sure you do this correctly.[13]
- Place one of your newspaper strips along one side of the slit at the back of your skirt. Tape the tip of the strip down on top of the slit. Then, move down about an inch and place another piece of tape across the strip. The idea is to create a series of slots along the seam of the dress, through which you'll later weave string to secure the dress in place. Keep taping down the slit of newspaper, leaving about one inch of space between pieces of tape, until you reach the end of the slit.
- Repeat the same process on the other side, using the other strip. Make sure the slots you create on the other side line up with slots you originally created.
- Then, take several pieces of string. Feed one piece of string between each slot on one side. Then, pass this piece of string through the corresponding slot on the other side. When you're ready to put on your skirt, you will tie the strings together to secure it. Later, when you want to take off your skirt, you can untie the strings.
Forming the Dress's Top
-
1Tape two more pieces of newspaper together. From here, you can create the top your dress. Once again, you'll start by taping two pieces of newspaper together like you did when you began your skirt.[14]
-
2Cut the tops of each newspaper in a curved shape that resembles the top of a low-cut dress. From here, you'll want to make the top of your newspapers look like the top of a low-cut dress. Cut the tops of each piece of newspaper into an upward bending curve. This should look something like the top of bra cups or a bikini top.[15]
-
3Fold in the bottom of the dress's top slightly. You do not want the top of the dress to look boxy or awkward when paired with the skirt. Therefore, it's a good idea to make sure the dress's top bends in slightly, following the curve of your waist.[16]
- Take the two taped together pieces of newspaper forming the top of your dress. Cut a small slit about halfway through the non-curved end of one piece. The slit should not go all the way to the top of the newspaper. Cut about halfway up the newspaper.
- Now, pull one end of the slit over the other end, bending your top at a slight angle. Tape these pieces together. Repeat this process on the other side.
-
4Tape the top portion of the dress around your torso. Wrap the top portion of your dress around your torso. The curved portions, the ones that resemble a bikini top, should fall on top of your chest. See how much of the newspaper you need for the top to fit. Mark where the newspaper intersects. Remove the top and then cut off any extraneous newspaper.[17]
-
5Tape the top back on and slip on the bottom. You now have a full newspaper dress. Place the bottom on, tying the strings in the back to secure the skirt in place. Then, wrap the top portion around your waist and tape it in place. You should have a full paper dress that you can wear to a Halloween party or just wear for fun.[18]
- You will probably need someone to help you secure the dress in place.
Community Q&A
-
QuestionCould you please elaborate on how to put in the drawstrings?
 Community AnswerTake a safety pin and hook it on to the drawstring. Insert the safety pin into a drawstring hole. Move the safety pin through the hole.
 -
QuestionI didn't understand the strips part of it. Can someone explain it to me?
 T. ChinsenTop AnswererA half sheet (lengthwise) of newspaper is rolled into a small tube (about 1"/2.5 cm diameter) that is flattened to form a strip. This makes the paper strong enough for lacing to be threaded through it.
Warnings
- If you wear this in rain or other bad weather, the dress will melt off. Wear undergarments (a short skirt and undershirt) in case this happens so that you are not parading around in your underwear.⧼thumbs_response⧽
- Keep away from fire.⧼thumbs_response⧽
References
- ↑ http://www.city-data.com/forum/dogs/1771523-where-get-stacks-newspapers.html
- ↑ https://www.youtube.com/watch?v=BGwwz-l8j-A
- ↑ https://www.youtube.com/watch?v=BGwwz-l8j-A
- ↑ https://www.youtube.com/watch?v=BGwwz-l8j-A
- ↑ http://www.healthdirect.gov.au/body-mass-index-bmi-and-waist-circumference
- ↑ https://www.youtube.com/watch?v=BGwwz-l8j-A
- ↑ https://www.youtube.com/watch?v=BGwwz-l8j-A
- ↑ https://www.youtube.com/watch?v=BGwwz-l8j-A
- ↑ https://www.youtube.com/watch?v=BGwwz-l8j-A
- ↑ https://www.youtube.com/watch?v=BGwwz-l8j-A
- ↑ https://www.youtube.com/watch?v=BGwwz-l8j-A
- ↑ https://www.youtube.com/watch?v=BGwwz-l8j-A
- ↑ https://www.youtube.com/watch?v=BGwwz-l8j-A
- ↑ https://www.youtube.com/watch?v=BGwwz-l8j-A
- ↑ https://www.youtube.com/watch?v=BGwwz-l8j-A
- ↑ https://www.youtube.com/watch?v=BGwwz-l8j-A
- ↑ https://www.youtube.com/watch?v=BGwwz-l8j-A
- ↑ https://www.youtube.com/watch?v=BGwwz-l8j-A
- Videos provided by Tayler Jade
About This Article
To make a paper dress, start by laying two sheets of newspaper side by side and taping them together. Then, wrap the paper around your waist, overlap the ends, and point the ends downwards slightly to form a triangular shape. Once you're happy with the position, tape it together to form the skirt. Next, add several layers of newspaper to the middle of your skirt to lengthen it. To make the top, tape 2 sheets of paper together and cut the tops so you have 2 upward-facing curves that look like a low-cut dress. Then, secure the paper around your torso with tape. To learn how to make a draw string for your skirt and taper in the top at your waist, read on!
