This article was co-authored by wikiHow Staff. Our trained team of editors and researchers validate articles for accuracy and comprehensiveness. wikiHow's Content Management Team carefully monitors the work from our editorial staff to ensure that each article is backed by trusted research and meets our high quality standards.
There are 16 references cited in this article, which can be found at the bottom of the page.
The wikiHow Video Team also followed the article's instructions and verified that they work.
This article has been viewed 62,234 times.
Learn more...
Paper is a great medium for a variety of projects! If you love cats and want to create some of these whimsical creatures out of paper, try making an origami cat, which is simple and fun. For another simple project, cut a cat out of a paper plate. If you have cardstock around, enjoy making a kitty that stands up on its own.
Steps
Making an Origami Cat
-
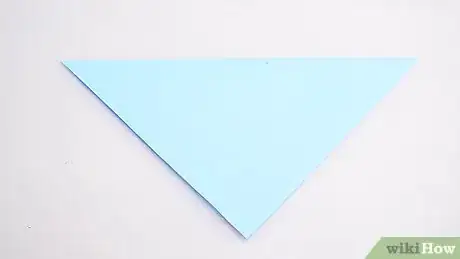
1Fold a square piece of paper in half to make triangles. Grab one corner and pull it diagonally across the square to the other corner, lining them up on top of each other. Line up the edges, too. Make a crease across the paper, creating one triangle folded on top of another.[1]
- Run your fingernail across the crease to make it sharper.
-
2Crease the triangle by folding it in half again and unfold it. With the original fold at the top, bring the top right corner over to meet the top left corner, lining them up. Make sure the edges are aligned, and then crease it down the middle. You should now have a smaller triangle with a fold on the right.[2]
- Once you've run your fingernail along this crease, open it up again to the original triangle you folded.
Advertisement -
3Fold the 2 corners of the triangle down. Lift up the right corner of the triangle. Bring it over toward the middle. When you make this fold, the edge of the triangle will start at the middle point of the larger triangle on the long top side and run outward to one side of the bottom point. The point will hang over the edge of the larger triangle. Make a crease along the top. Do the same on the other side.[3]
-
4Bring the bottom point up about halfway. Grab the point at the bottom and make a fold about 1/4 of the way up the triangle. That will leave the point about halfway up. Use your finger to make a crease across this fold.[4]
- At this point, you should have a triangle on each side with the points hanging over the edge. In the middle, you'll have a large triangle with a smaller triangle inside it.
-
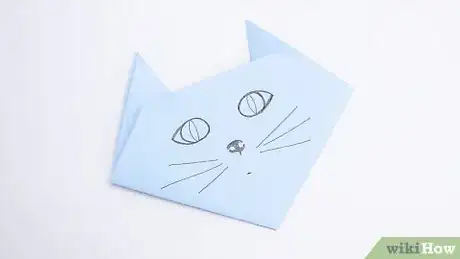
5Flip the paper over to see your cat and draw a face. When you flip it over, turn the paper so the pointed parts you folded over the edge are at the top, making the ears. Draw on eyes, a nose, mouth, and whiskers, and your paper kitty is done.[5]
Creating a Cat out of a Paper Plate
-
1Flatten out and paint the plate. Use your fingers to stretch out the edge of the paper plate as much as possible. Paint the back side of the plate the color you want your cat to be. Black works well for a scary Halloween cat![6]
- You can use acrylic paint, tempura paint, or even finger paint. Apply it with a sponge brush, sponge, or large paintbrush.
-
2Trace and cut out a large circle on one edge of the plate. Use a food container top or another large circle you have. The circle should take up about 50% of the larger circle. Trace it close to one edge on the non-painted side, then cut out the circle and that edge together.[7]
- You can also use a compass to trace the circle.
- You want the larger circle to end up looking like a crescent moon with pointed ends.
-
3Outline a smaller circle on the head piece for cutting out the head, tail, and ears. The head piece is the smaller circle you snipped out of the original plate. Using a container lid, trace a smaller circle onto the back of this piece in the smooth part of the plate and snip around it. Leave the wrinkled edge for the tail. From the strip you have left, cut out 2 small triangles for ears and a curved piece for the tail.[8]
-
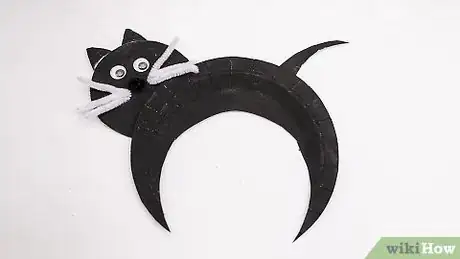
4Tape the head and tail on the crescent. Flip the crescent shape so the points are downward, forming the legs. Turn it to the non-painted side. Tape or glue the smaller circle on one side of the arch near the top. Place it slightly behind the big circle. Arrange the tail arching away from the crescent on the other end and tape or glue it into place.[9]
- The painted sides should all be facing front.
-
5Glue or tape the ears, eyes, nose, and whiskers on the cat's face. Glue the ears you cut out on the back of the cat's head with the painted side facing forward. Cut out small strips for the whiskers and glue them into place. For the eyes and nose, you can cut out pieces of paper in other colors or use googly eyes and a pompom for the nose.[10]
- For a cat nose, cut a little triangle out of pink paper. For eyes, cut eye shapes then draw in slits in the middle.
Cutting out and Gluing a Paper Cat
-
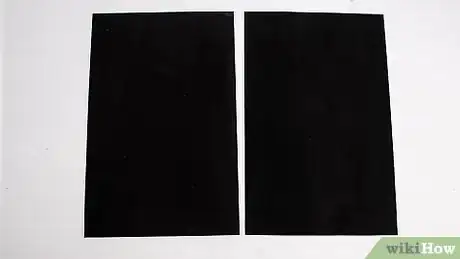
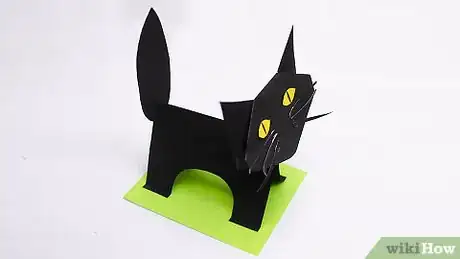
1Slice a piece of 11 by 8.5 inches (28 by 22 cm) cardstock in half. Create 2 rectangles. Each one will be 5.5 by 8.5 inches (14 by 22 cm). You'll use one half for the body of the cat and one half for the head and tail.[11]
- This can be any color you want. Try black for Halloween or a white cat for winter!
-
2Start the body by folding 1 piece of the cardstock in half. Find the middle of the long edge on one of the smaller pieces of cardstock you just cut. Fold it over to make this long edge half the size; make sure the edges meet.[12]
- For another type of body, cut out a wide triangle with a curved edge. Pull the sides of the triangle together to overlap, making a cone. Glue the edges together. You can cut out small strips of paper for feet at the bottom.[13]
-
3Finish the body by cutting out a half circle. On the folded rectangle, find the new long edge that's not the folded edge. Come in about 1 inch (2.5 cm) on this edge and cut a half circle that reaches to about 1 inch (2.5 cm) from the other side.[14]
- This makes the body and the legs; the top of the half circle is the body and the parts that come down are the legs. Unfold the rectangle slightly to make an "A" shape. On the bottom of each leg, bend out a small square that's about 0.25 inches (0.64 cm) long; fold it at a 90-degree angle to make feet.
-
4Glue the body onto a small piece of cardstock. Use a half sheet of cardstock, though pick a different color from the cat. Add glue to the bottom of the cat's feet and press them onto the cardstock. As you glue the body, make an "A" shape with it using the feet as the bottom of the "A." Hold the feet in place for a few seconds until the glue starts to set.[15]
- If you used the cone-shaped body, you don't need to glue it to anything, as it is sturdy enough as it is.
-
5Slice a tail off of the second piece of cardstock you cut in the beginning. Cut about 1 inch (2.5 cm) of cardstock off one of the short ends, leaving a rectangle that's about 7.5 by 5.5 inches (19 by 14 cm). Cut off the corners of the strip so that the tail is pointed at both of the short ends.[16]
- You could cut out a curvy tail instead if you prefer![17]
-
6Cut the head out of the rest of the second piece of cardstock. Fold the piece of paper so that you half the long side. On the long non-folded edge, make the cat's chin by curving the corners with scissors. Unfold the rectangle for a moment, and start cutting halfway up the bottom rectangle; as you do, angle the cut in about 1 inch (2.5 cm) and stop at the crease in the middle. Fold the rectangle back, and the cuts you just made will pop up for the ears.[18]
- Run your fingernail along the crease at the top to make sure the cat's face stays folded.
-
7Create the eyes and whiskers by cutting them out of paper. For the eyes, cut out 2 eye shapes from a contrasting color. Yellow goes well with black! Draw in a slit on each eye with a marker. Using the scraps of paper from your cat's main color, cut out small strips of paper for the whiskers. Glue the eyes and whiskers in place on the cat's face.[19]
-
8Add the tail and face to the cat's body by cutting slots for them to slide into. Along the top of the fold on the cat's body, cut a small slit going downward on either end of the body about 1 inch (2.5 cm) from the ends. Slide the back rectangle of the cat's face into one end, facing away from the body. Slide one end of the tail into the back slit.[20]
- Add a bit of glue if they don't want to stay in place.
Community Q&A
-
QuestionIs there a way to make it 3D?
 Community AnswerThere is a pattern in the Silhouette library for a 3D paper cat. There are also many patterns and ideas if you Google "3D paper cat."
 -
QuestionCan I make it 3D?Paper is not a good medium for 3D creations. Try making a cat from modelling clay instead of paper.
-
QuestionWhy doesn't the cat have a body?
 Community AnswerIt has nowhere to stick the body to -- but you could try to make it out of modeling clay.
Things You'll Need
Making an Origami Cat
- Square piece of paper
- Pen or marker
Creating a Cat out of a Paper Plate
- Paper plate
- Acrylic paint
- Paintbrush
- Scissors
- Circular lid
- Glue or tape
- Paper scraps or googly eyes and a pompom
Cutting out and Gluing a Paper Cat
- Cardstock
- Scissors
- Glue or glue stick
References
- ↑ https://www.youtube.com/watch?v=V2R_s9nsaF4&feature=youtu.be&t=17
- ↑ https://www.youtube.com/watch?v=V2R_s9nsaF4&feature=youtu.be&t=24
- ↑ https://www.youtube.com/watch?v=eExNjaHWnh8&feature=youtu.be&t=38
- ↑ https://www.youtube.com/watch?v=V2R_s9nsaF4&feature=youtu.be&t=41
- ↑ https://www.youtube.com/watch?v=V2R_s9nsaF4&feature=youtu.be&t=71
- ↑ https://craftsbyamanda.com/paper-plate-black-cat/
- ↑ https://www.youtube.com/watch?v=y8P5hH7LeC4&feature=youtu.be&t=51
- ↑ https://www.youtube.com/watch?v=y8P5hH7LeC4&feature=youtu.be&t=67
- ↑ https://craftsbyamanda.com/paper-plate-black-cat/
- ↑ https://craftsbyamanda.com/paper-plate-black-cat/
- ↑ https://artprojectsforkids.org/halloween-black-cat/
- ↑ https://artprojectsforkids.org/halloween-black-cat/
- ↑ https://www.easypeasyandfun.com/paper-cat-craft-template/
- ↑ https://artprojectsforkids.org/halloween-black-cat/
- ↑ https://artprojectsforkids.org/halloween-black-cat/
- ↑ https://artprojectsforkids.org/halloween-black-cat/
- ↑ https://www.easypeasyandfun.com/paper-cat-craft-template/
- ↑ https://artprojectsforkids.org/halloween-black-cat/
- ↑ https://www.easypeasyandfun.com/paper-cat-craft-template/
- ↑ https://www.easypeasyandfun.com/paper-cat-craft-template/
