This article was co-authored by wikiHow Staff. Our trained team of editors and researchers validate articles for accuracy and comprehensiveness. wikiHow's Content Management Team carefully monitors the work from our editorial staff to ensure that each article is backed by trusted research and meets our high quality standards.
There are 10 references cited in this article, which can be found at the bottom of the page.
The wikiHow Video Team also followed the article's instructions and verified that they work.
This article has been viewed 12,276 times.
Learn more...
Palm Sunday just wouldn’t be the same without palm fronds and the lovely crosses you can make with them! Once you get a few practice rounds in, you’ll be able to make these palm crosses within just a few minutes. They’re great symbols to give as gifts or remembrances on Palm Sunday.
Steps
Making the Center Square
-
1Split a palm frond leaf in half if it isn’t already done. Look at the palm frond and locate the center vein separating the 2 halves of the leaf. Take your thumbnail and place it directly against one side of the vein, and run your finger along its length to separate the 2 halves. Use the side without the vein for your craft.[1]
- You can buy palm fronds online or from a palm frond distributor, which is a common way to do it if you need a large quantity for a church service. Some fronds come pre-split, but if they aren’t, you’ll need to do it yourself.[2]
-
2Hold the palm frond in your hand, so the pointed end is facing up. You could also lay the frond flat in front of you on a table—whichever method feels easiest to you is fine![3]
- Use a frond that’s about 18 to 24 inches (46 to 61 cm) long and 1⁄2 in (1.3 cm) wide for an average-size cross.[4]
Advertisement -
3Bend the blade and fold the pointed end to the right at a 90-degree angle. Gently bend the frond right in the middle, then fold the top half to the right and crease the fold. What was a straight, vertical frond is now a right angle. The horizontal part will become the cross’s arms, and the vertical part will make the cross’s head and base.[5]
- The most iconic part of the palm frond cross is the neat little center square that holds everything together. This step is the first part of forming that square!
- Don’t worry too much about proportions at this stage. You can adjust the length of all the sides later on.
-
4Fold the vertical part up and over the 90-degree angle you made. Bring the frond's end all the way around so that it’s still pointing down when you finish.[6]
- This step encloses that 90-degree angle so that it doesn’t come undone easily.
-
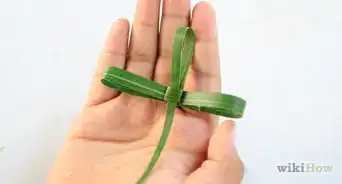
5Wrap the horizontal frond around the back of the square so it points left. Crease your fold to make a neat line. At this point, there should be one horizontal frond pointing to the left and one vertical part pointing downward.[7]
- It may seem a little confusing the first time you try to make a palm cross, but it starts to come together once you finish your first one. Getting the square formed looks trickier than it actually is!
-
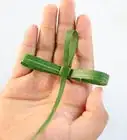
6Pull the end of the horizontal frond through the center of the square. Take the very end of the frond and gently bend it back toward the center. Slip it between the center square you formed, and pull it all the way through. This essentially locks your square in place![8]
- If you look at the little square from the side, you’ll see a front and back with a little gap between, which is the perfect size for your frond to pass through.

Finishing the Arms and Body
-
1Slide the horizontal frond halfway back through the square. You don’t want to pull it through all the way this time. This step forms the lefthand side of the cross.[9]
- The nice thing about having the center square in place is that you don’t have to worry about holding your folds and bends tightly. The square keeps everything in place, making for a more enjoyable crafting experience.
-
2Secure the remaining horizontal end behind the square. Take the end on the righthand side and gently bend it backward. Slip the end into the center square to hold it in place. The arms of your cross are done![10]
- For a fuller-looking cross, leave the ends of the arms uncreased. For a flatter-looking cross, go ahead and crease those ends.
-
3Pull the pointed vertical end up through the square. Gently bend the frond backward, away from your body. Slip the end up through the opening in the square, and pull it about 2/3 of the way through.[11]
- If you need to, flip the frond over during this part so you can see what you’re doing a little more easily.
-
4Flip the frond (now a cross!) over and make adjustments to the height. You may want to tug either end of the cross to adjust the proportions. About 1/3 of the height should be the head of the cross, and 2/3 of the height should be the base.[12]
- Once you get the hang of the process, it shouldn’t take you more than 2-3 minutes to make a palm cross.
-
5Store palm fronds in the fridge until you’re ready to use them. This rule applies to both folded and unfolded fronds. The refrigeration keeps the fronds from drying out too quickly, ensuring they’ll look their best on Palm Sunday.[13]
- If you’re using blessed palm fronds, make sure to dispose of them carefully once you’re done using them. Burying or burning them is acceptable.

Things You’ll Need
- Palm fronds
- Scissors (optional)
-Step-8-Version-3.webp)

-Step-10.webp)


References
- ↑ https://youtu.be/znDyR8_POCU?t=156
- ↑ https://themiscellany.org/2015/03/26/the-fronds-and-foliage-of-palm-sunday/
- ↑ https://everydaybest.com/how-to-fold-palm-fronds-into-a-cross/
- ↑ http://www.episcopalnet.org/TRACTS/PalmCrosses.html
- ↑ https://www.stnicholascenter.org/media/assets/make-palm-crosses.pdf
- ↑ https://youtu.be/znDyR8_POCU?t=40
- ↑ https://everydaybest.com/how-to-fold-palm-fronds-into-a-cross/
- ↑ https://youtu.be/znDyR8_POCU?t=81
- ↑ https://youtu.be/znDyR8_POCU?t=100
- ↑ https://youtu.be/znDyR8_POCU?t=110
- ↑ http://www.episcopalnet.org/TRACTS/PalmCrosses.html
- ↑ https://youtu.be/znDyR8_POCU?t=143
- ↑ https://themiscellany.org/2015/03/26/the-fronds-and-foliage-of-palm-sunday/
- ↑ https://themiscellany.org/2015/03/26/the-fronds-and-foliage-of-palm-sunday/
- ↑ https://themiscellany.org/2015/03/26/the-fronds-and-foliage-of-palm-sunday/
- ↑ https://themiscellany.org/2015/03/26/the-fronds-and-foliage-of-palm-sunday/
About This Article


-Step-8-Version-3.webp)

-Step-10.webp)


