This article was co-authored by Melissa Nelson, DVM, PhD and by wikiHow staff writer, Sophia Latorre. Dr. Nelson is a Veterinarian who specializes in Companion and Large Animal Medicine in Minnesota, where she has over 18 years of experience as a veterinarian in a rural clinic. She received her Doctor of Veterinary Medicine from the University of Minnesota in 1998.
wikiHow marks an article as reader-approved once it receives enough positive feedback. In this case, 88% of readers who voted found the article helpful, earning it our reader-approved status.
This article has been viewed 534,585 times.
Scratching is an innate and necessary part of being a cat. Scratching cleans and sharpens claws and is something a cat will do regardless of the sanctity of the surfaces in your home. If you want to provide a lure away from the furniture, having a scratching post is essential. You can make one using particle board, a square post, and carpet or rope.
Steps
Making the Base
-
1Cut or buy the base wood. Use plywood, particle board, or MDF to create a base for the scratching post. Buy a piece that’s 2 ft by 4 ft by ½ in (.61 m by 1.2 m by 1.27 cm) or cut it to the correct measurements using a table saw.[1] Exercise caution when cutting to ensure no one gets hurt.
- Try to pick a natural, non-treated wood. Avoid wood treated with chemicals, as these may be harmful to cats.
-
2Cut the base carpet to size. Your carpet should be at least 3 ft (.92 m) by 5 ft (1.5 m) to ensure you have enough to wrap around the base and staple it tightly. Use an X-acto knife and a ruler to ensure you have a neat, straight line.
- Choose a stiff carpet, such as Berber, for a longer lasting post.
Advertisement -
3Cut notches for the corners. Flip the carpet upside down and lay the base in the middle of the carpet.
- Draw a line straight out from each side of the base to the end of the carpet so you have squares extending from the corners.[2]
- Draw a straight line ¾ in (1.9 cm) from the corner of the base that intersects the squares you made.[3]
- Cut across the straight line first, then cut along the lines you made extending from the corners.[4]
-
4Cover the base in carpet. Staple the carpet to the bottom of the base on one side, putting staples in every 2 in (5 cm) using a ½ inch (1.3 cm) crown stapler. Pull the carpet tight and staple it on the bottom of the opposite side, putting staples in every 2 in (5 cm). Repeat on the remaining two sides, making sure to staple all the way to edge so your corners are flush.[5]


Making the Post
-
1Choose the post. Purchase a 4 in by 4 in (10 cm by 10 cm) piece of wood from the hardware store. Alternatively, nail two 2 in by 4 in (5 cm by 10 cm) pieces of wood together, making sure they line up evenly and no nails are exposed that could injure your cat.
- Again, go for a non-treated wood for safety reasons.
-
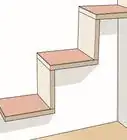
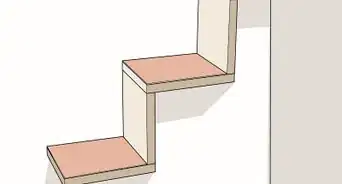
2Attach the post to the base. Put the base upside down (carpeted side facing the post) on top of the post. Ensure it is centered and screw the post into the base using 2 in (5 cm) wood screws. Then, flip the base around so it is on the ground, with the post on top.
- The length of the post is up to you, just make sure it is long enough for your cat to stretch on. If you’re not sure how long to make it, measure your cat from nose to end of tail, then add a few in/cm.
-
3Cover the top of the post. Get a 4 in by 4 in (10 cm by 10 cm) beveled wood square from the hardware store for a neat post topper. Use wood glue to attach the topper to the post.[6]
- Alternatively, you can cover the top in carpet and staple it down. Put two staples on each side of the post, rather than on the top.
-
4Cut the post carpet to size. It needs to be at least 20 in (51 cm) wide in order to wrap around the post, and the exact height of the post. Use an X-acto knife and a ruler to ensure you have a neat, straight line.
-
5Wrap carpet around the post. Start at a corner and staple the carpet in place every 1 in (2.5 cm) vertically. Wrap the carpet completely around the post and staple it in place every 1 in (2.5 cm) along the vertical seam. Cut off any excess, and ensure you have a smooth seam so your cat’s claws don’t snag on the fabric.
-
6Use rope as an alternative to carpet. Alternatively, you can wrap the post in sisal rope rather than carpet. Cover your post in non-toxic glue to ensure the rope won’t unravel.[7]
-
7Flatten the hardware. Use a hammer to flatten the staples down. A staple gun does not always create a flush staple, and you want to ensure your cat’s claws don’t get hung up or ripped out due to a staple sticking out of the post.


Warnings
- Wear protective eyewear and gloves.⧼thumbs_response⧽
Things You'll Need
- A section of 4x4 post
- Plywood, particle board, or MDF
- Wood Screws
- Staples and a staple gun
- Hammer
- Stiff carpet
- Non-toxic glue
- Sisal rope
- Protective eyewear
- Work gloves


References
- ↑ https://dadand.com/diy-cat-tower/
- ↑ https://dadand.com/diy-cat-tower/
- ↑ https://dadand.com/diy-cat-tower/
- ↑ https://dadand.com/diy-cat-tower/
- ↑ https://dadand.com/diy-cat-tower/
- ↑ http://www.dreamalittlebigger.com/post/diy-cat-scratching-post-that-literally-lasts-for-years.html
- ↑ http://www.dreamalittlebigger.com/post/diy-cat-scratching-post-that-literally-lasts-for-years.html
- ↑ http://www.dreamalittlebigger.com/post/diy-cat-scratching-post-that-literally-lasts-for-years.html
- ↑ http://www.dreamalittlebigger.com/post/diy-cat-scratching-post-that-literally-lasts-for-years.html
About This Article

When making a cat scratching post, use a natural, non-treated wood to avoid chemicals that could be harmful to cats. Start by cutting a base that is 2 feet by 4 feet by 1/2 inch. Once covered in a stiff carpet, like Berber, flip the base upside down on top of the post. The post should be long enough to allow your cat to comfortably stretch on it. Once the post and base are centered, screw the post onto the base. Cover the post with the same carpet or a thick rope material. Finally, make sure that seams are smooth and nails are flush to keep your cat happy and safe from injury. To learn more from our Veterinary Doctor co-author, like how to hide seams on the base and post, keep reading the article!